Help
Easy-to-Use Credentialing, Privileging, and Ongoing Monitoring PortalThis web-based solution allows you to securely store and manage all your credentialing information online.
Designed by credentialing experts, our cloud-based platform makes the credentialing process simple, efficient, and accessible.
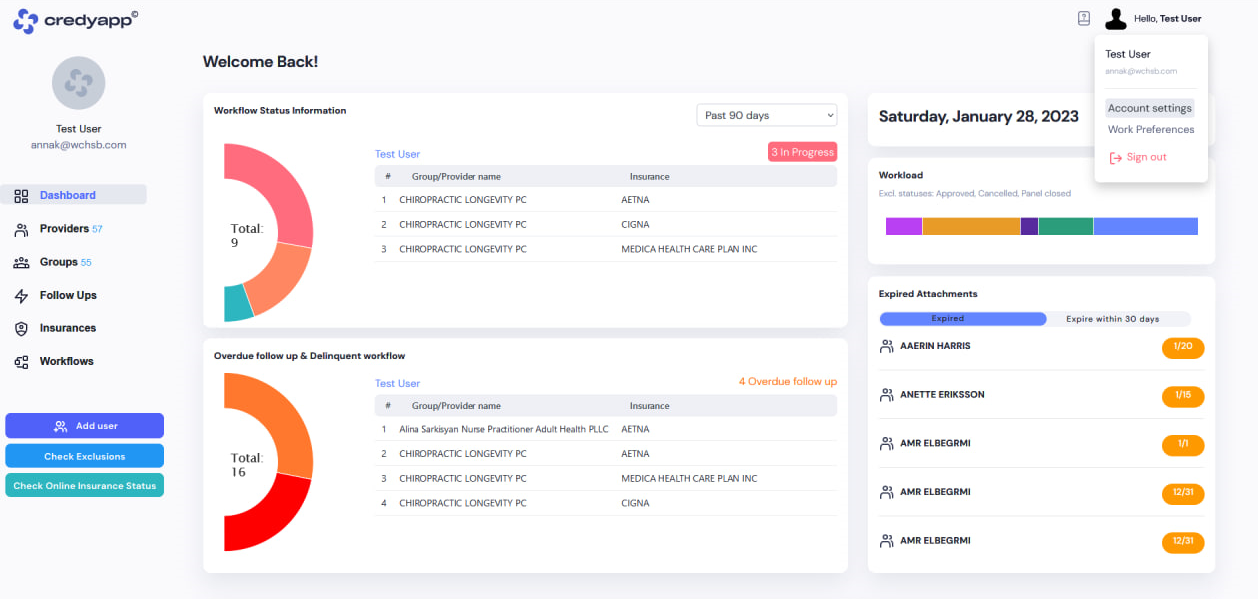
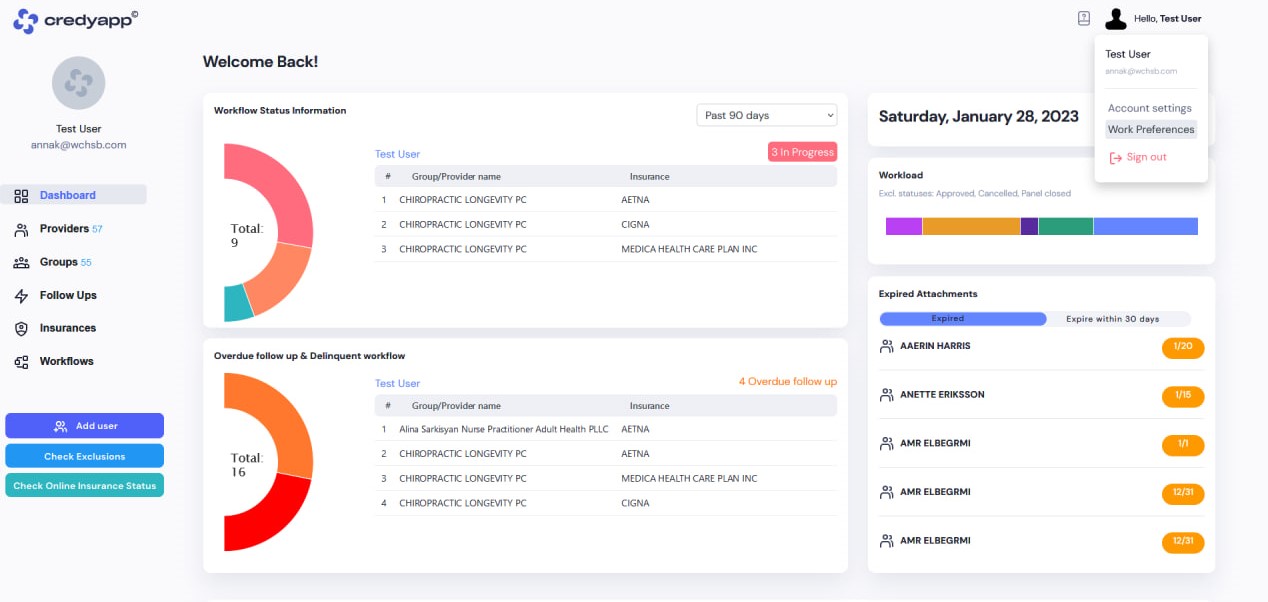
The CredyApp Dashboard provides a comprehensive overview of company performance. This dynamic platform simplifies and streamlines the credentialing process while making monitoring easier. It enables users to efficiently collect and report detailed credential data.
We have also created a credentialing analytics dashboard that makes tracking expired documents simple and effective for medical credentialing companies.
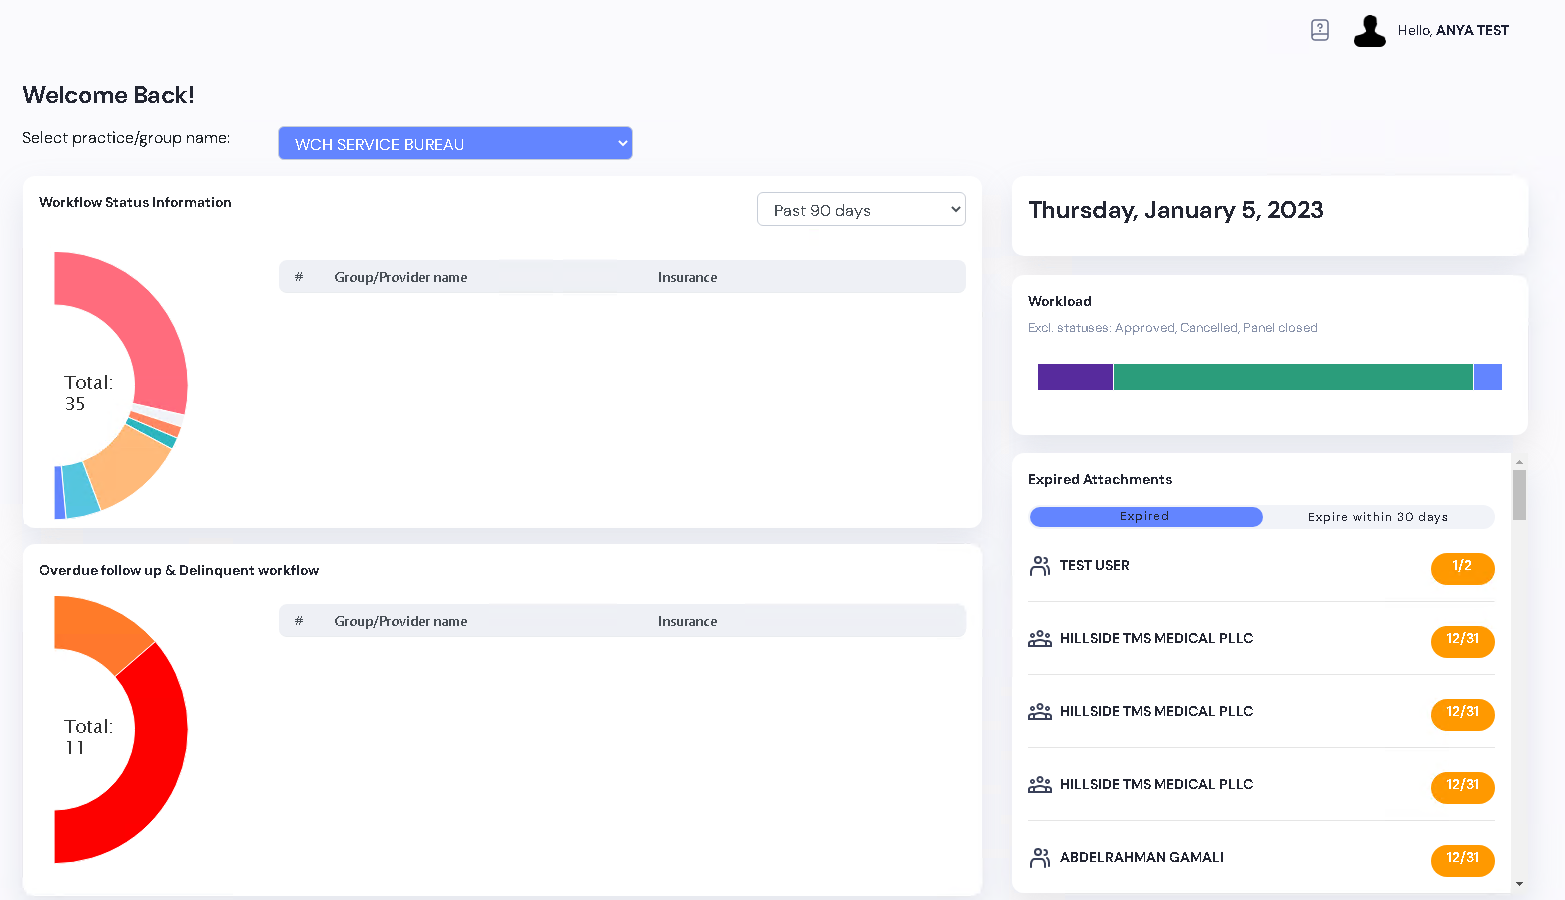
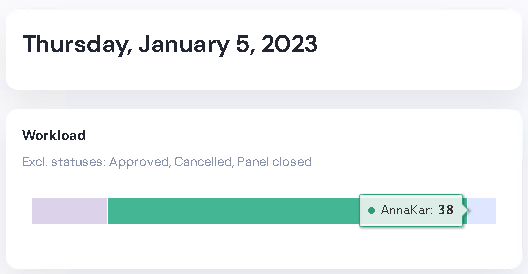
This graphic displays the total number of workflows by employee. Statuses are highlighted in different colors and include:
- In Progress
- Appeal
- Panel Closed
- Returned
- Info Requested
- Need to submit
- Cancelled
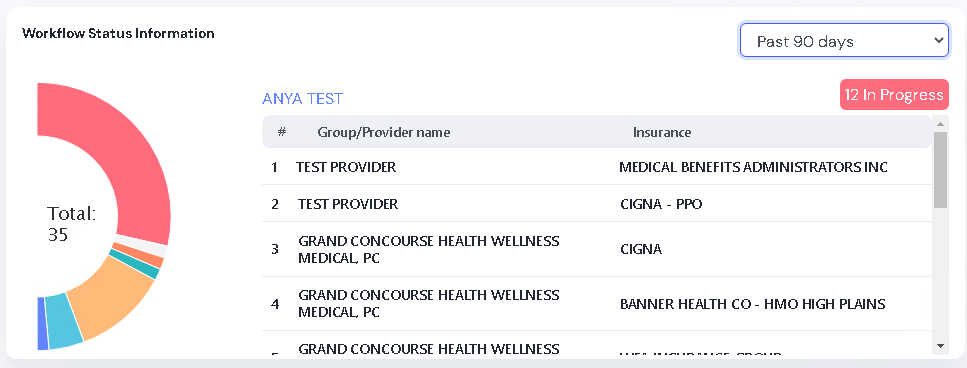
To use the graphic, click on the status you want to check and select an employee. The display will show the total number of workflows created by that employee with the selected status (e.g., In Progress).
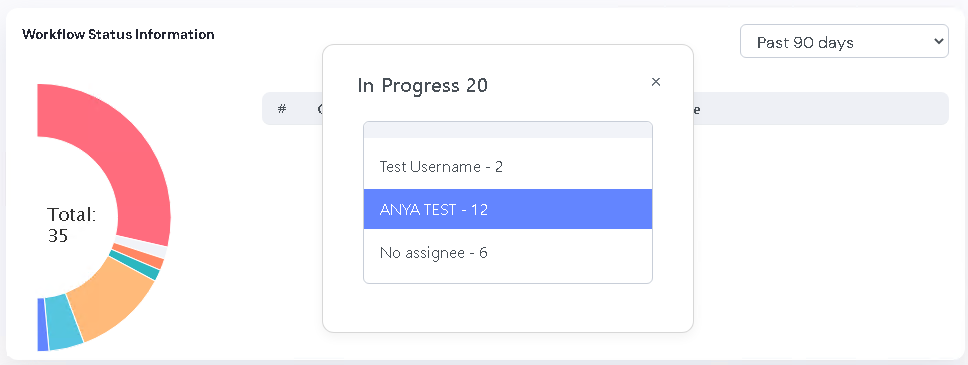
Once you select an employee, the Workflow Information section will display columns showing the Group/Provider Name and Insurance.
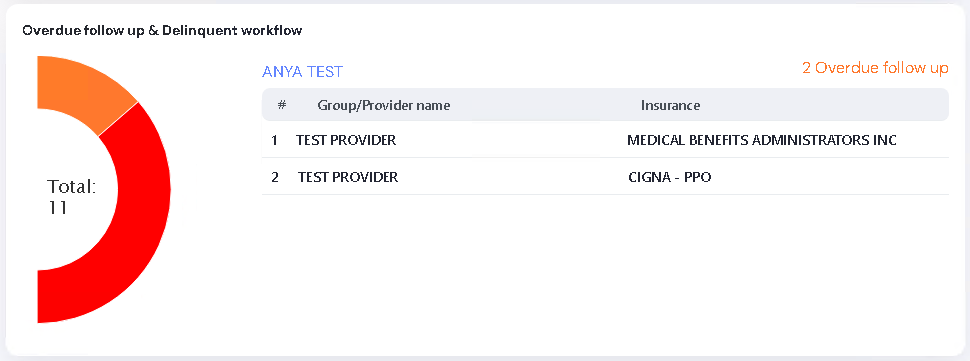
Overdue Follow Ups– All Workflows with the status In Progress where the follow-up date is earlier than the current date and the Workflow has not been updated recently.
Delinquent Workflow- All Workflows where the last Note was added more than 30 days ago, excluding the statuses Approved, Panel Closed, Canceled, and Hold.
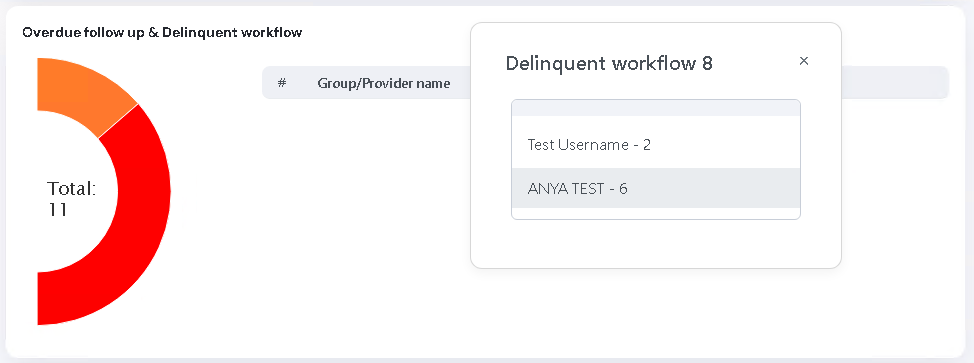
Select Overdue or Delinquent Workflows, in the pop-up window, you will see the total number of Workflows by employee.
Once you select an employee, Workflow information will appear with the following columns: Group/Provider Name and Insurance.
This block shows the total number of Workflows by employee. Each employee is assigned a specific color. Hover over the color to see the employee’s name and the total number of Workflows.
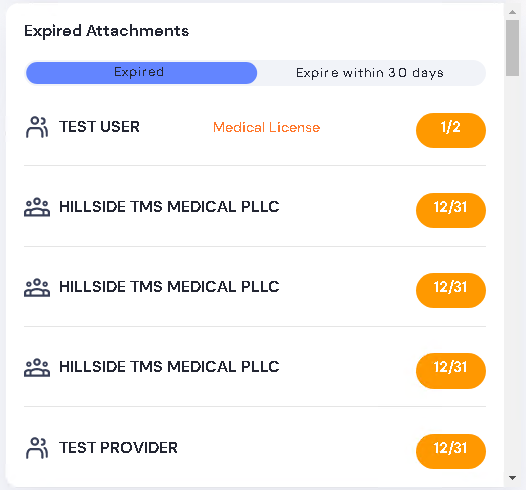
This block shows all attachments that have expired or will expire within the next 30 days.
Left side – Group/Provider Name
Right side – Expiration date
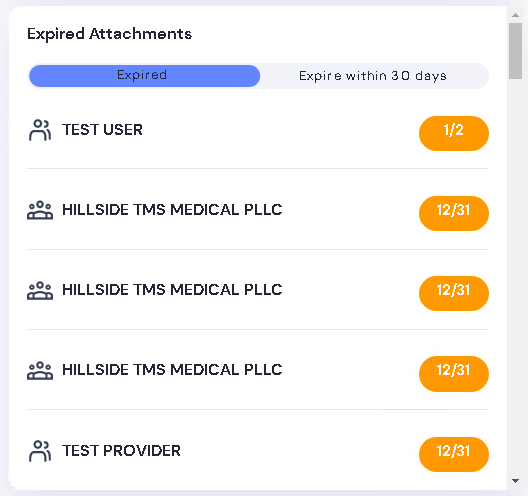
Hover over the line to see the type of the expired document.
If you need more detailed information about a document or want to view the full list of attachments, click the Group/Provider name. You will be redirected to the Attachment List.
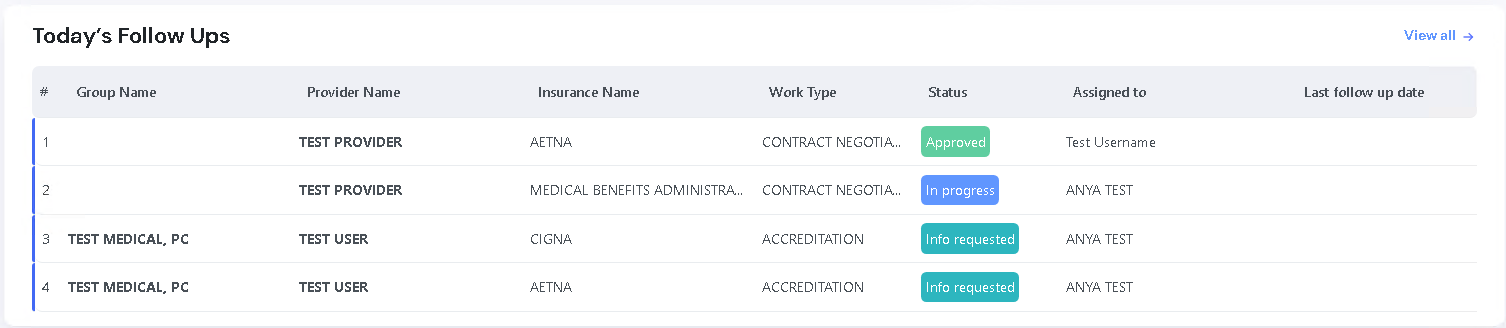
In this block, the user sees a list of all today’s Follow-Ups. You can click any Workflow line to view additional Workflow details or read the notes.
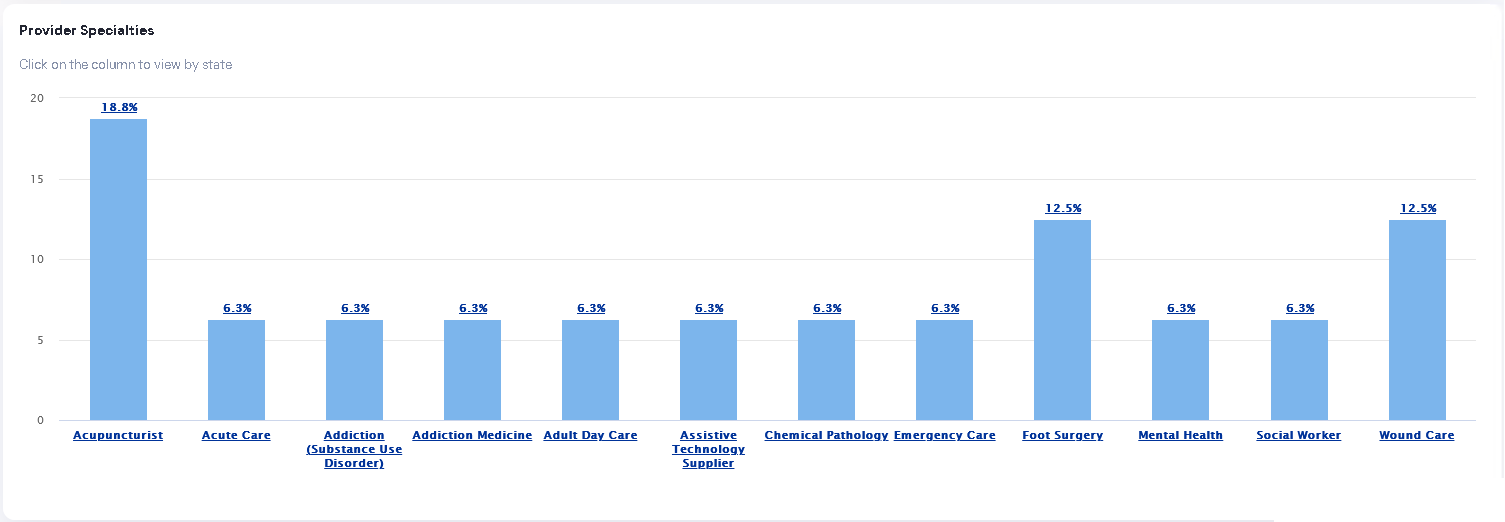
Shows Provider specialties in your company divided by State.
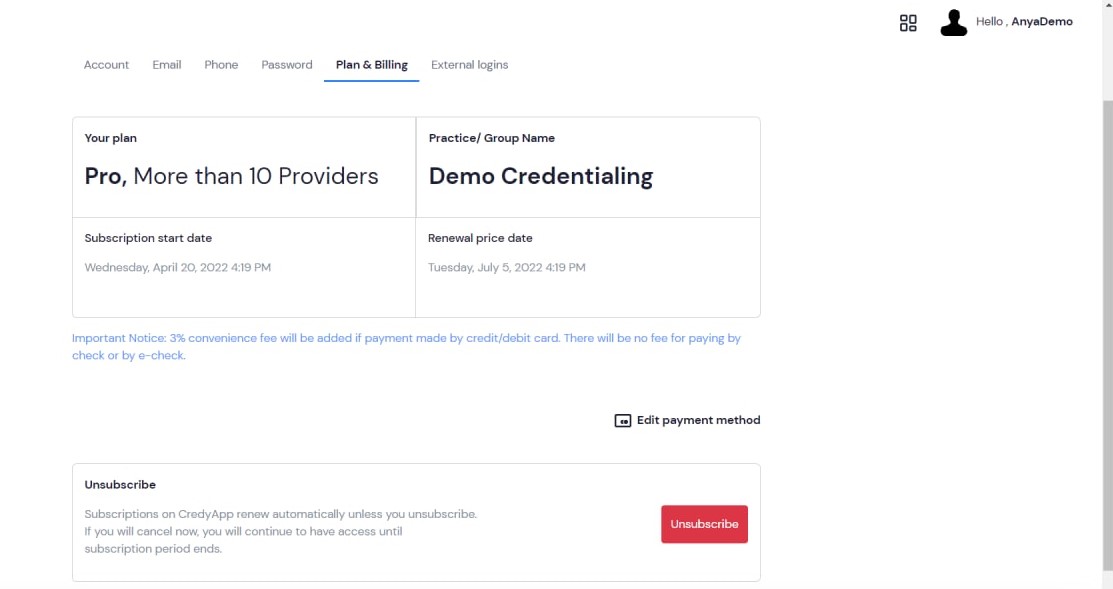
Only the Company Admin (the user who completed the Company Registration process) can cancel the subscription or edit the payment method.
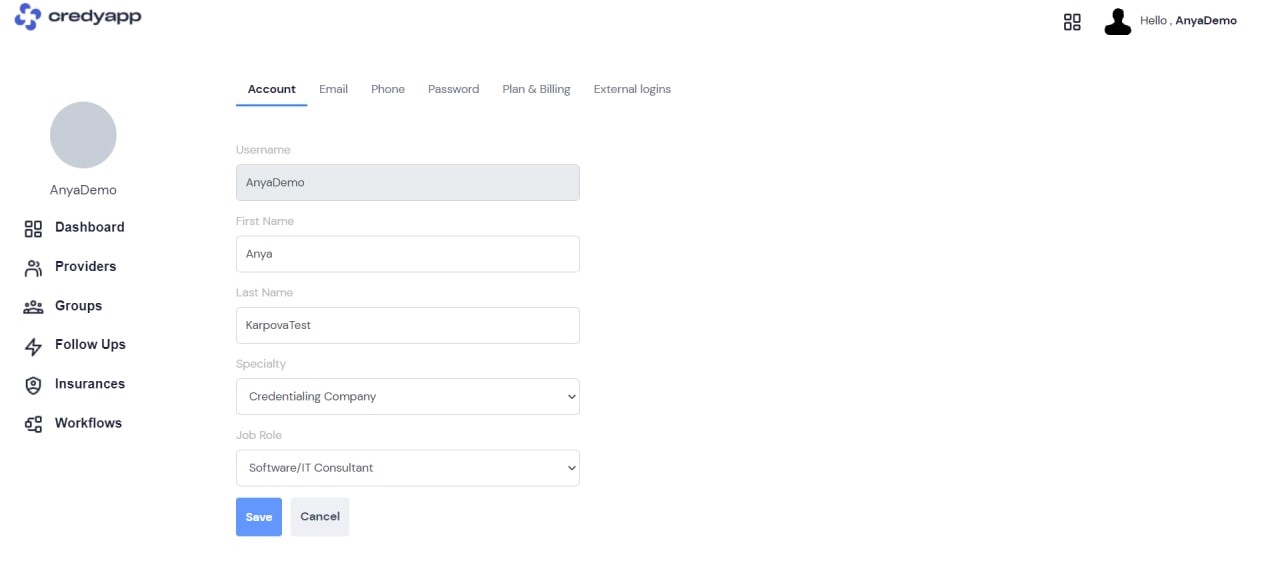
In the top right corner, click your username and select Account Settings.
Choose the Plan & Billing tab. On this page, click Unsubscribe(if you want to cancel your subscription or subscribe again) or Edit Payment Method(to update your credit card).
In the top right corner, click your username and select Account Settings.
On this page, you can add or edit additional information, reset your password, or add external logins.
In the top right corner, click your username and select Work Preferences.
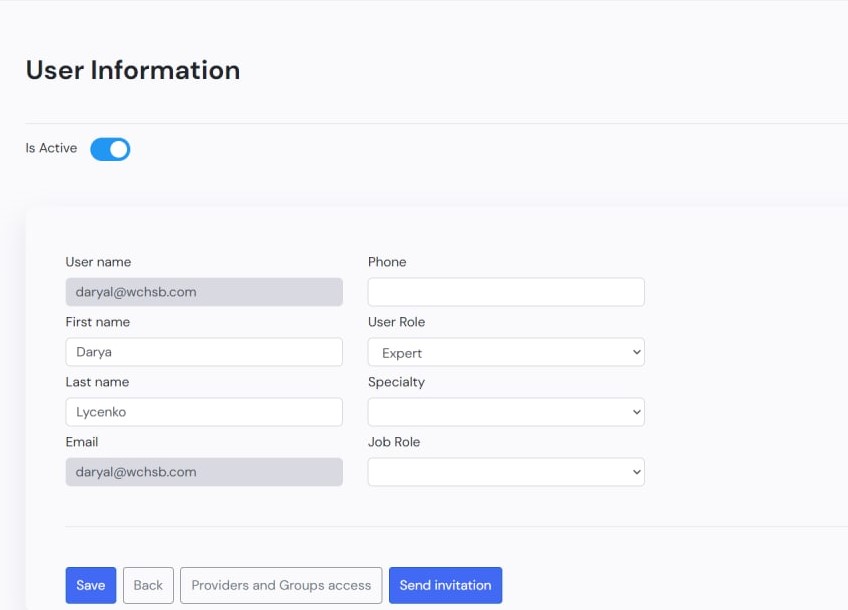
In the Users tab, you will see a full list of all users linked to your practice. In the Actions column, click Edit.
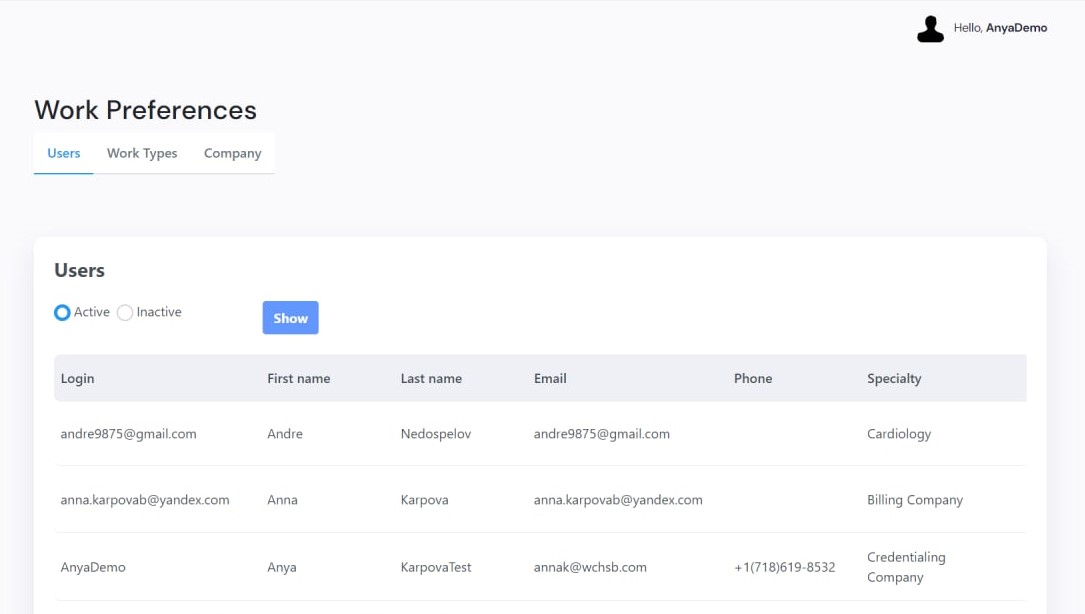
Through this form, you can deactivate a user, add their first and last name, phone number, role, and specialty; edit assigned access; and send email invitations.
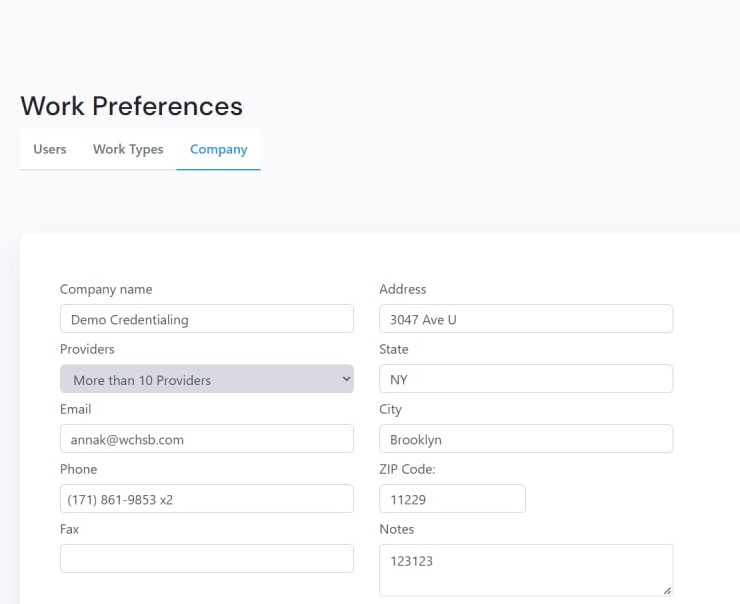
In the top right corner, click your username and select Work Preferences.
Select the Company tab.
From this page, you can add or edit information about your company/practice, such as company name, email, address, phone, and fax.
- Login into your website
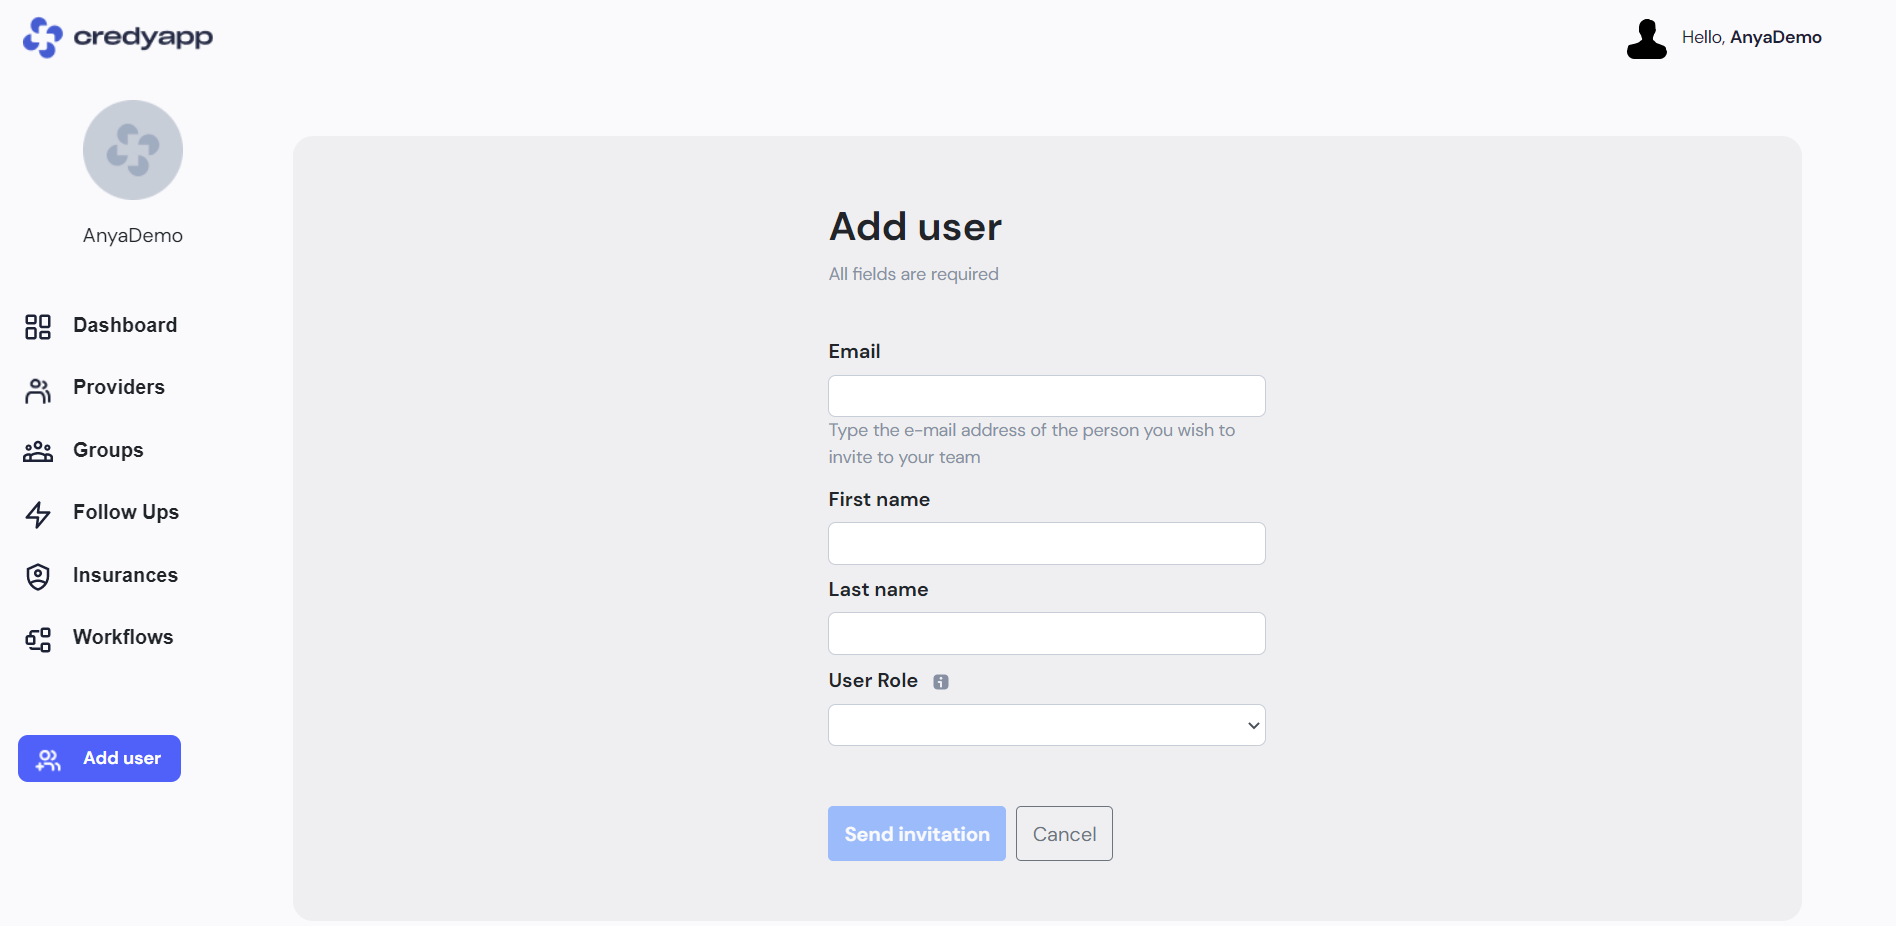
- From the left menu, click on Add user button.
- In the form, fill out the required fields, such as Practice/Group Name,Email, First Name, Last Name , and User Role.
- Choose Practice/Group Name. If you have more than one practice, specify which practice you wish to assign the user to.
- If a user with the entered email already exists in the database, their First Name and Last Name will be automatically filled out.
-
Select User Role. A flexible set of permissions has been developed. These permissions vary according to a user’s role:
-
Entry Level
- Can add notes in workflows.
- Can edit own notes in workflows.
- Can view all information except the company profile.
- Cannot add new groups, providers, insurances, or workflows.
- Cannot edit groups, providers, or workflows.
- Cannot deactivate provider profiles, groups, or workflows.
- Cannot invite new users into the account.
- Cannot invite providers.
-
Experienced
- Can add notes in workflows.
- Can edit own notes in workflows.
- Can view all information except the company profile.
- Can add new groups, providers, insurances, and workflows.
- Can edit only groups, providers, and workflows that they added.
- Can deactivate only provider profiles, groups, and workflows that they added.
- Can delete insurances not added by a CredyApp Admin.
- Cannot invite new users into the account.
- Can invite providers.
-
Expert
- Can add notes in workflows.
- Can edit own notes in workflows.
- Can view all information except the company profile.
- Can add new groups, providers, insurances, and workflows.
- Can edit any added groups, providers, and workflows.
- Can deactivate all provider profiles, groups, and workflows.
- Can delete insurances not added by a CredyApp Admin.
- Cannot invite new users into the account.
- Can invite providers.
-
Provider
- Can view workflows for assigned providers/groups.
- Can complete information requested by the credentialing specialist
- Can invite other users via Send Invitation (User will receive invitation email from your Practice)
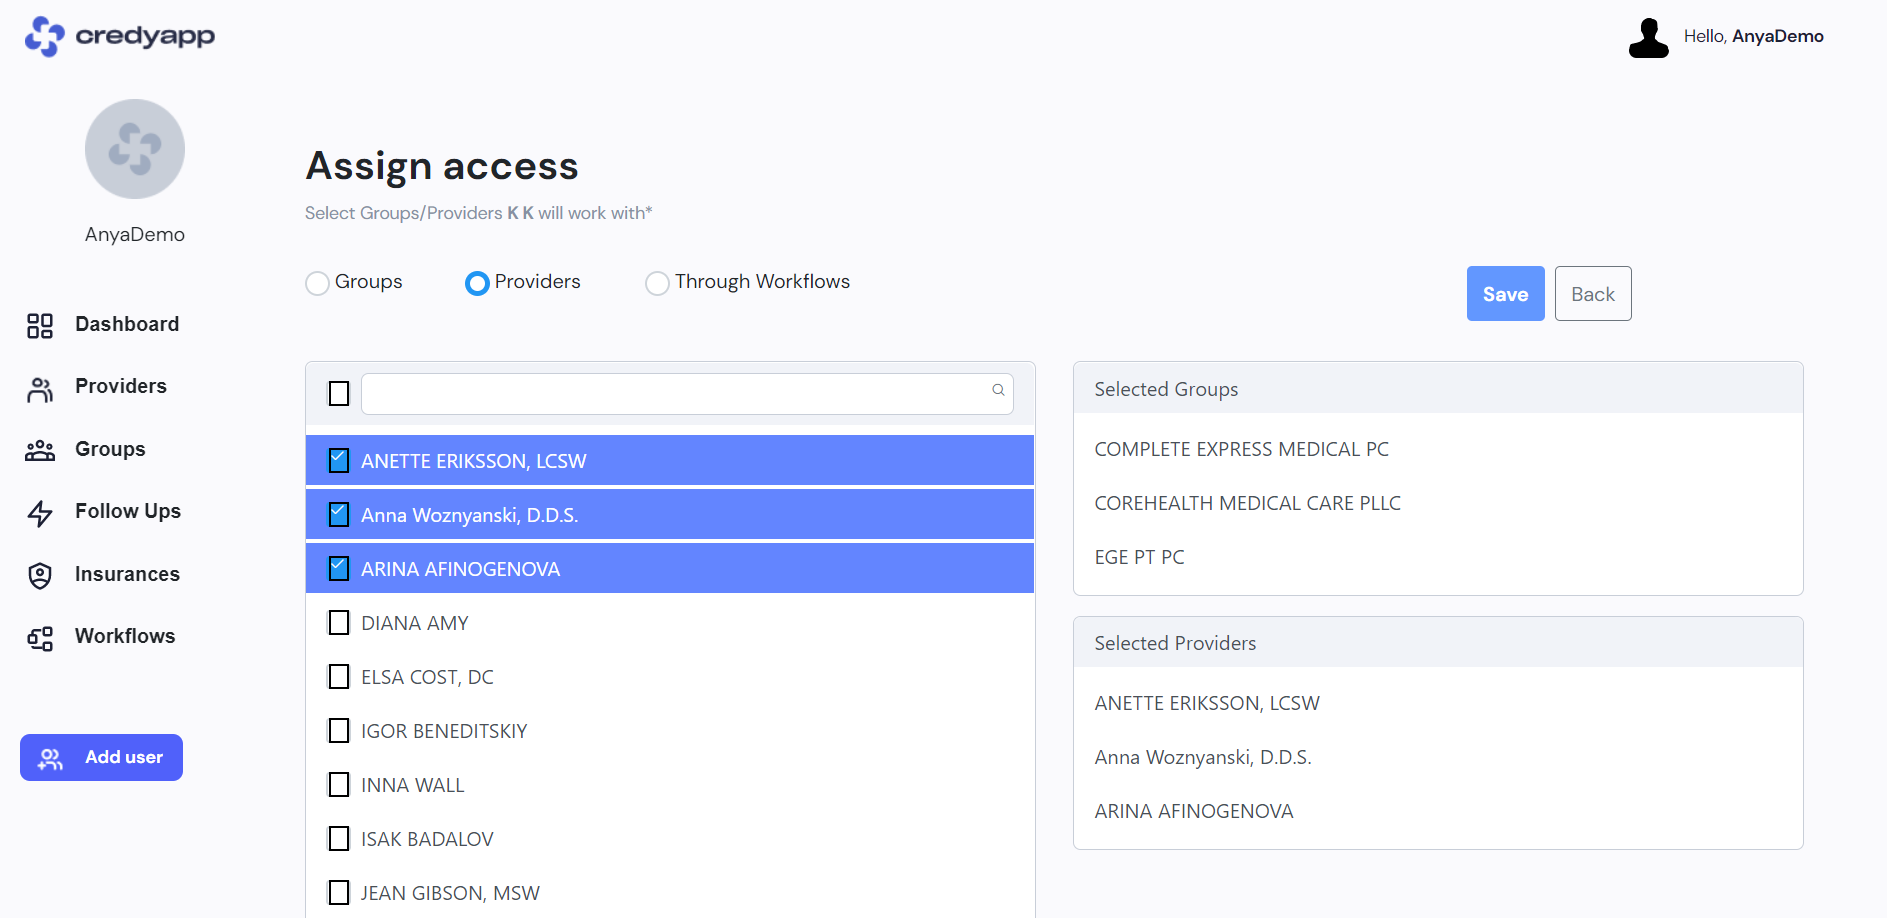
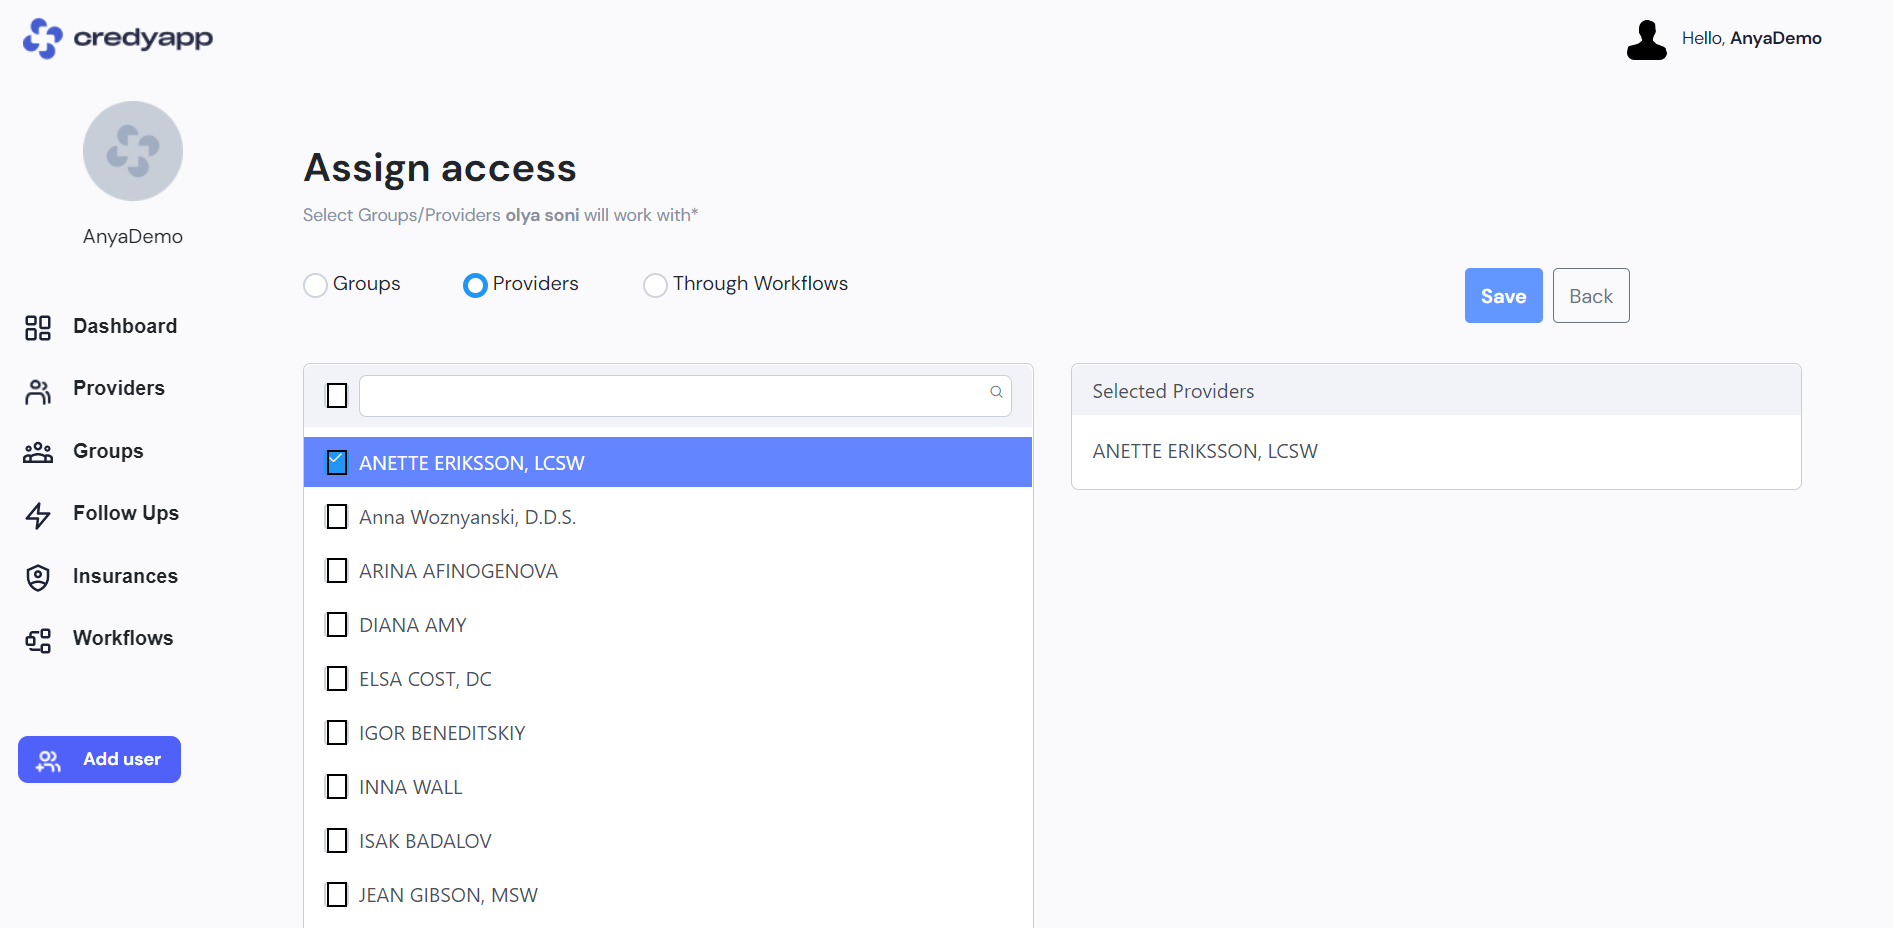
- After an email invitation has been sent, you can assign access to groups and providers for a newly created user.
- Groups – Shows a list of all groups that your practice works with. You can select the group names to which you want to grant access to the user.
- Radio Button Provider – Shows a list of providers that your practice works with.
- Through Workflow – Shows group names and the list of mapped providers.
Click on Send Invitation button.
The next step is to assign access to the provider so that they can see only the allowed groups and providers on their side.
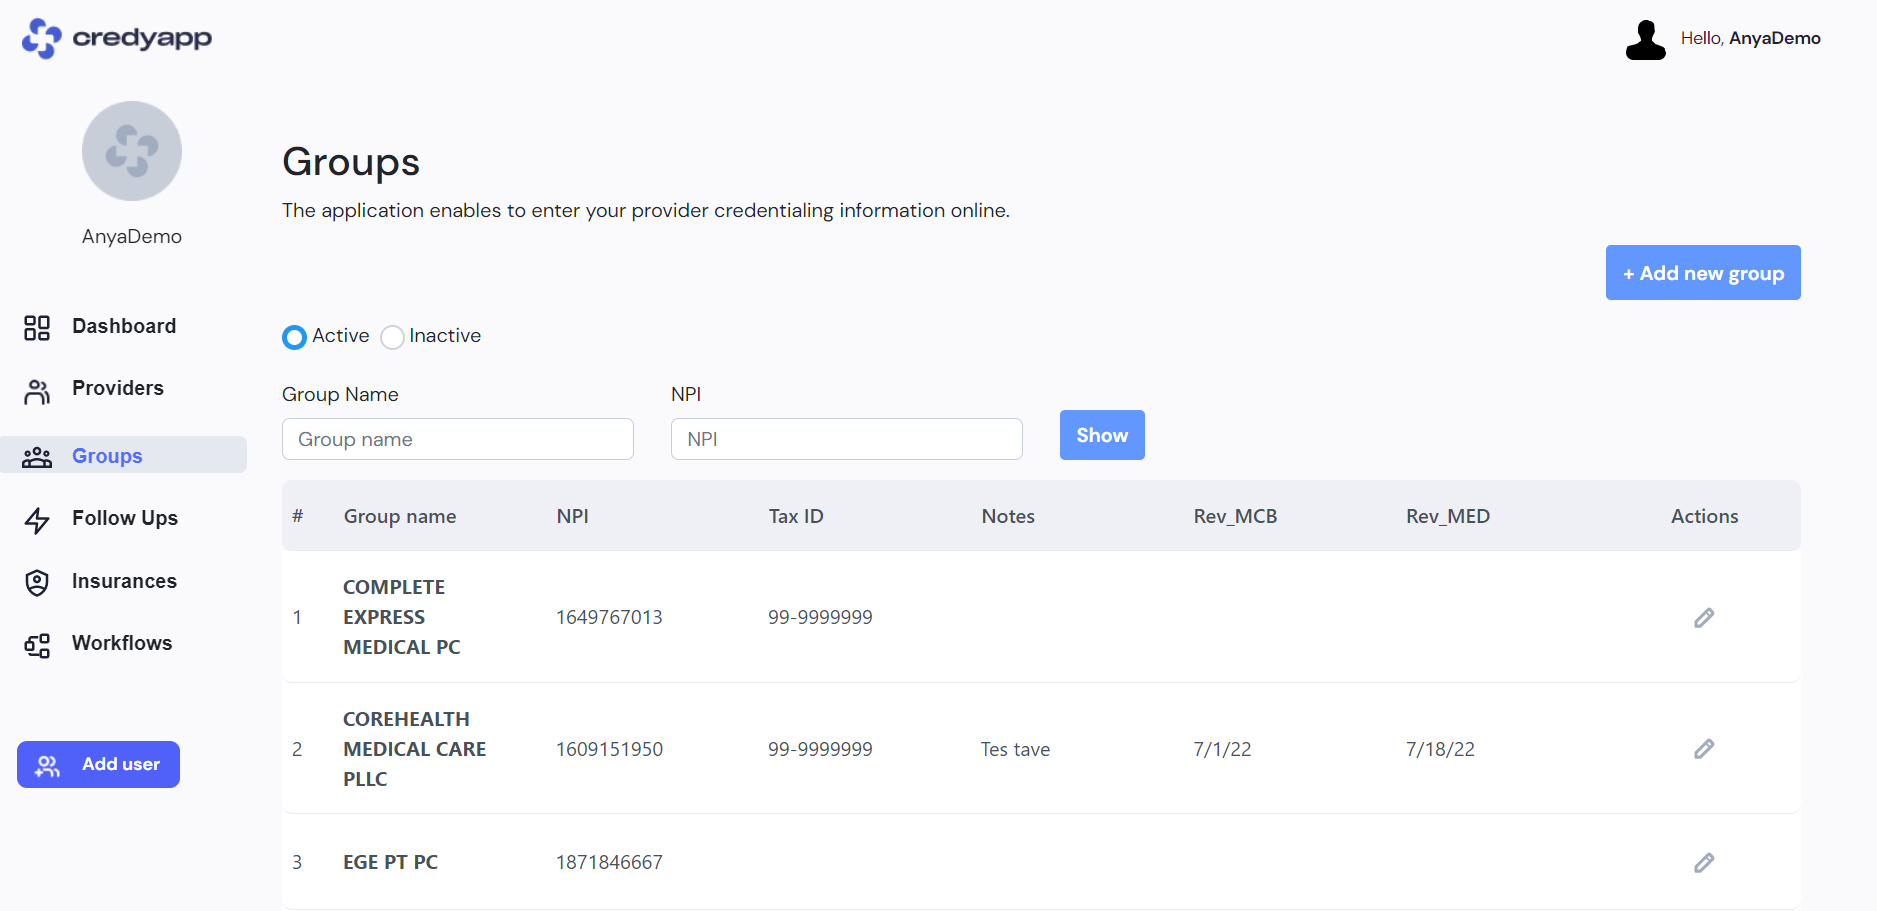
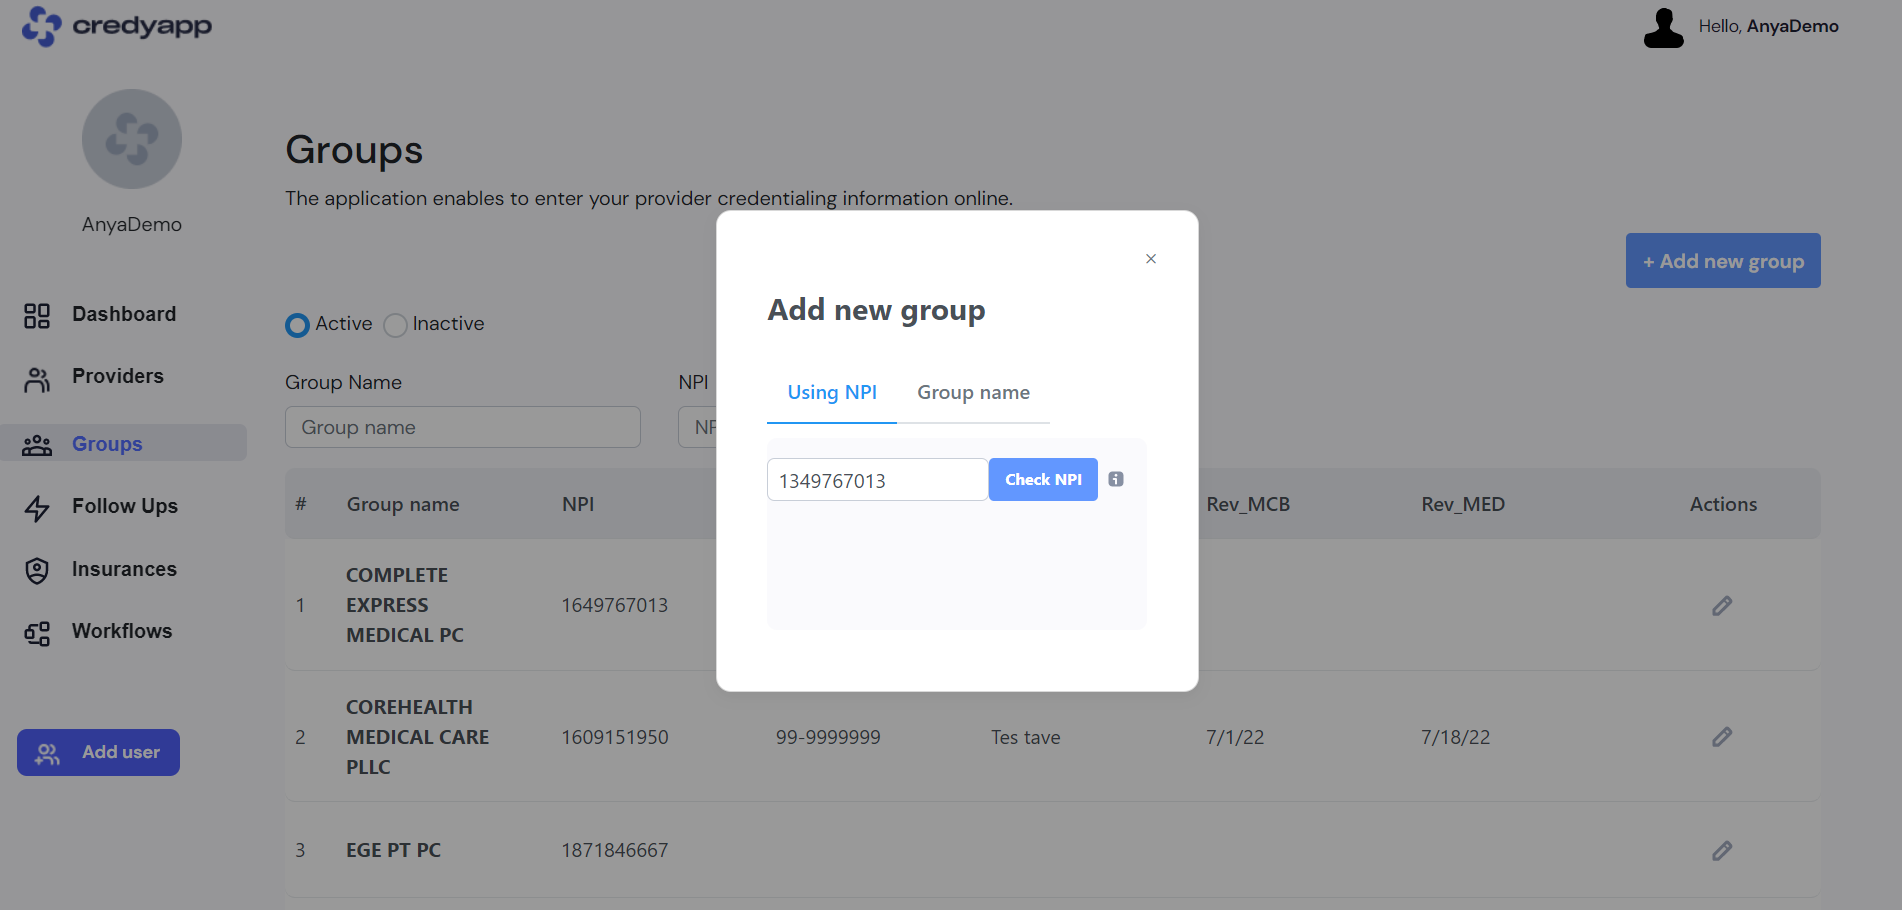
- From the left menu, click the Groups tab.
- On this page, click the Add New Group button.
-
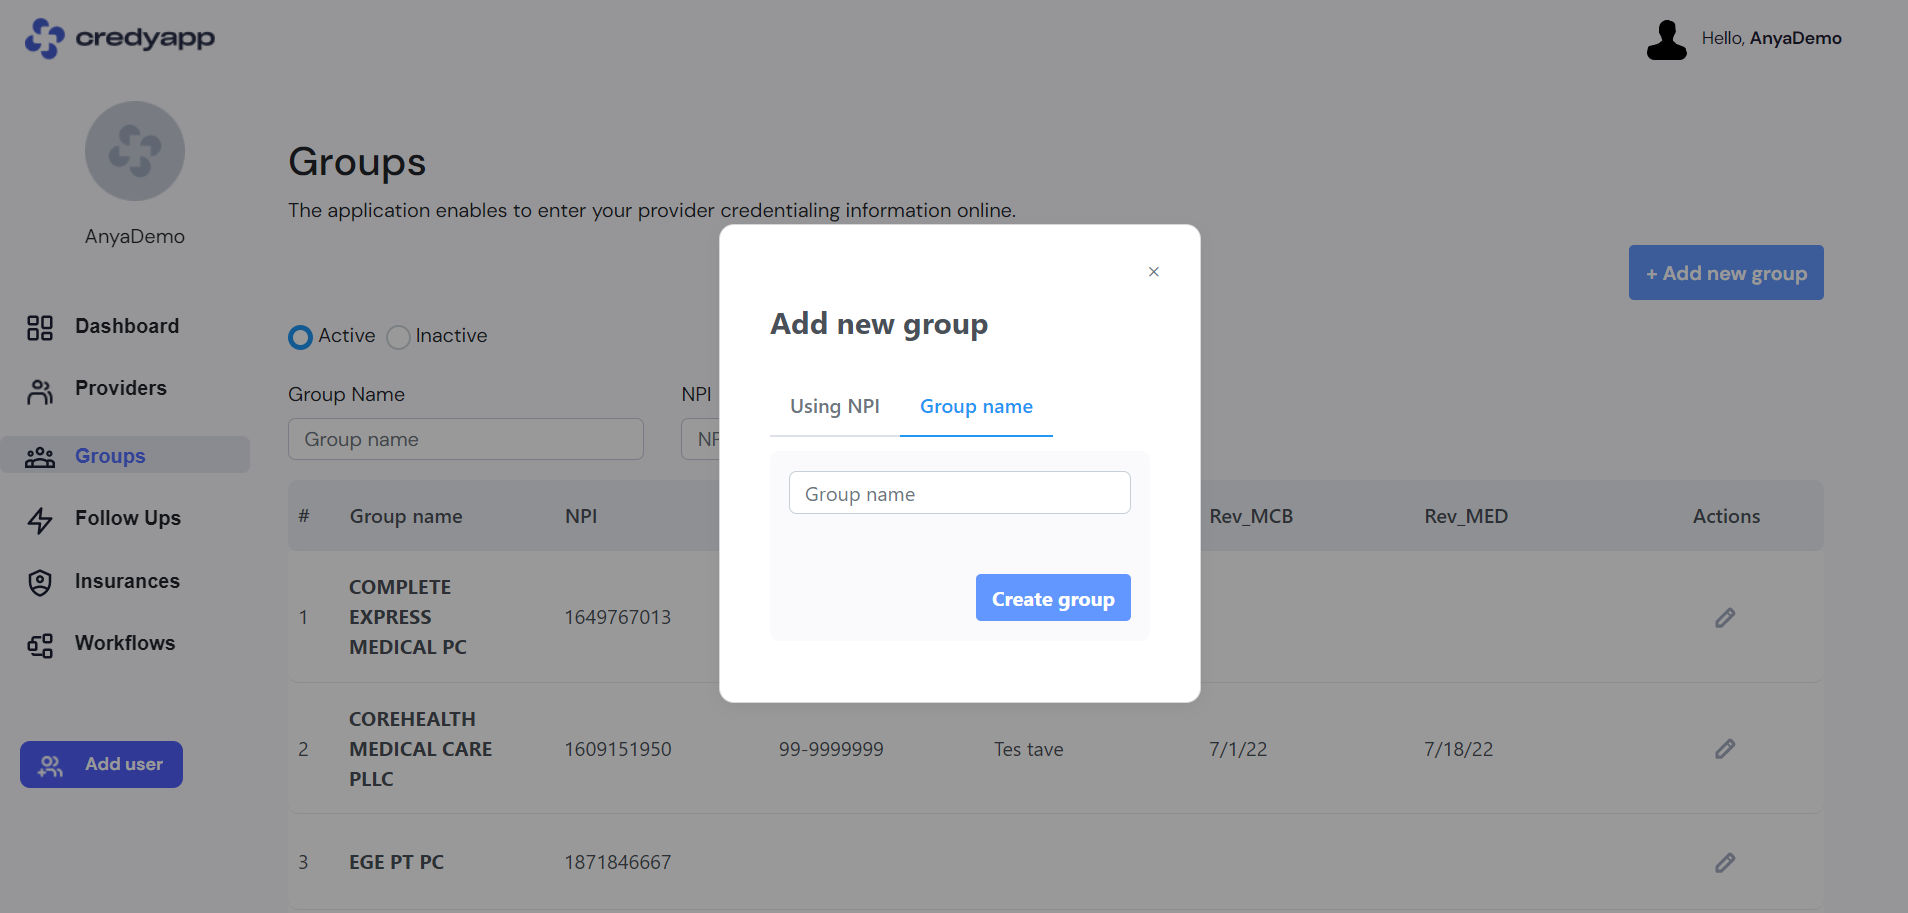
In the pop-up window, select the Group Name tab, enter the group name, and then click the Create Group button.
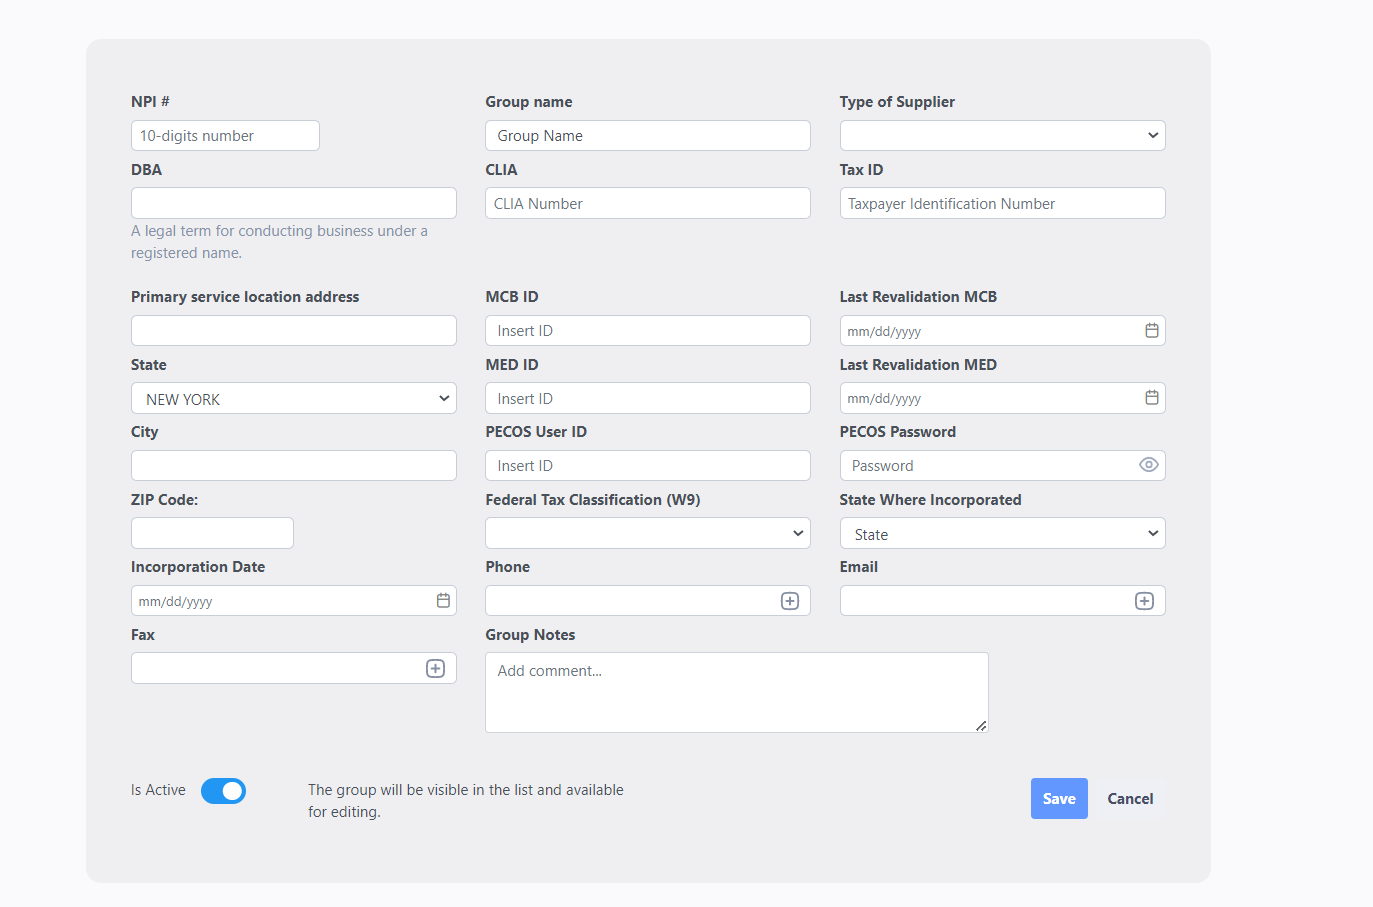
- Next, you can enter all additional information about the group, such as:
-
NPI
- A ten-digit number that must be submitted on the enrollment form.
- Remains with an individual provider regardless of job or location changes.
- Is submitted to the contractor for payment.
-
There are two types of NPIs:
- Type 1 NPIs — Assigned to individual physicians, nonphysician practitioners, and sole proprietors.
- Type 2 NPIs — Assigned to organizations, including physician and nonphysician groups, hospitals, nursing homes, and corporations formed when an individual incorporates as a sole owner.
Type of Supplier (optional) – Examples include Clinic/Group Practice, Pharmacy, or Hospital Department.
DBA – (optional) Stands for “Doing Business As.” It is also referred to as your business’s assumed, trade, or fictitious name. Filing for a DBA allows you to conduct business under a name other than your own; your DBA is different from your personal name or your business's legal, registered name.
CLIA - The CLIA number is issued by the Cruise Lines International Association. It identifies you as a seller of travel-related services.
Tax ID - You may need a Tax ID number when filing taxes or communicating with the IRS. A Tax Identification Number (TIN) is a unique nine-digit number that identifies you to the IRS. Social Security numbers are the most common TINs, but others include ITIN, EIN, ATIN, and PTIN.
Primary Service location address – The location of the provider’s office.
Incorporation Date
Medicare ID / Medicaid ID - A Medicare/Medicaid Provider Number (MPN) verifies that a provider is Medicare certified and establishes the type of care they can provide. This identifier is a six-digit number.
Last Revalidation MCB /MED - Providers must periodically revalidate—or renew—their enrollment record to maintain Medicare/Medicaid billing privileges. Generally, providers and suppliers revalidate every five years, but DMEPOS suppliers revalidate every three years.
-
Pecos User ID - The online Medicare enrollment management system allows you to:
- Enroll as a Medicare provider or supplier
- Revalidate (renew) your enrollment
- Withdraw from the Medicare program
- Review and update your information
- Report changes to your enrollment record
- Electronically sign and submit your information
State where Incorporated
Phone/Fax/Email - You can add multiple phone numbers, fax numbers, or email addresses.

- If you have a group NPI number, you can add a new group using the NPI number.
- In the pop-up window, select the Using NPI tab.
- Enter the NPI number and click the Check NPI button.
- Information such as the group name, primary service location address, phone, and fax will be filled in automatically.

Professional Liability Insurance (Optional): -Professional liability insurance is a type of business insurance that provides coverage for professionals and businesses to protect against claims of negligence from clients or customers. It typically covers negligence, copyright infringement, personal injury, and more.
Medical License Number (Optional):The medical license number accurately identifies the prescribing physician in a large pharmacy claims database.
General Liability Insurance (Optional) General liability insurance policies typically cover you and your company for claims involving bodily injuries and property damage resulting from your products, services, or operations. It may also cover damages to your landlord’s property if you are held liable.
Accreditation (Optional): In healthcare, accreditation refers to the official review process that allows organizations to demonstrate their ability to meet regulatory requirements and standards. Requirements differ by accreditation organization, but the goal remains the same: to show that your healthcare organization’s commitment to meeting accreditation standards results in higher performance and a greater focus on patient care.
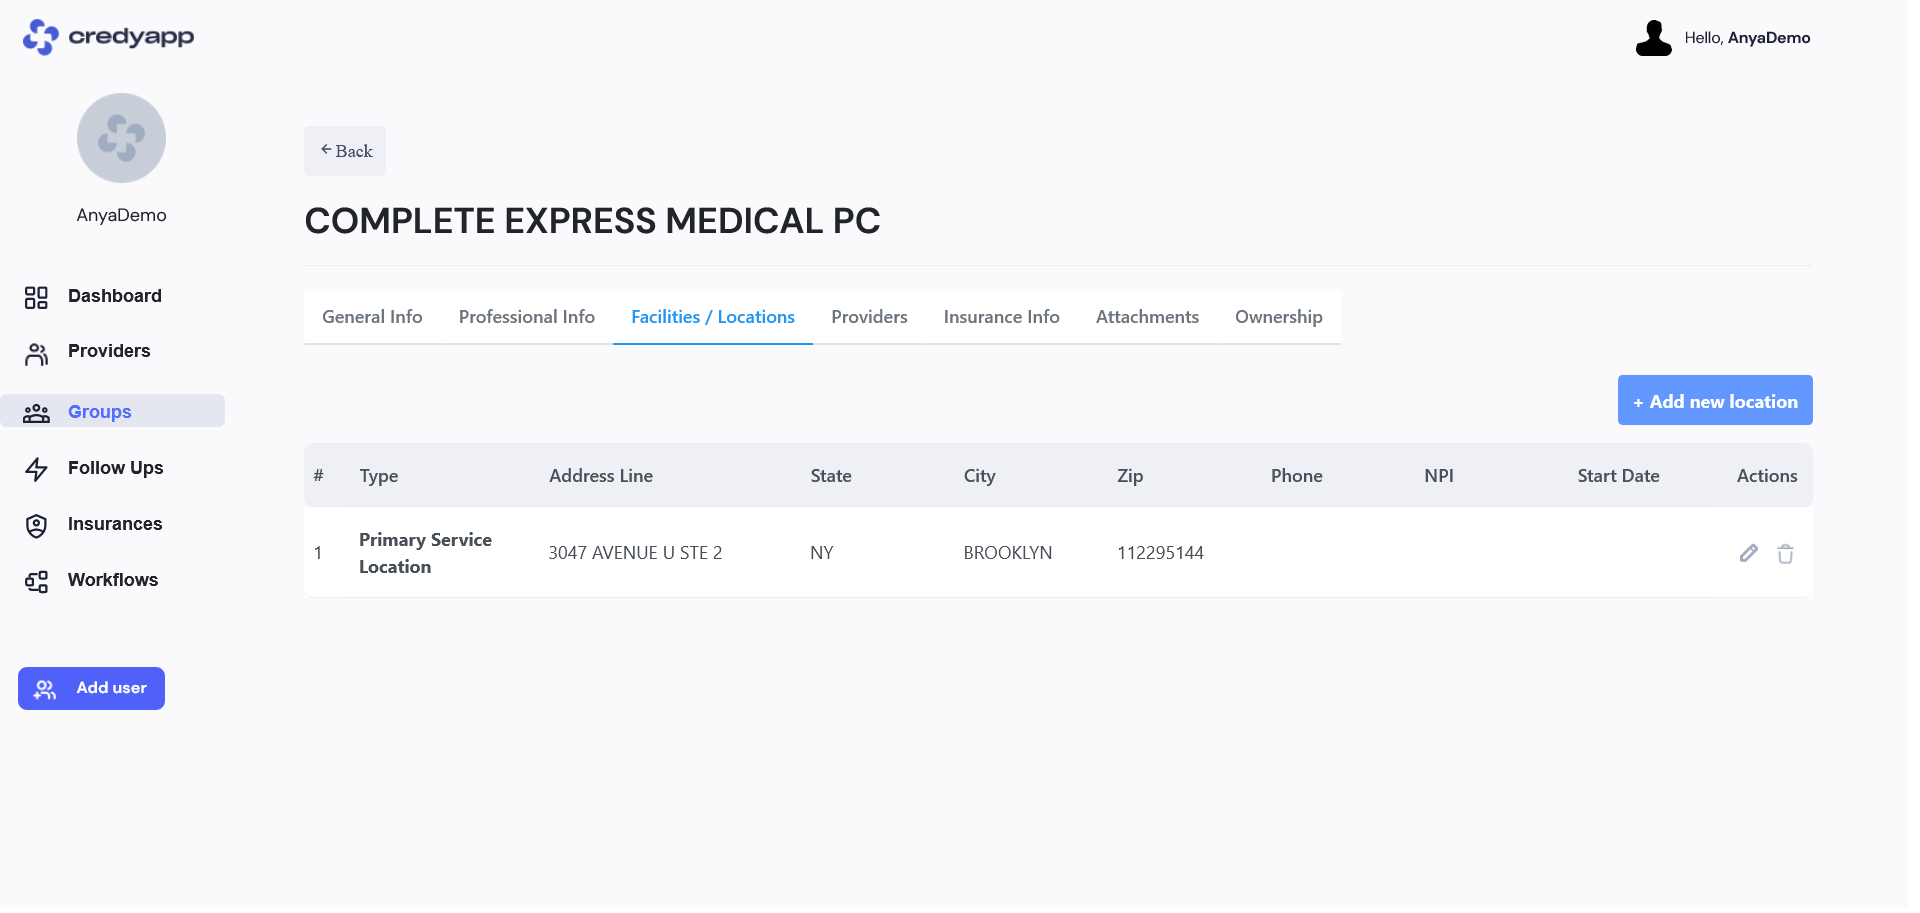
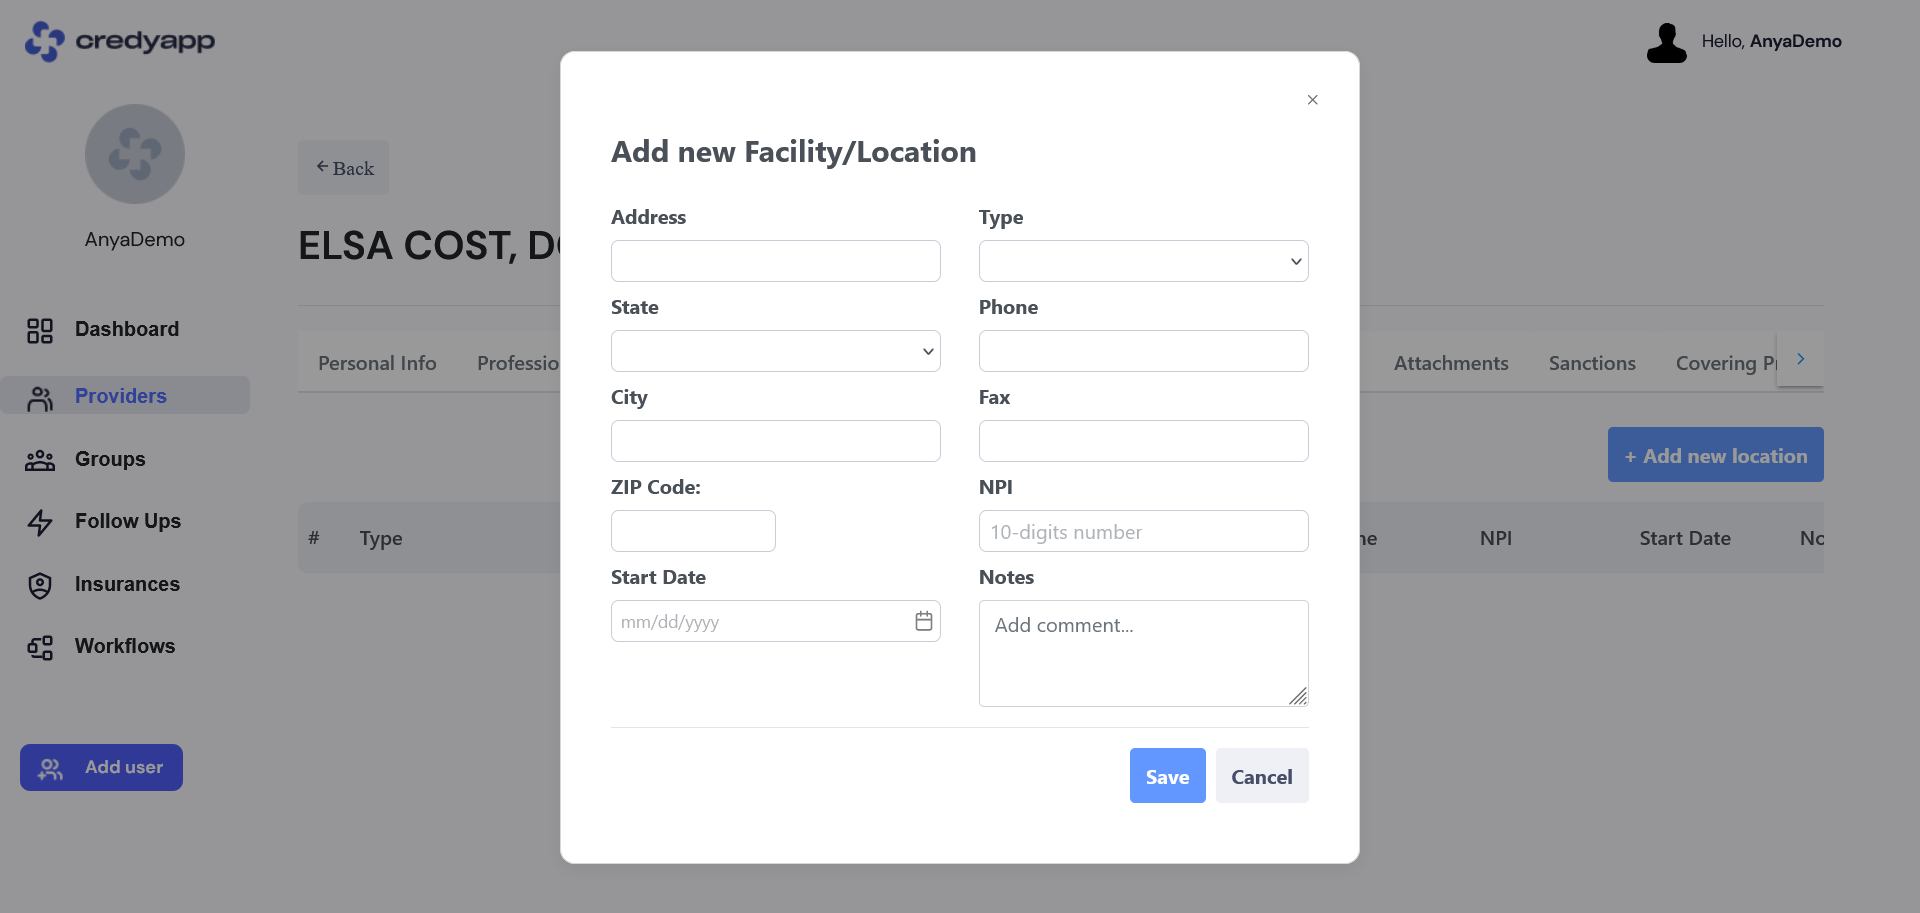
To add a location, go to the Facilities/Locations tab. This tab will appear after you save the General Group Information.
Click the + Add New Location button.
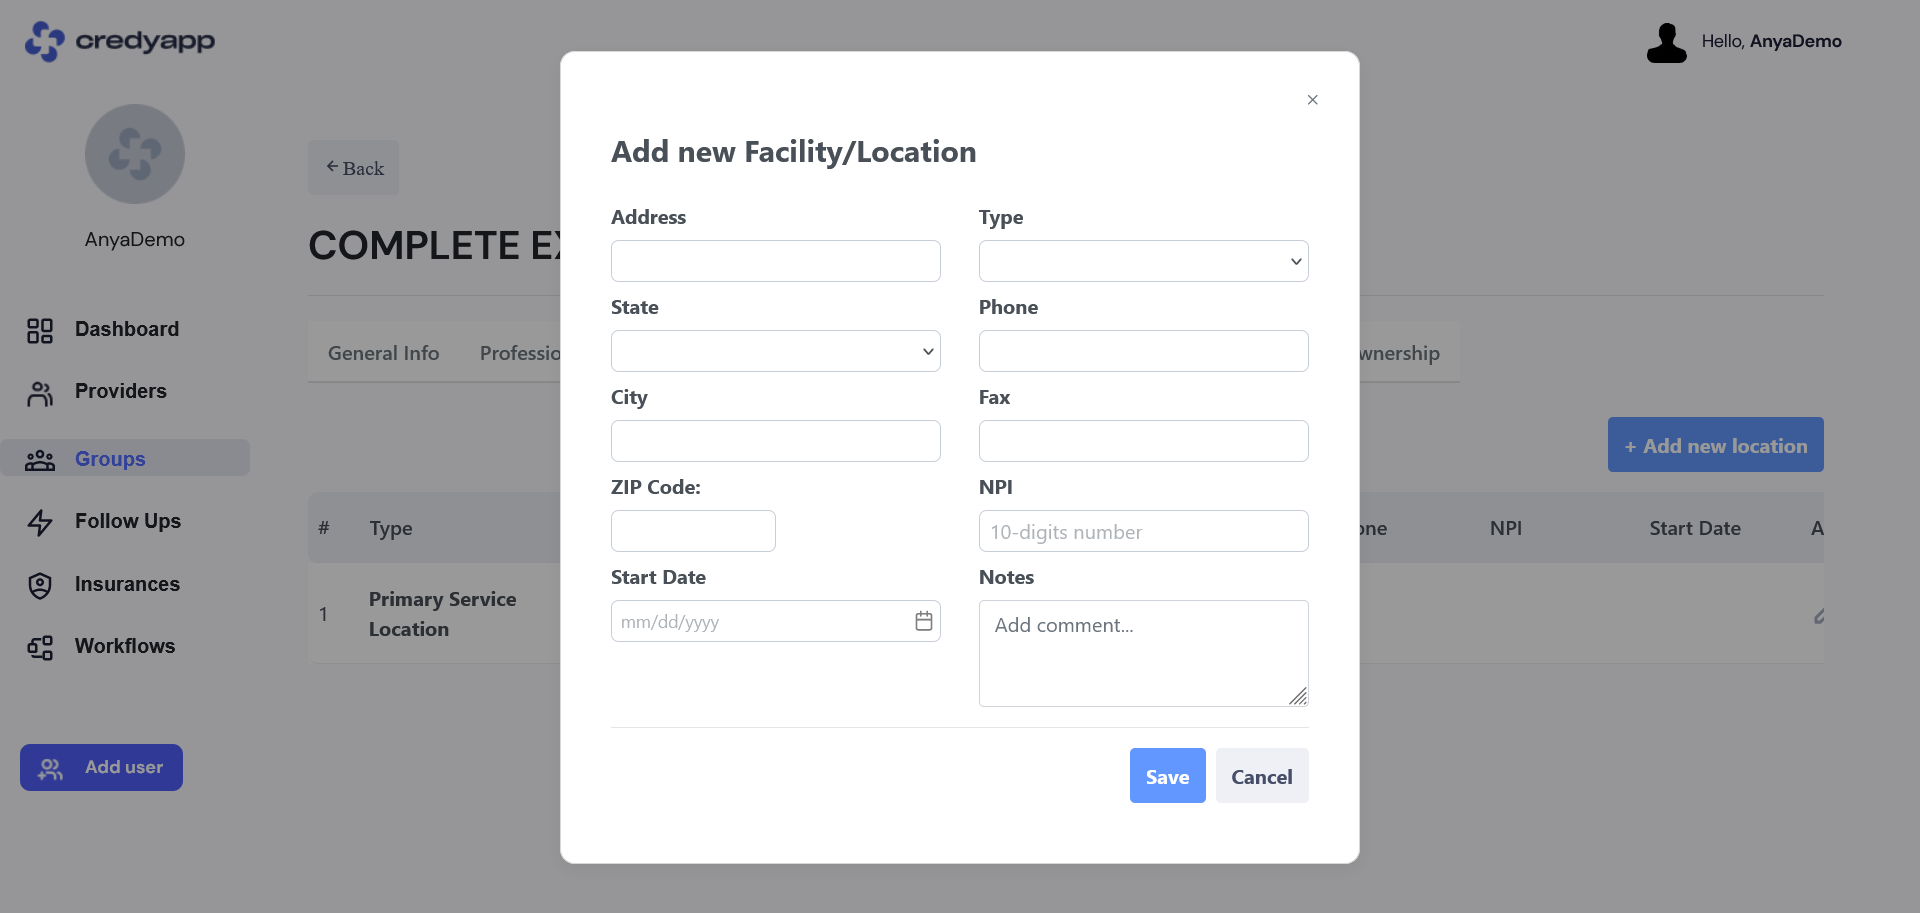
You can also add additional information, such as Phone, Fax, Start Date, NPI, and Notes.
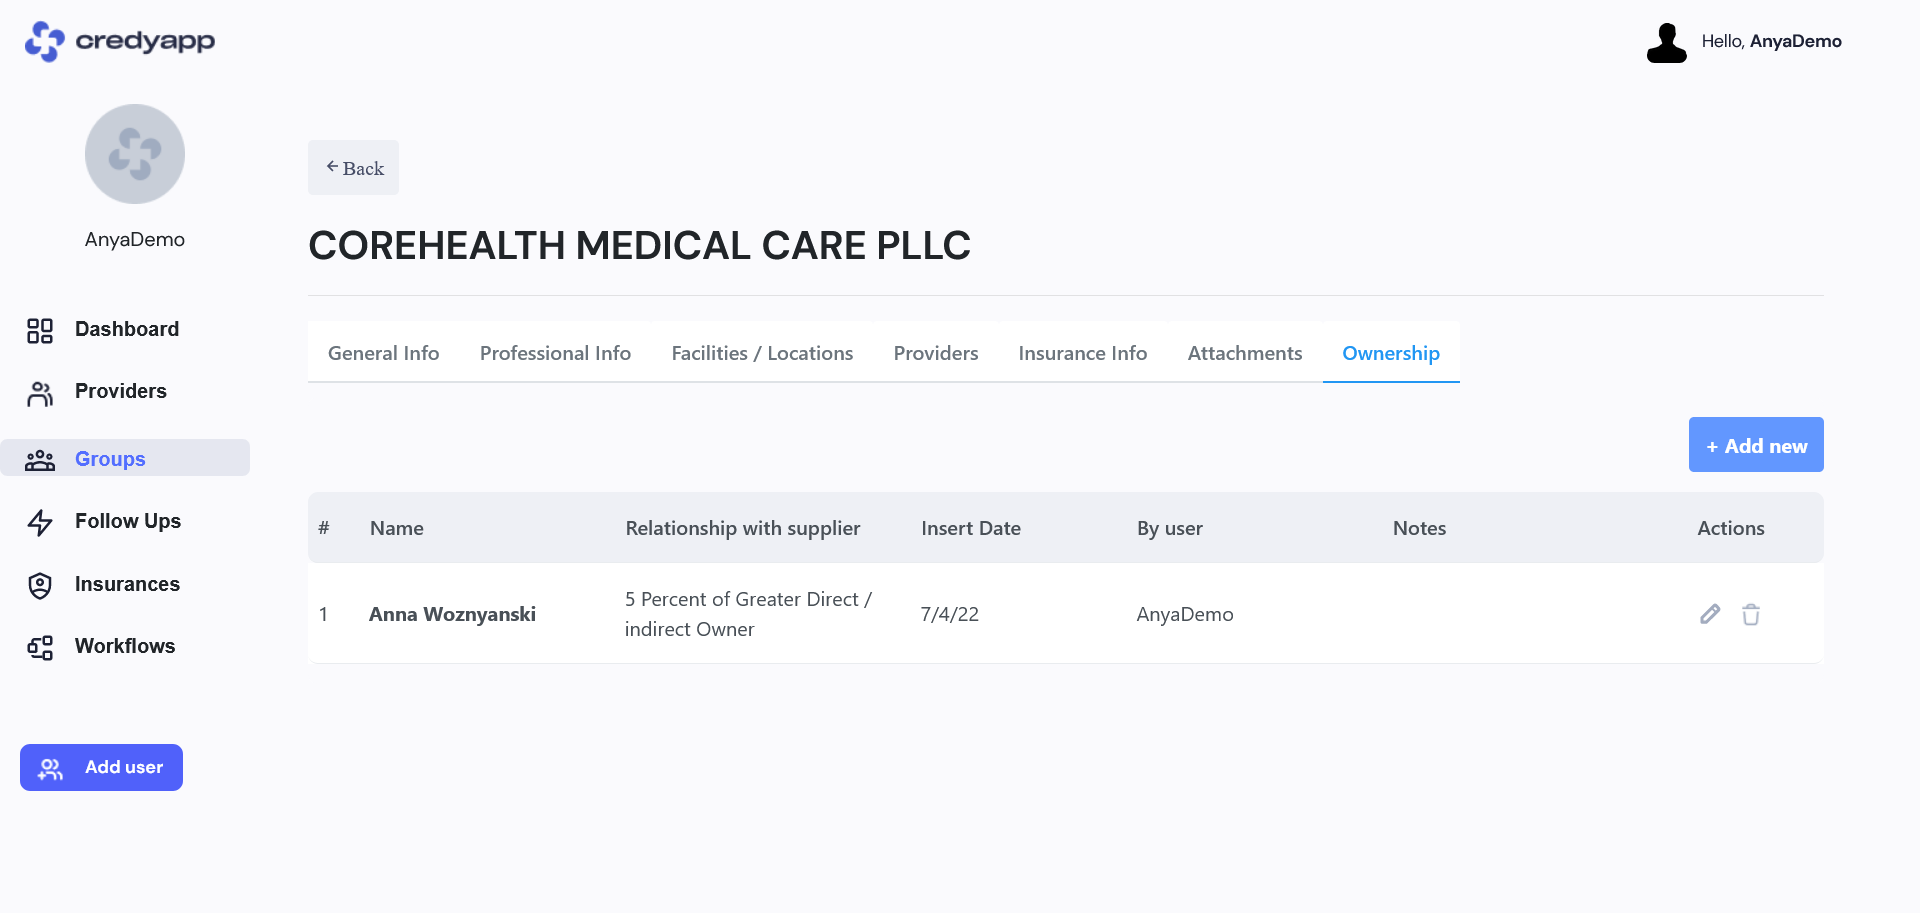
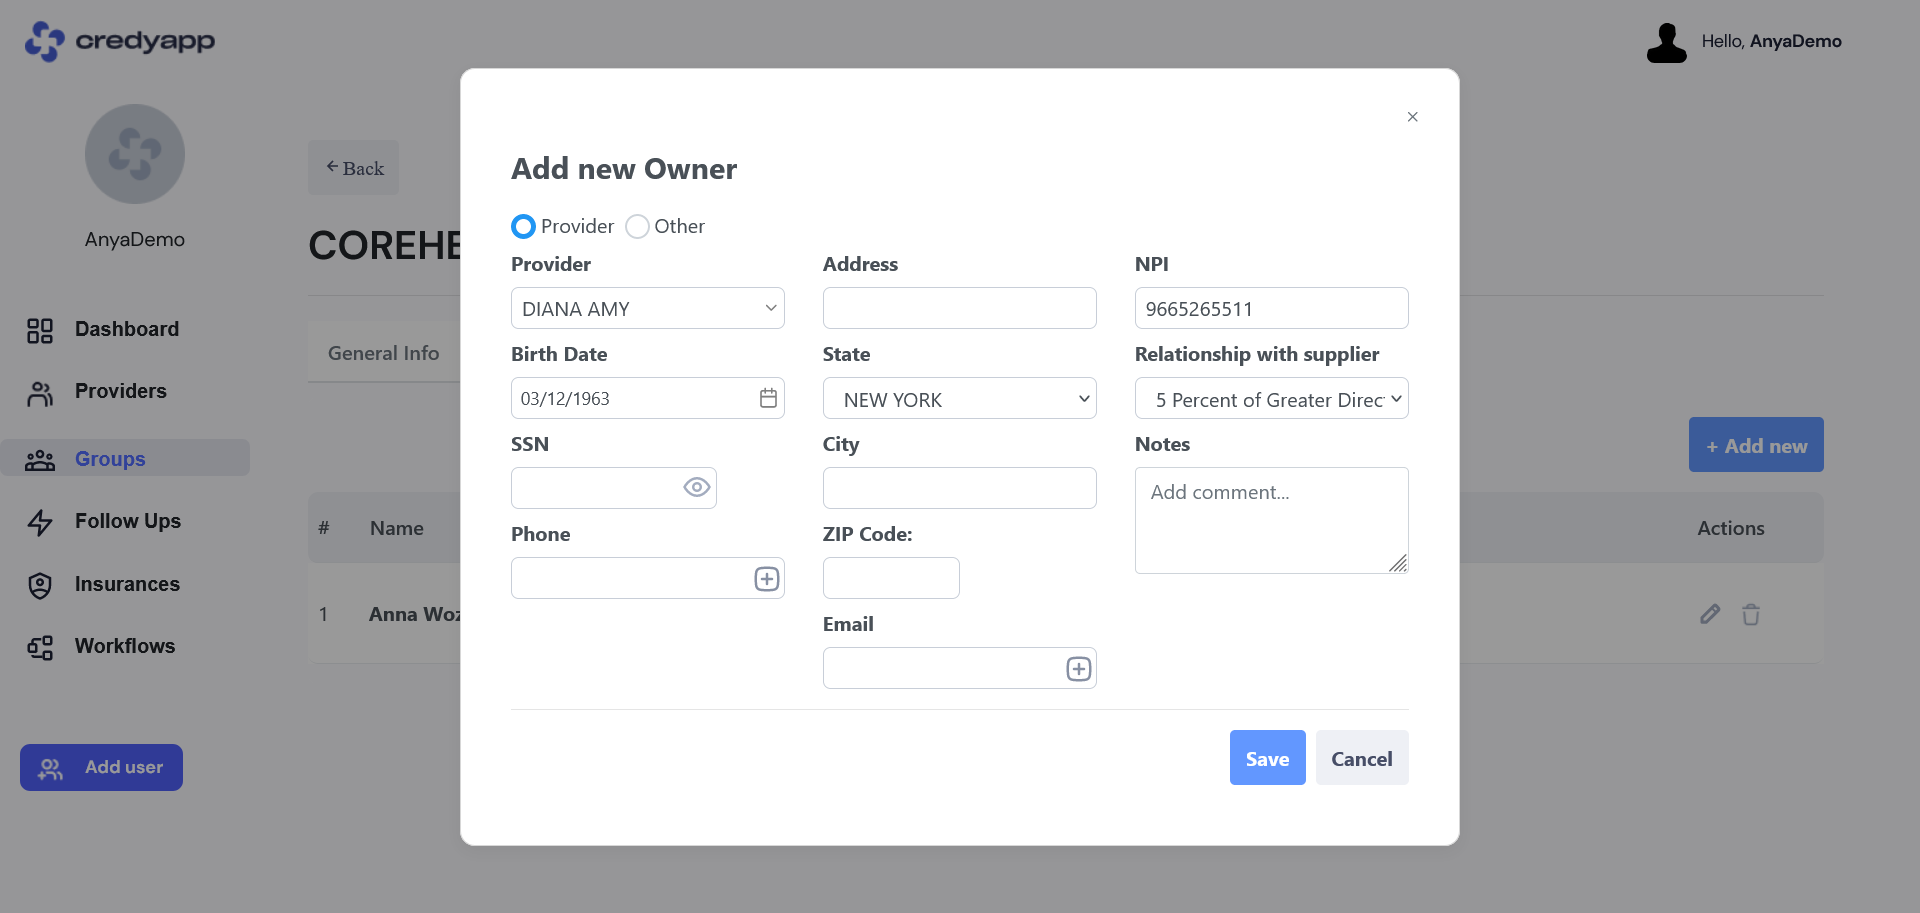
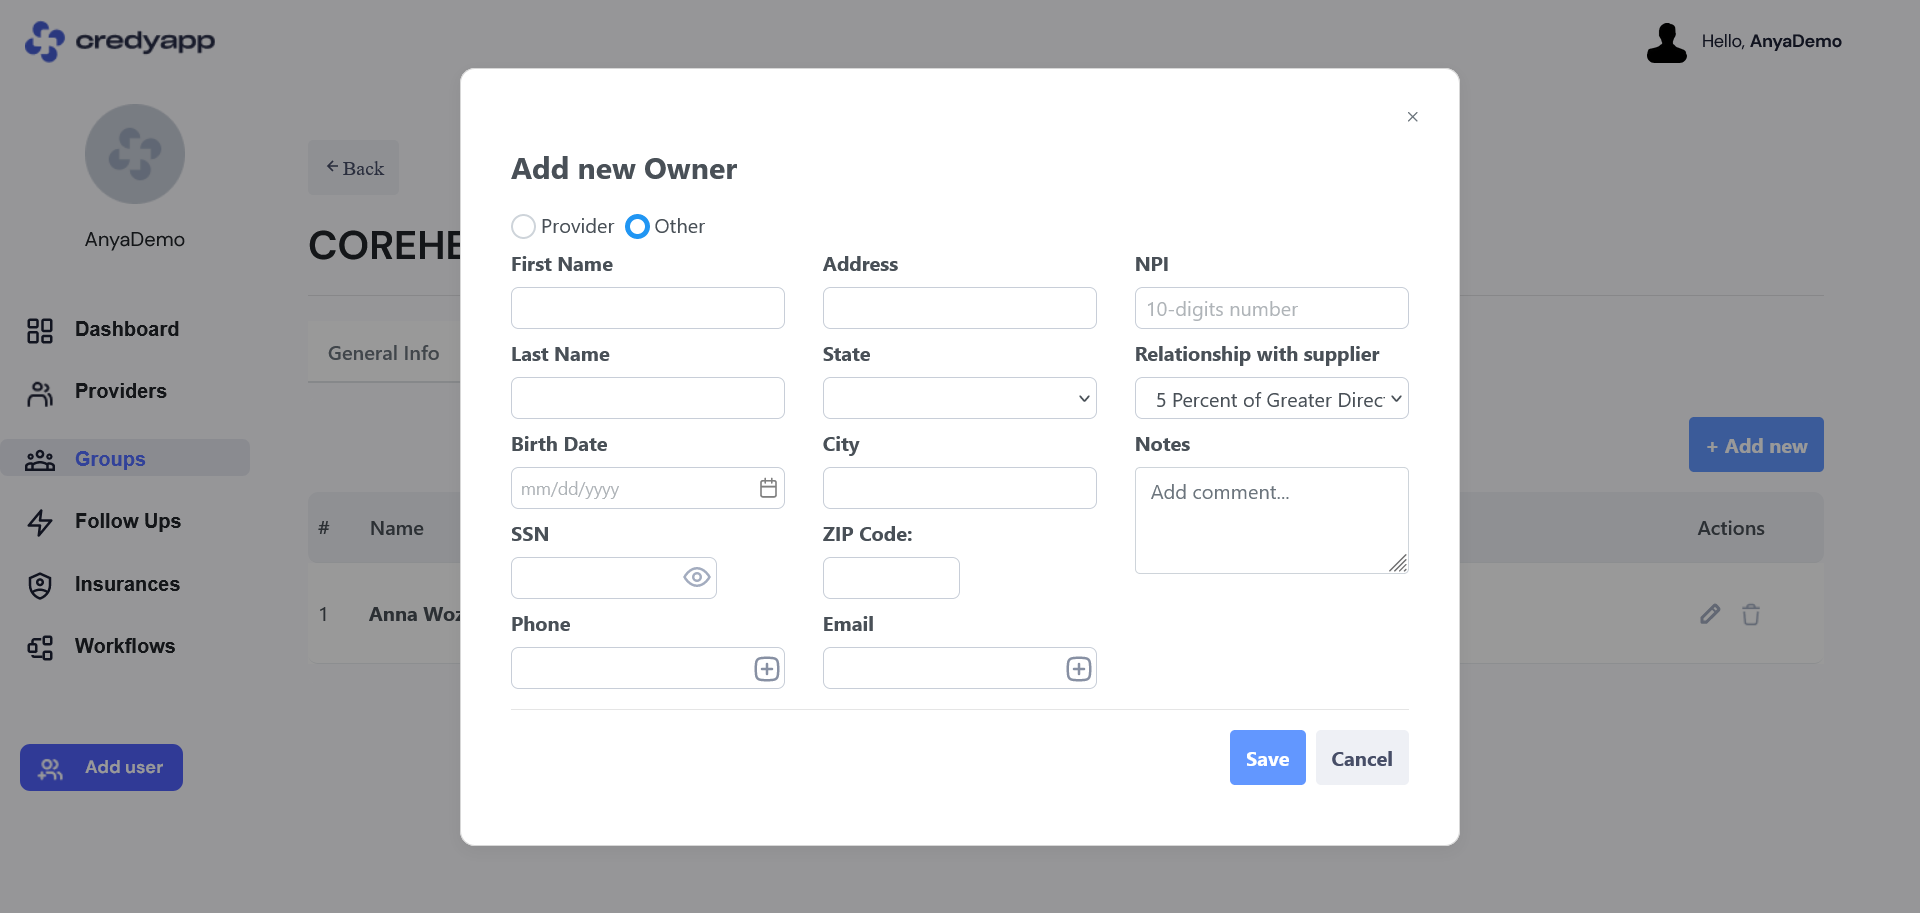
To add an owner, go to the Owners tab. This tab will appear after you save the General Group Information. Click the + Add New button.
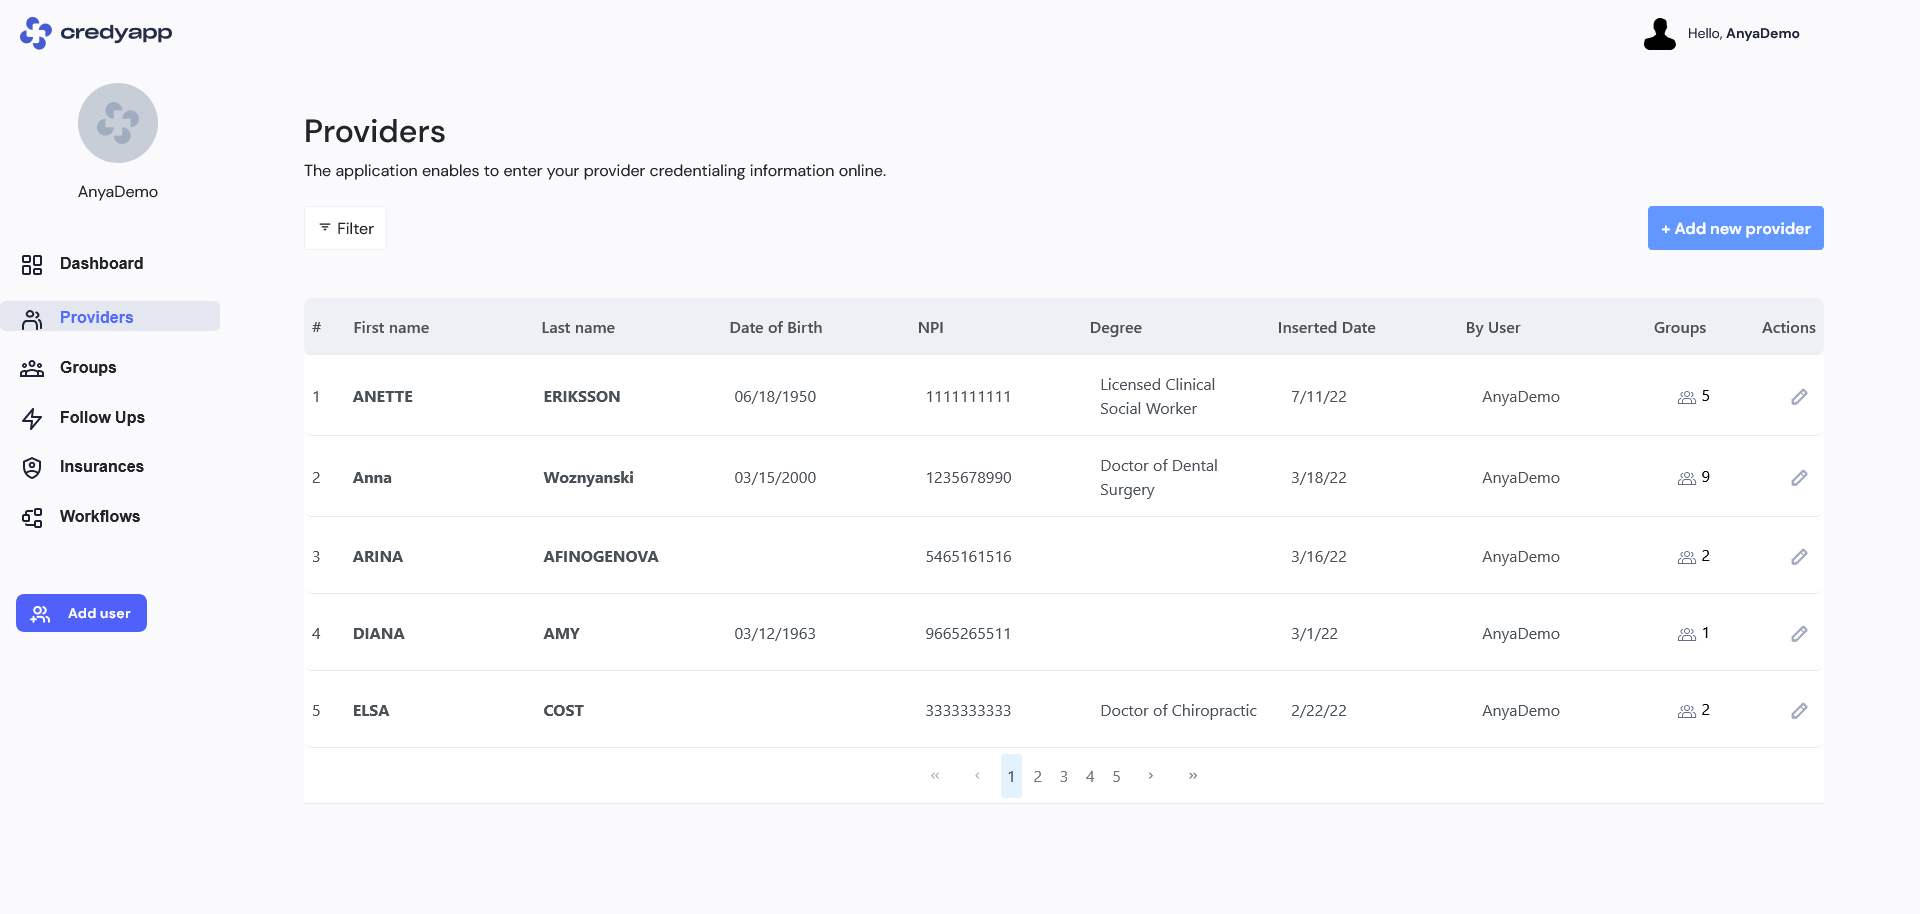
- From the left menu, click the Providers tab.
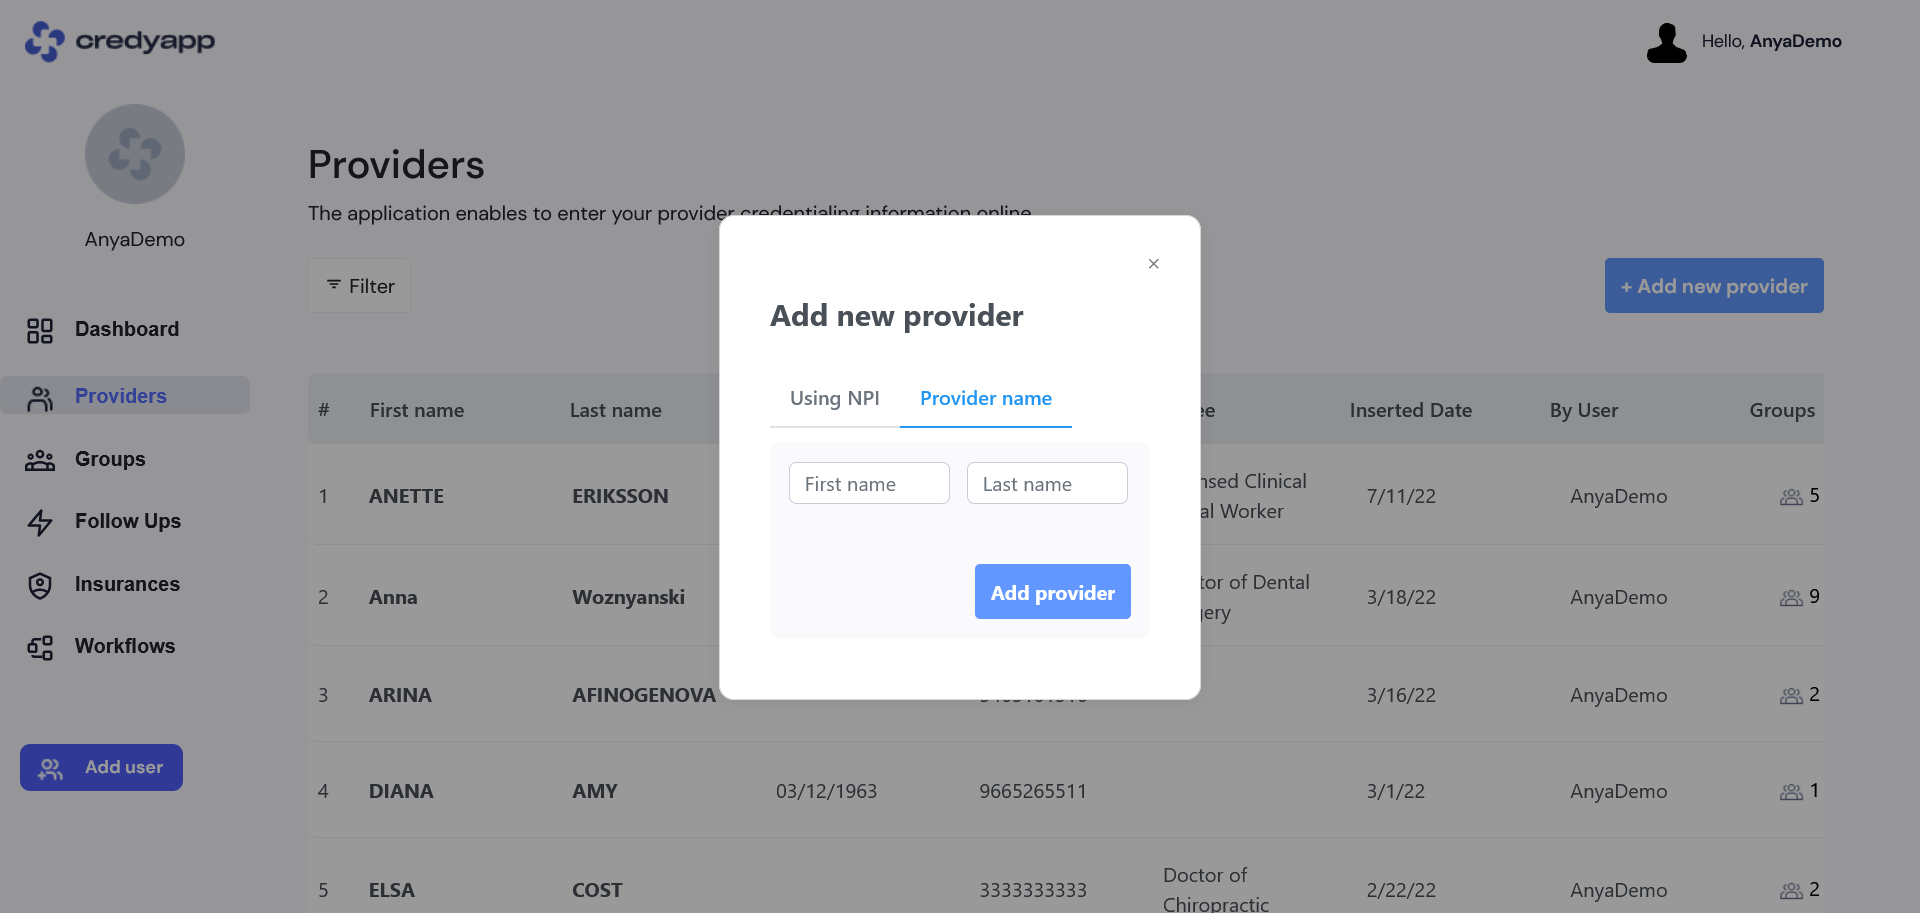
- On this page, click the Add New Provider button.
-
In the pop-up window, select the Provider Name tab, enter the first and last name, and then click the Add Provider button.
- Next, you can enter any additional information you have for this provider (optional).
-
NPI:
- A ten-digit number that must be submitted on the enrollment form.
- Remains with an individual provider regardless of job or location changes.
- Is submitted to the contractor for payment.
-
-
There are two types of NPIs:
- Type 1 NPIs — Assigned to individual physicians, nonphysician practitioners, and sole proprietors.
- Type 2 NPIs — Assigned to organizations, including physician and nonphysician groups, hospitals, nursing homes, and corporations formed when an individual incorporates as a sole owner.
-
If you need to verify or update your NPI, visit the NPPES website. For help logging in, contact the NPI Enumerator at 800-465-3203 (TTY 800-692-2326).
Important Note: Whenever you are asked to supply your LBN or legal name, indicate the name exactly as it appears at the IRS or SSA office. For groups, this includes any suffix, such as PC, PA, LLC, PLLC, Inc., etc.
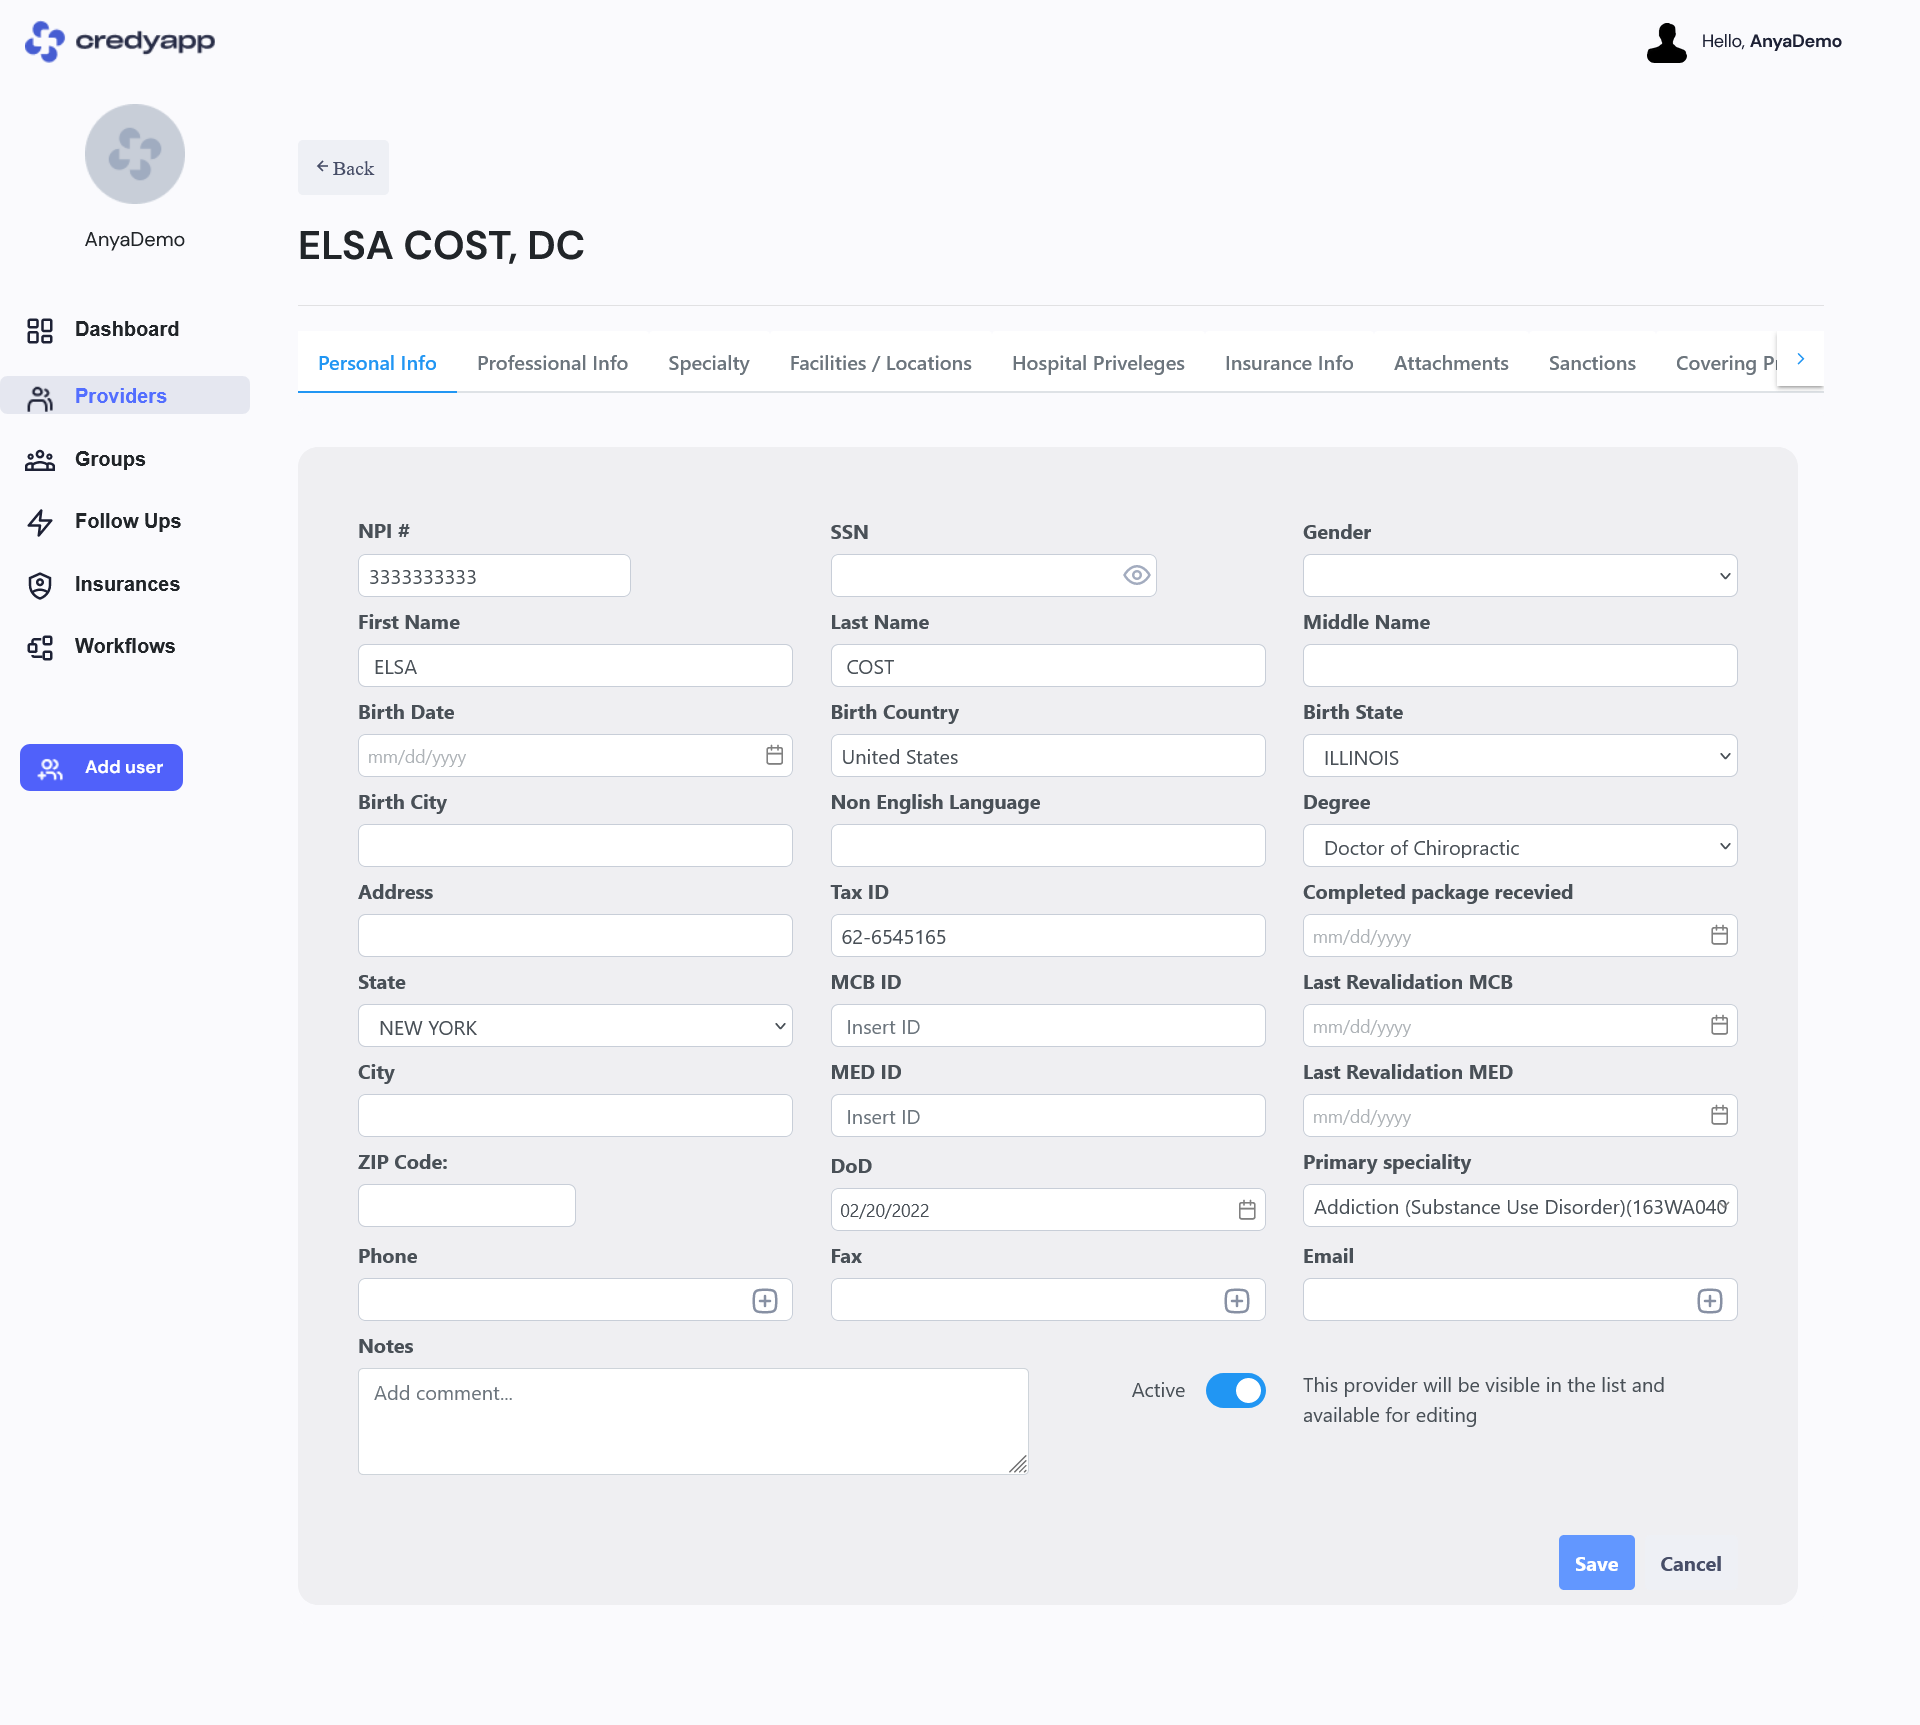
Gender
Birth Day
Birth Country
Birth State
Birth City
Non-English language
Degree-Doctor’s medical degree.
Address Line –Primary practice address.
Tax ID - You may need a tax ID number when filing taxes or communicating with the IRS. A Tax Identification Number (TIN) is a unique nine-digit number that identifies you to the IRS. It is required on your tax return and requested in other IRS interactions. Social Security numbers are the most common TINs, but others include ITIN, EIN, ATIN, and PTIN.
Completed package received
Medicare ID / Medicaid ID - A Medicare/Medicaid Provider Number (MPN) verifies that a provider is Medicare certified and establishes the type of care the provider can perform. This identifier is a six-digit number.
Last Revalidation MCB /MED - Providers must periodically revalidate—or renew—their enrollment record to maintain Medicare/Medicaid billing privileges. Generally, providers and suppliers revalidate every five years, but DMEPOS suppliers revalidate every three years.
Primary Specialty - Primary care specialties include family medicine, general internal medicine, general pediatrics, combined internal medicine/pediatrics (Med/Peds), and general obstetrics and gynecology (OB/GYN), fulfilling the general medical needs of specific patient populations.
Phone/Fax/Email – You can add multiple phone numbers, fax numbers, or email addresses.
DoD – Date of death of the provider.
- If you have a provider NPI number, you can add a new provider using the NPI number.
- In the pop-up window, select the Using NPItab.
- Enter the NPI number and click the Check NPI button.
- Information such as first name, last name, gender, address, phone, fax, and primary specialty will be filled in automatically.
CAQH ID - ProView is an online provider data-collection solution. It streamlines provider data collection using a standard electronic form that meets the needs of nearly every health plan, hospital, and other healthcare organization. CAQH ProView enables physicians and other healthcare professionals in all 50 states and the District of Columbia to enter information free of charge into a secure central database and authorize healthcare organizations to access that information. CAQH ProView eliminates redundant paperwork and reduces administrative burden.
-
Pecos -The online Medicare enrollment management system allows you to:
- Enroll as a Medicare provider or supplier
- Revalidate (renew) your enrollment
- Withdraw from the Medicare program
- Review and update your information
- Report changes to your enrollment record
- Electronically sign and submit your information
DEA Number - The acronym for Controlled Dangerous Substances, which is synonymous with “controlled substances.” These are medications subject to certain restrictions on their use, including amphetamines, narcotics and other opiates, anabolic steroids, and benzodiazepines.
Professional Liability Insurance - Professional liability insurance is a type of business insurance that provides coverage for professionals and businesses to protect against claims of negligence from clients or customers. It typically covers negligence, copyright infringement, personal injury, and more.
Medical License Number - The medical license number accurately identifies the prescribing physician in a large pharmacy claims database.
Professional School Name – Name of the medical school attended.
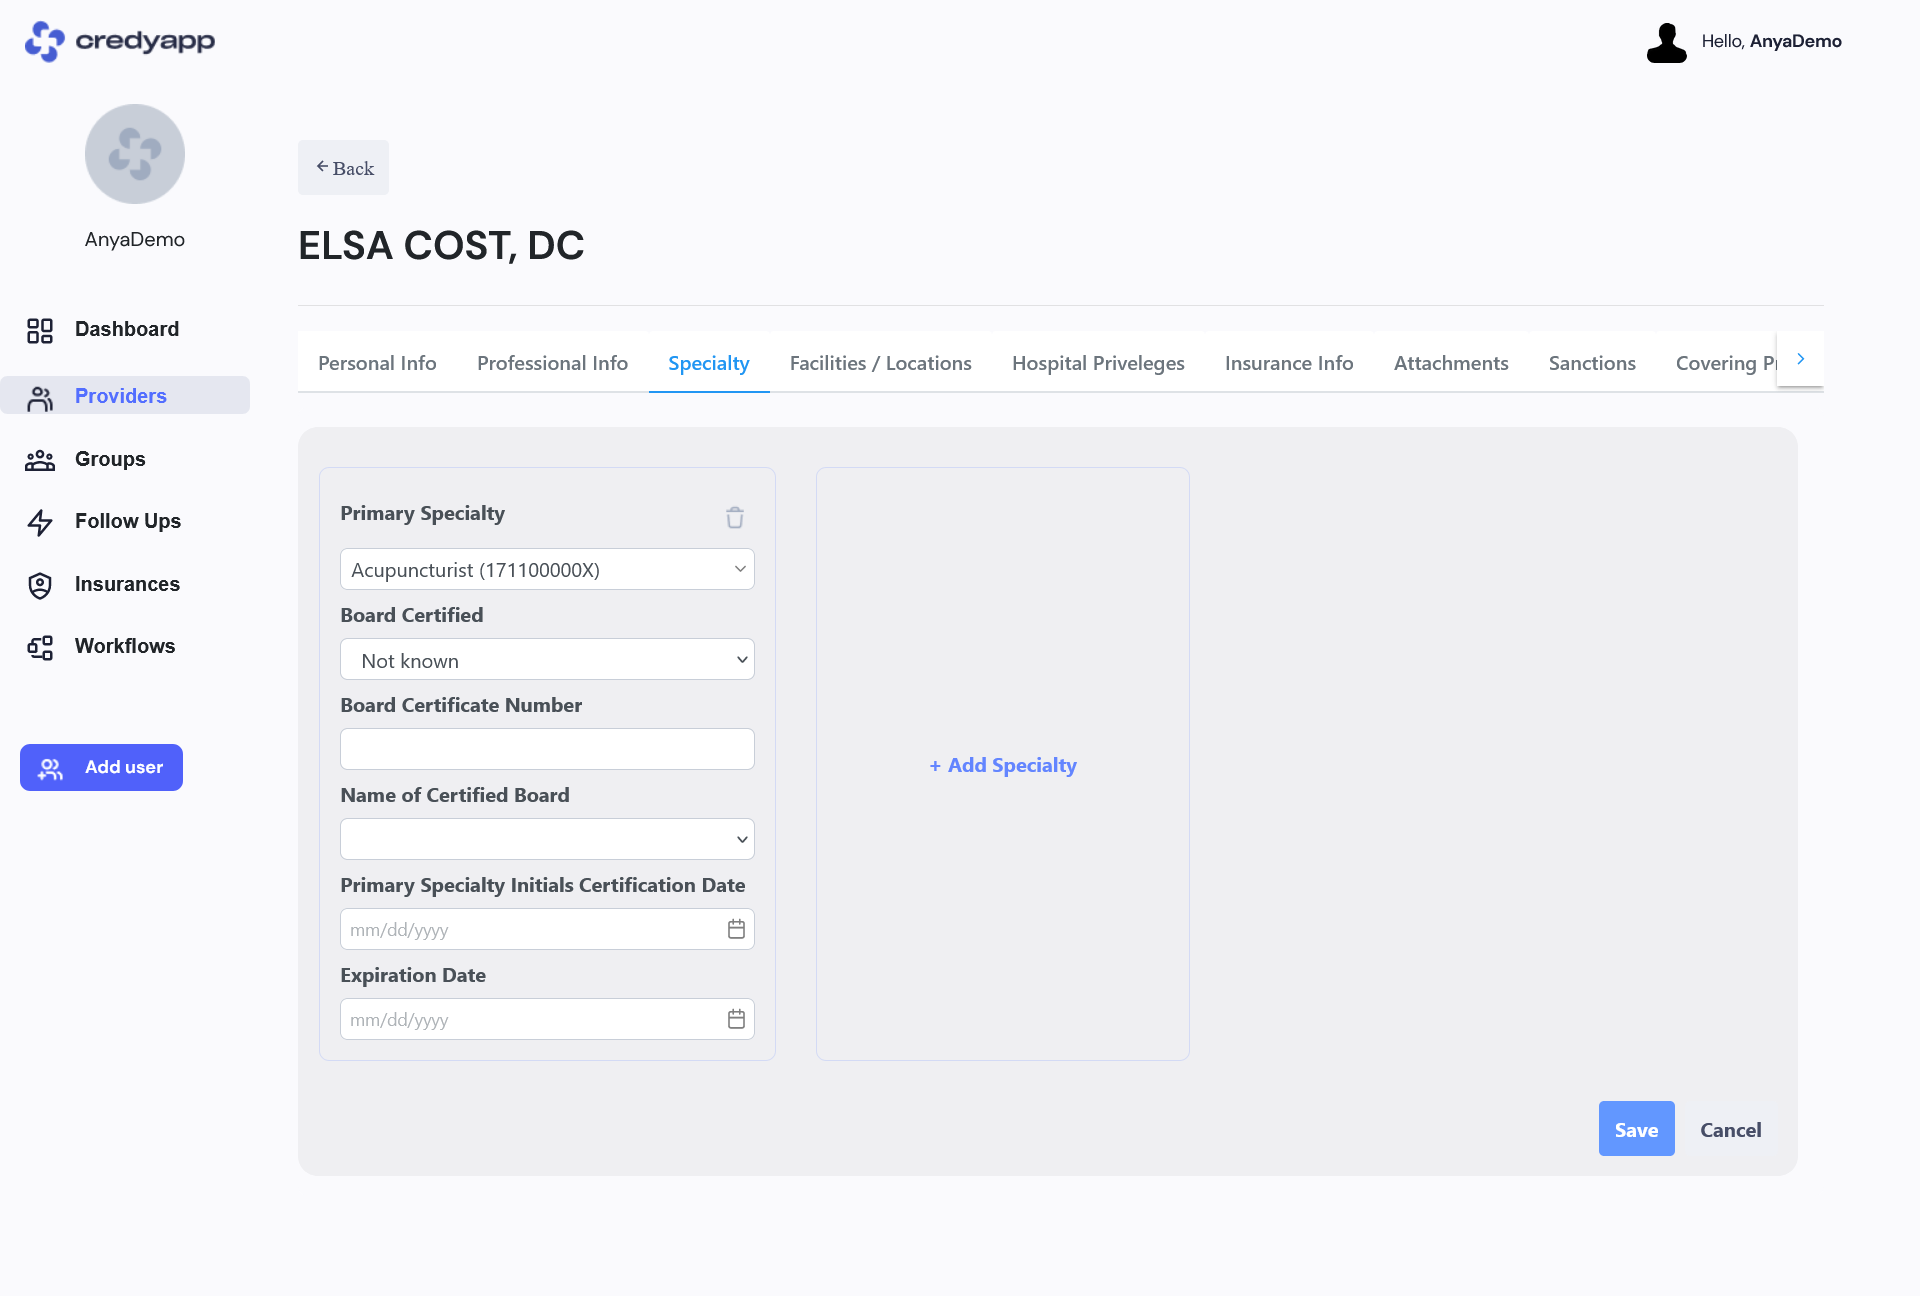
Board certification The process by which a physician or other professional demonstrates mastery of advanced knowledge and skills through written, practical, or simulator-based testing.
Board certification - Specific to specialties and subspecialties, it represents an individual’s advanced knowledge, training, and skills in a particular area of medicine.
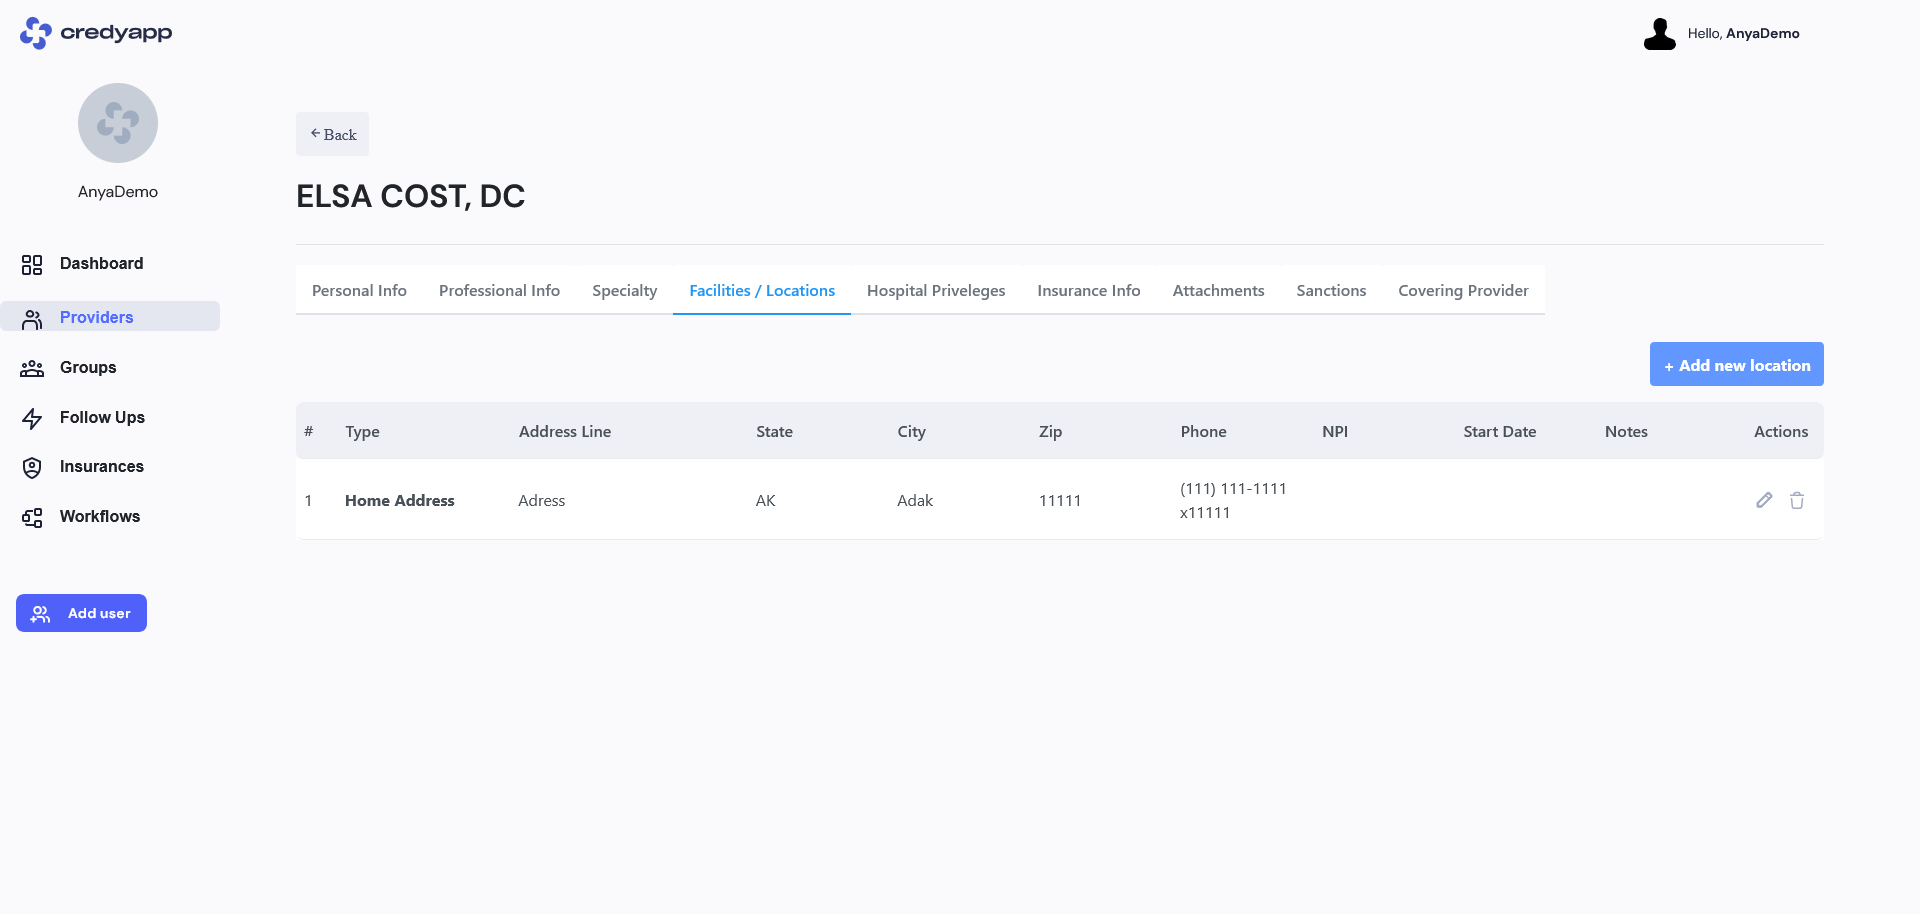
To add a location, go to the Facilities/Locations tab. This tab will appear after you save the Personal Provider Information.
Click the + Add New Location button.
You can also add additional information for each address, such as Phone, Fax, Start Date, NPI, and Notes.
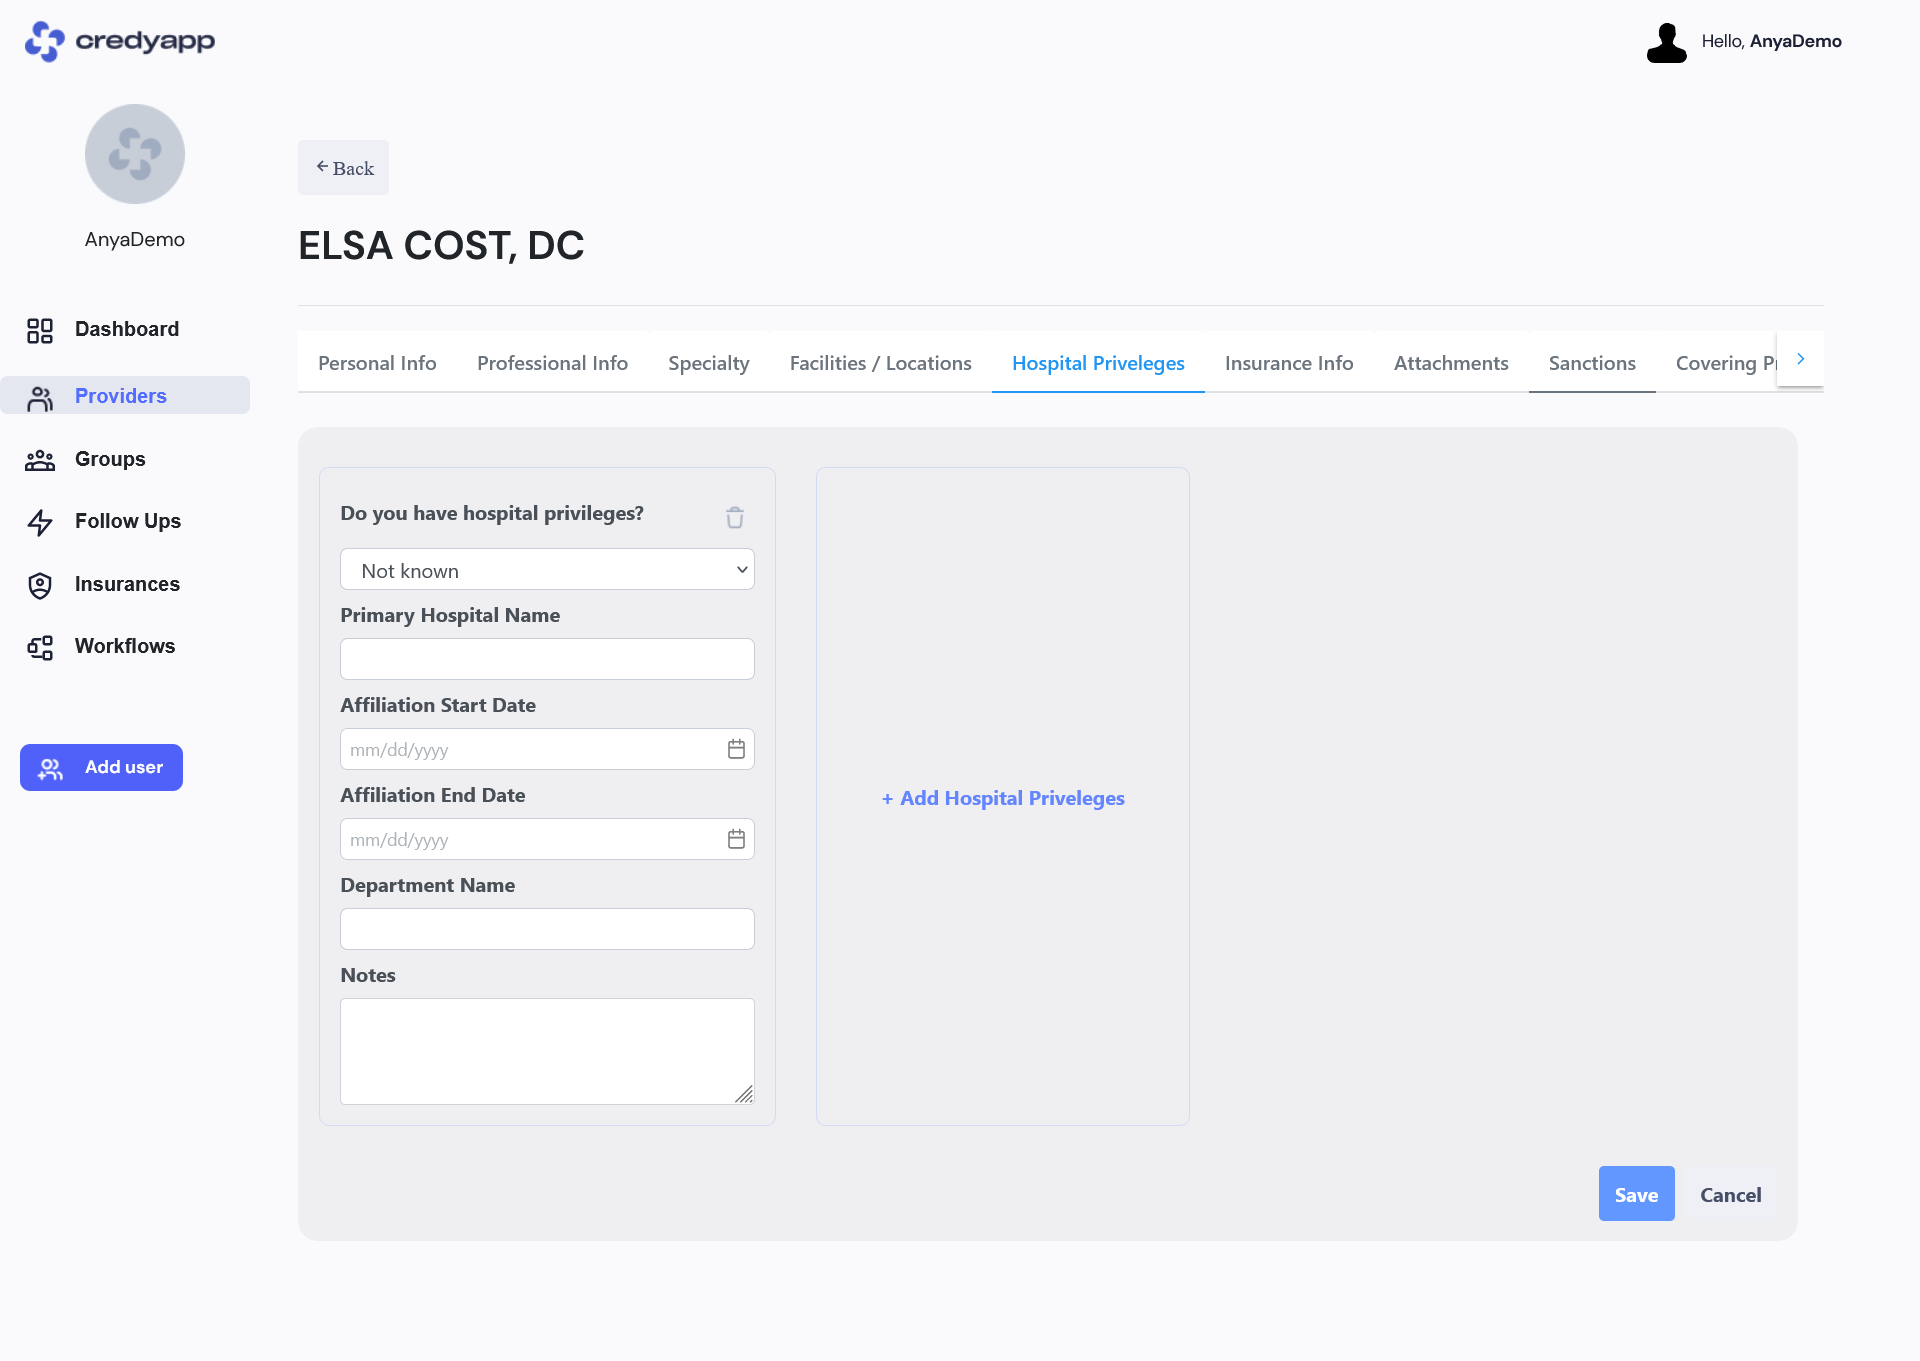
To add hospital privileges, go to the Hospital Privileges tab. This tab will appear after you save the Personal Provider Information.
Through this form, you can add additional information about a provider’s hospital privileges.
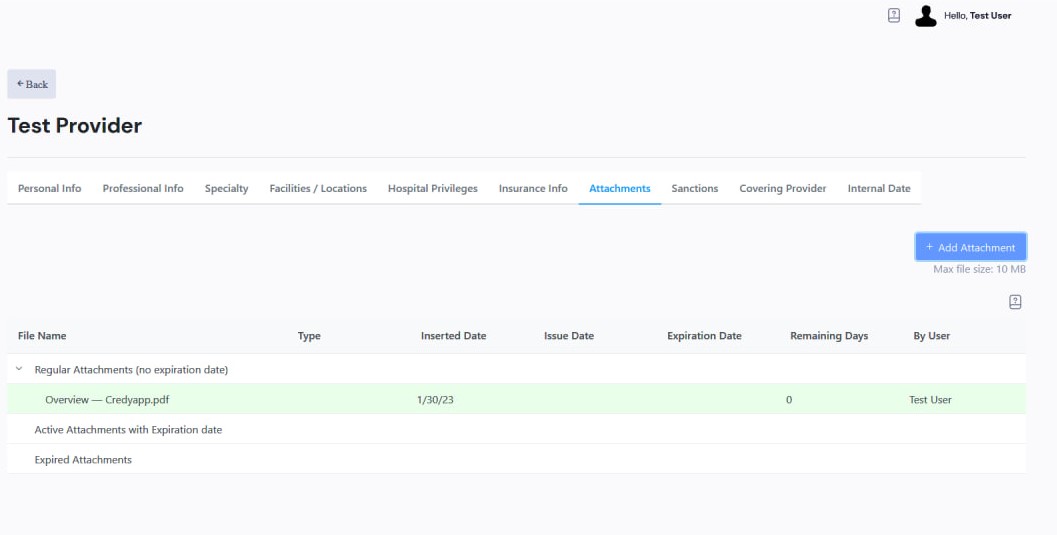
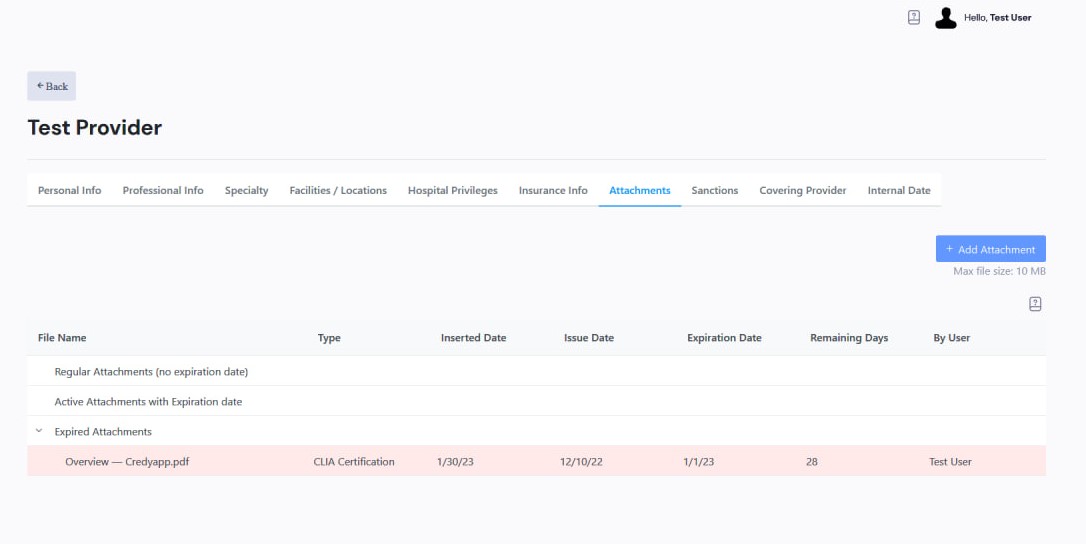
Click the + Add Attachment button, then select the attachments you want to add. By default, all attachments will be added without an expiration date.
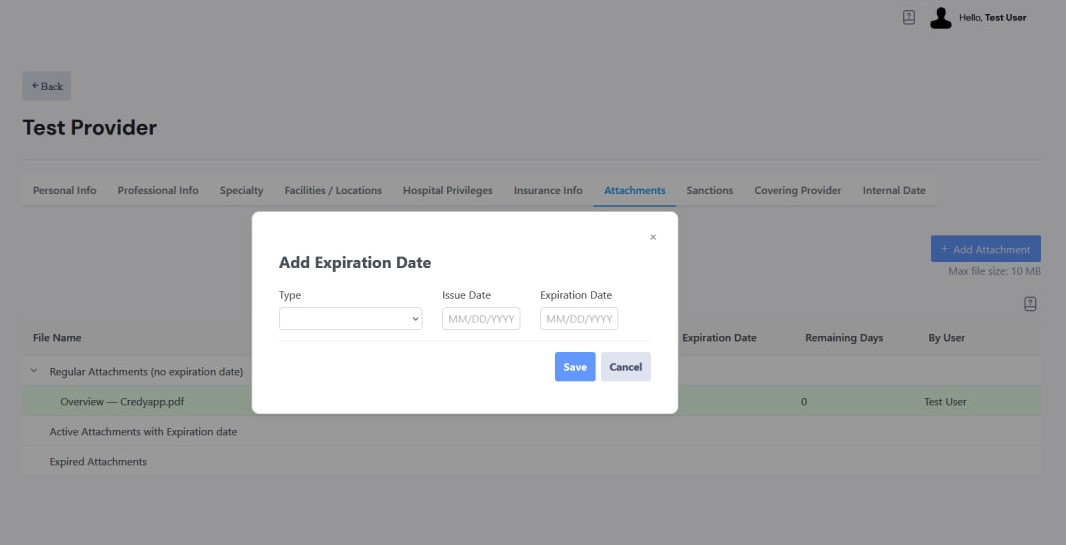
The Active Period column shows a countdown of days during which the attachment is active. When the document expires, it will be moved to the Expired Attachments block.
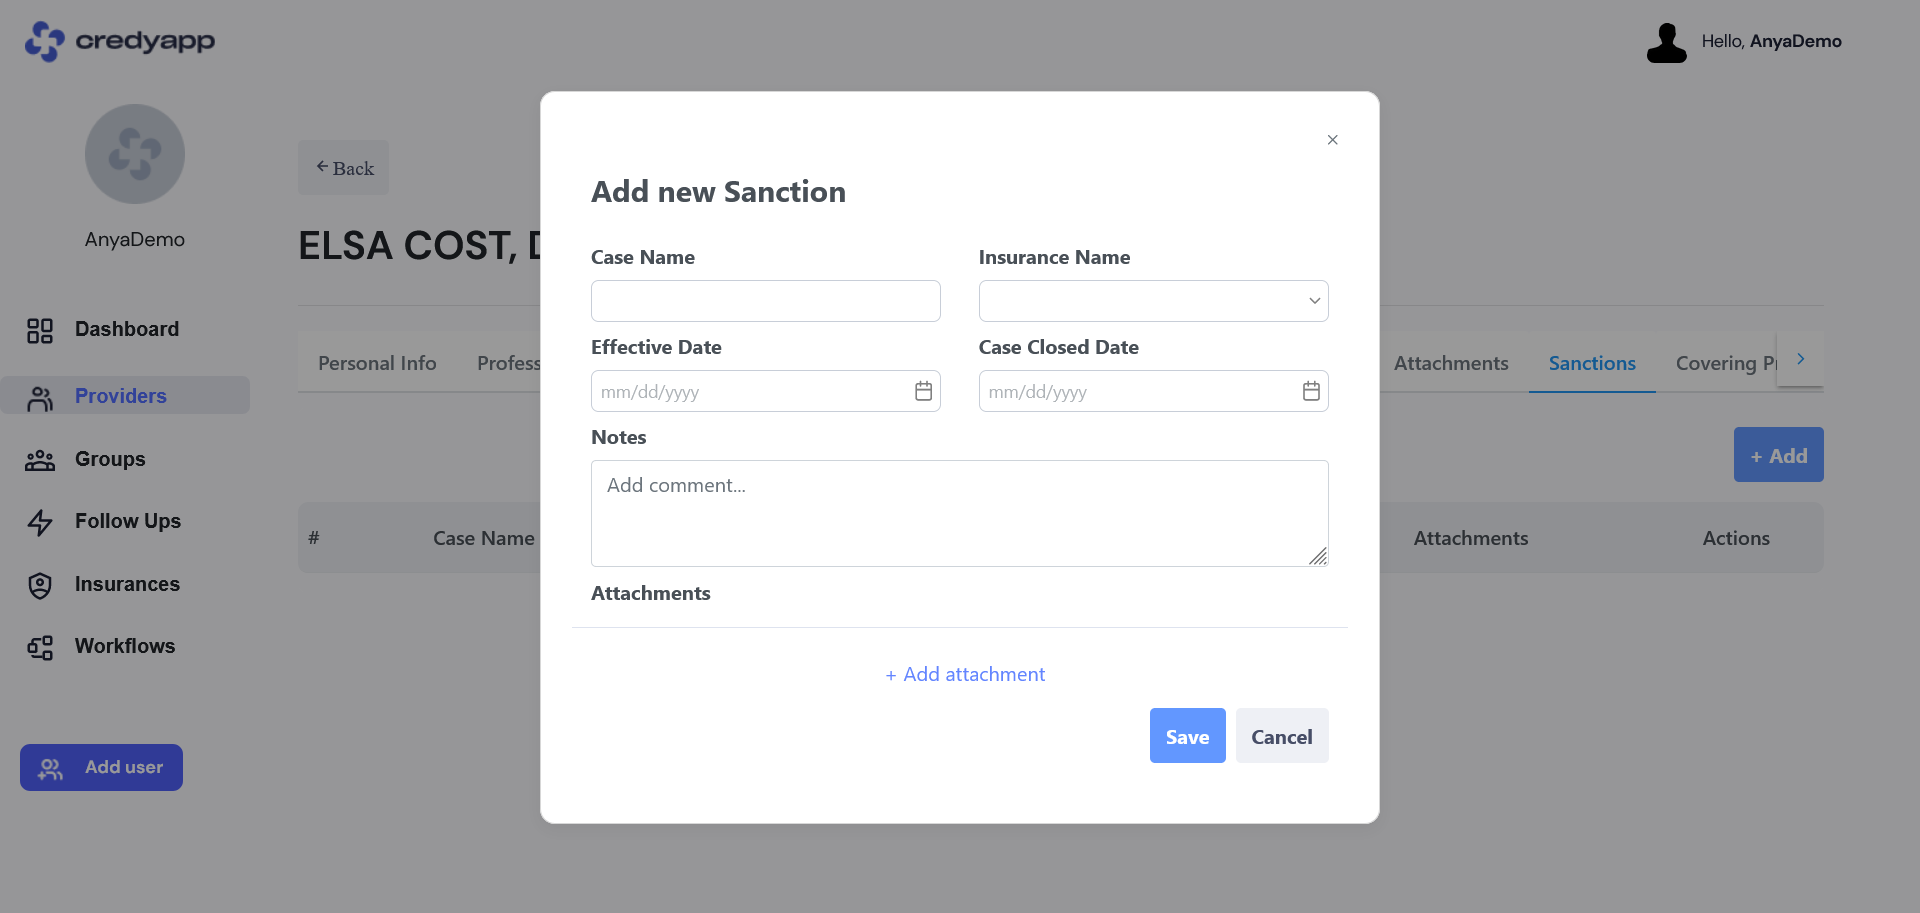
To add sanctions, go to the Sanctionstab. This tab will appear after you save the Personal Provider Information.
Click the + Add button.
Through this form, you can add a new sanction. Enter the Case Name, Insurance, Effective Date, Case Close Date, Notes, and Attachments.
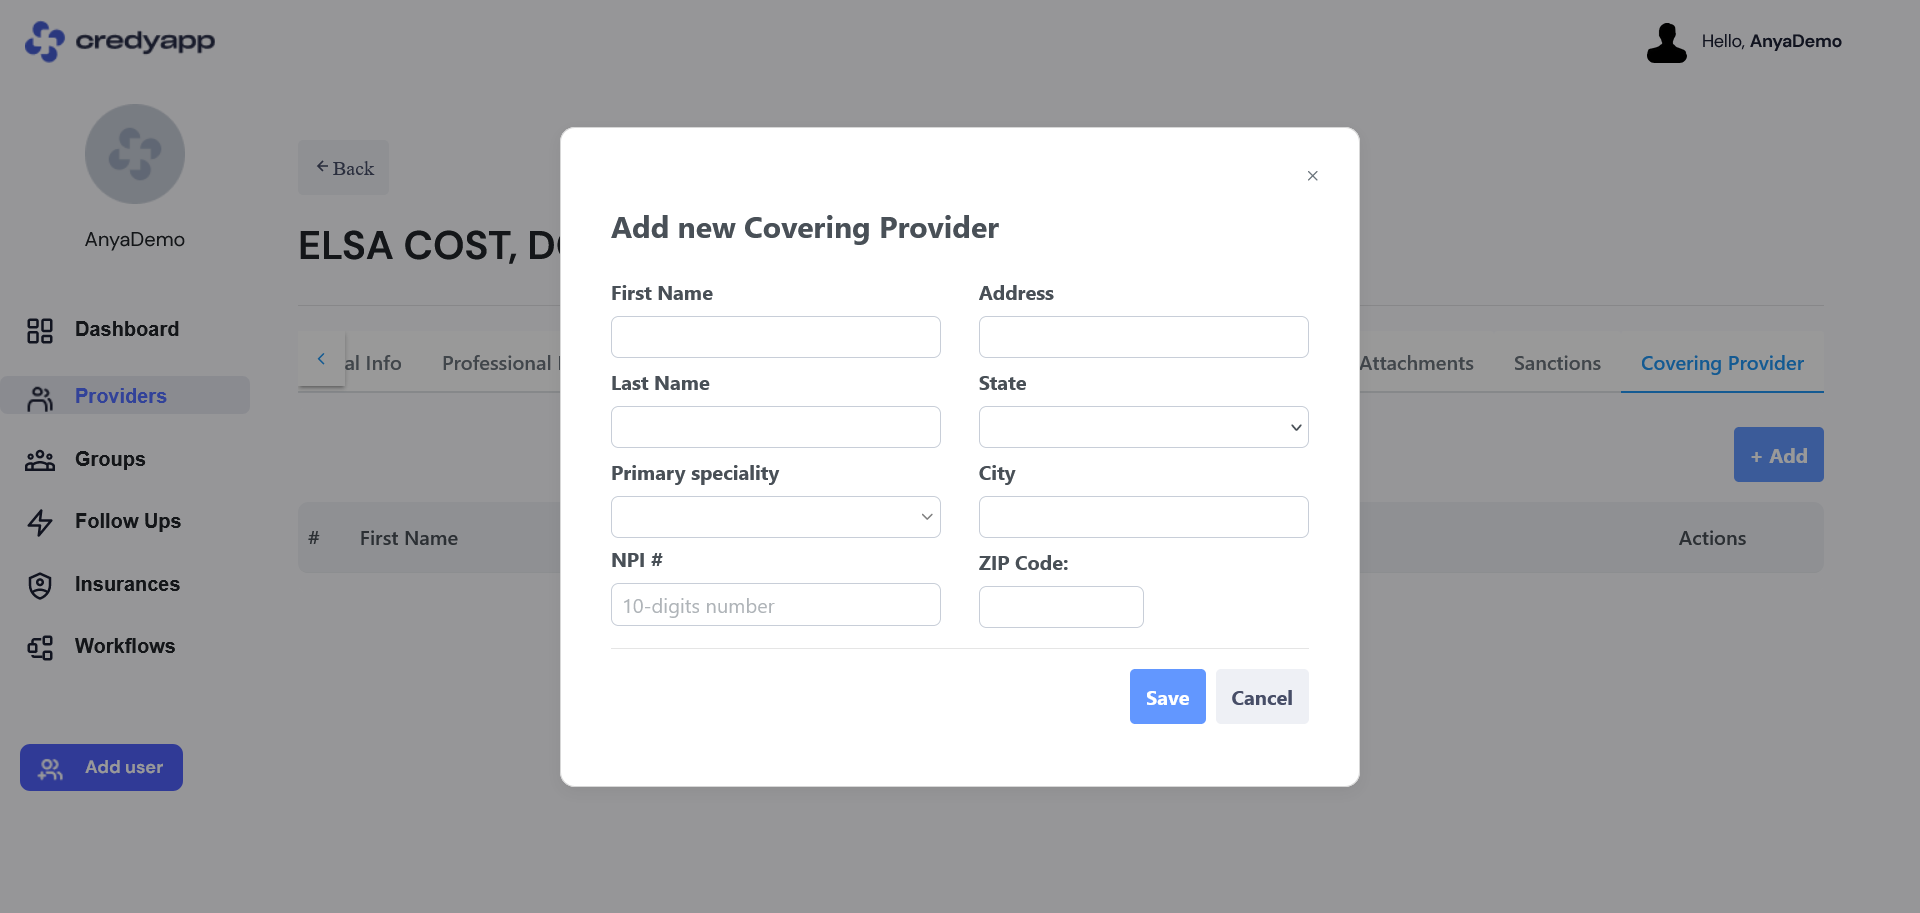
To add a covering provider, go to the Covering Provider tab. This tab will appear after you save the Personal Provider Information.
Click the + Add button.
Enter the First Name, Last Name, Primary Specialty, NPI, and Address, then click Save.
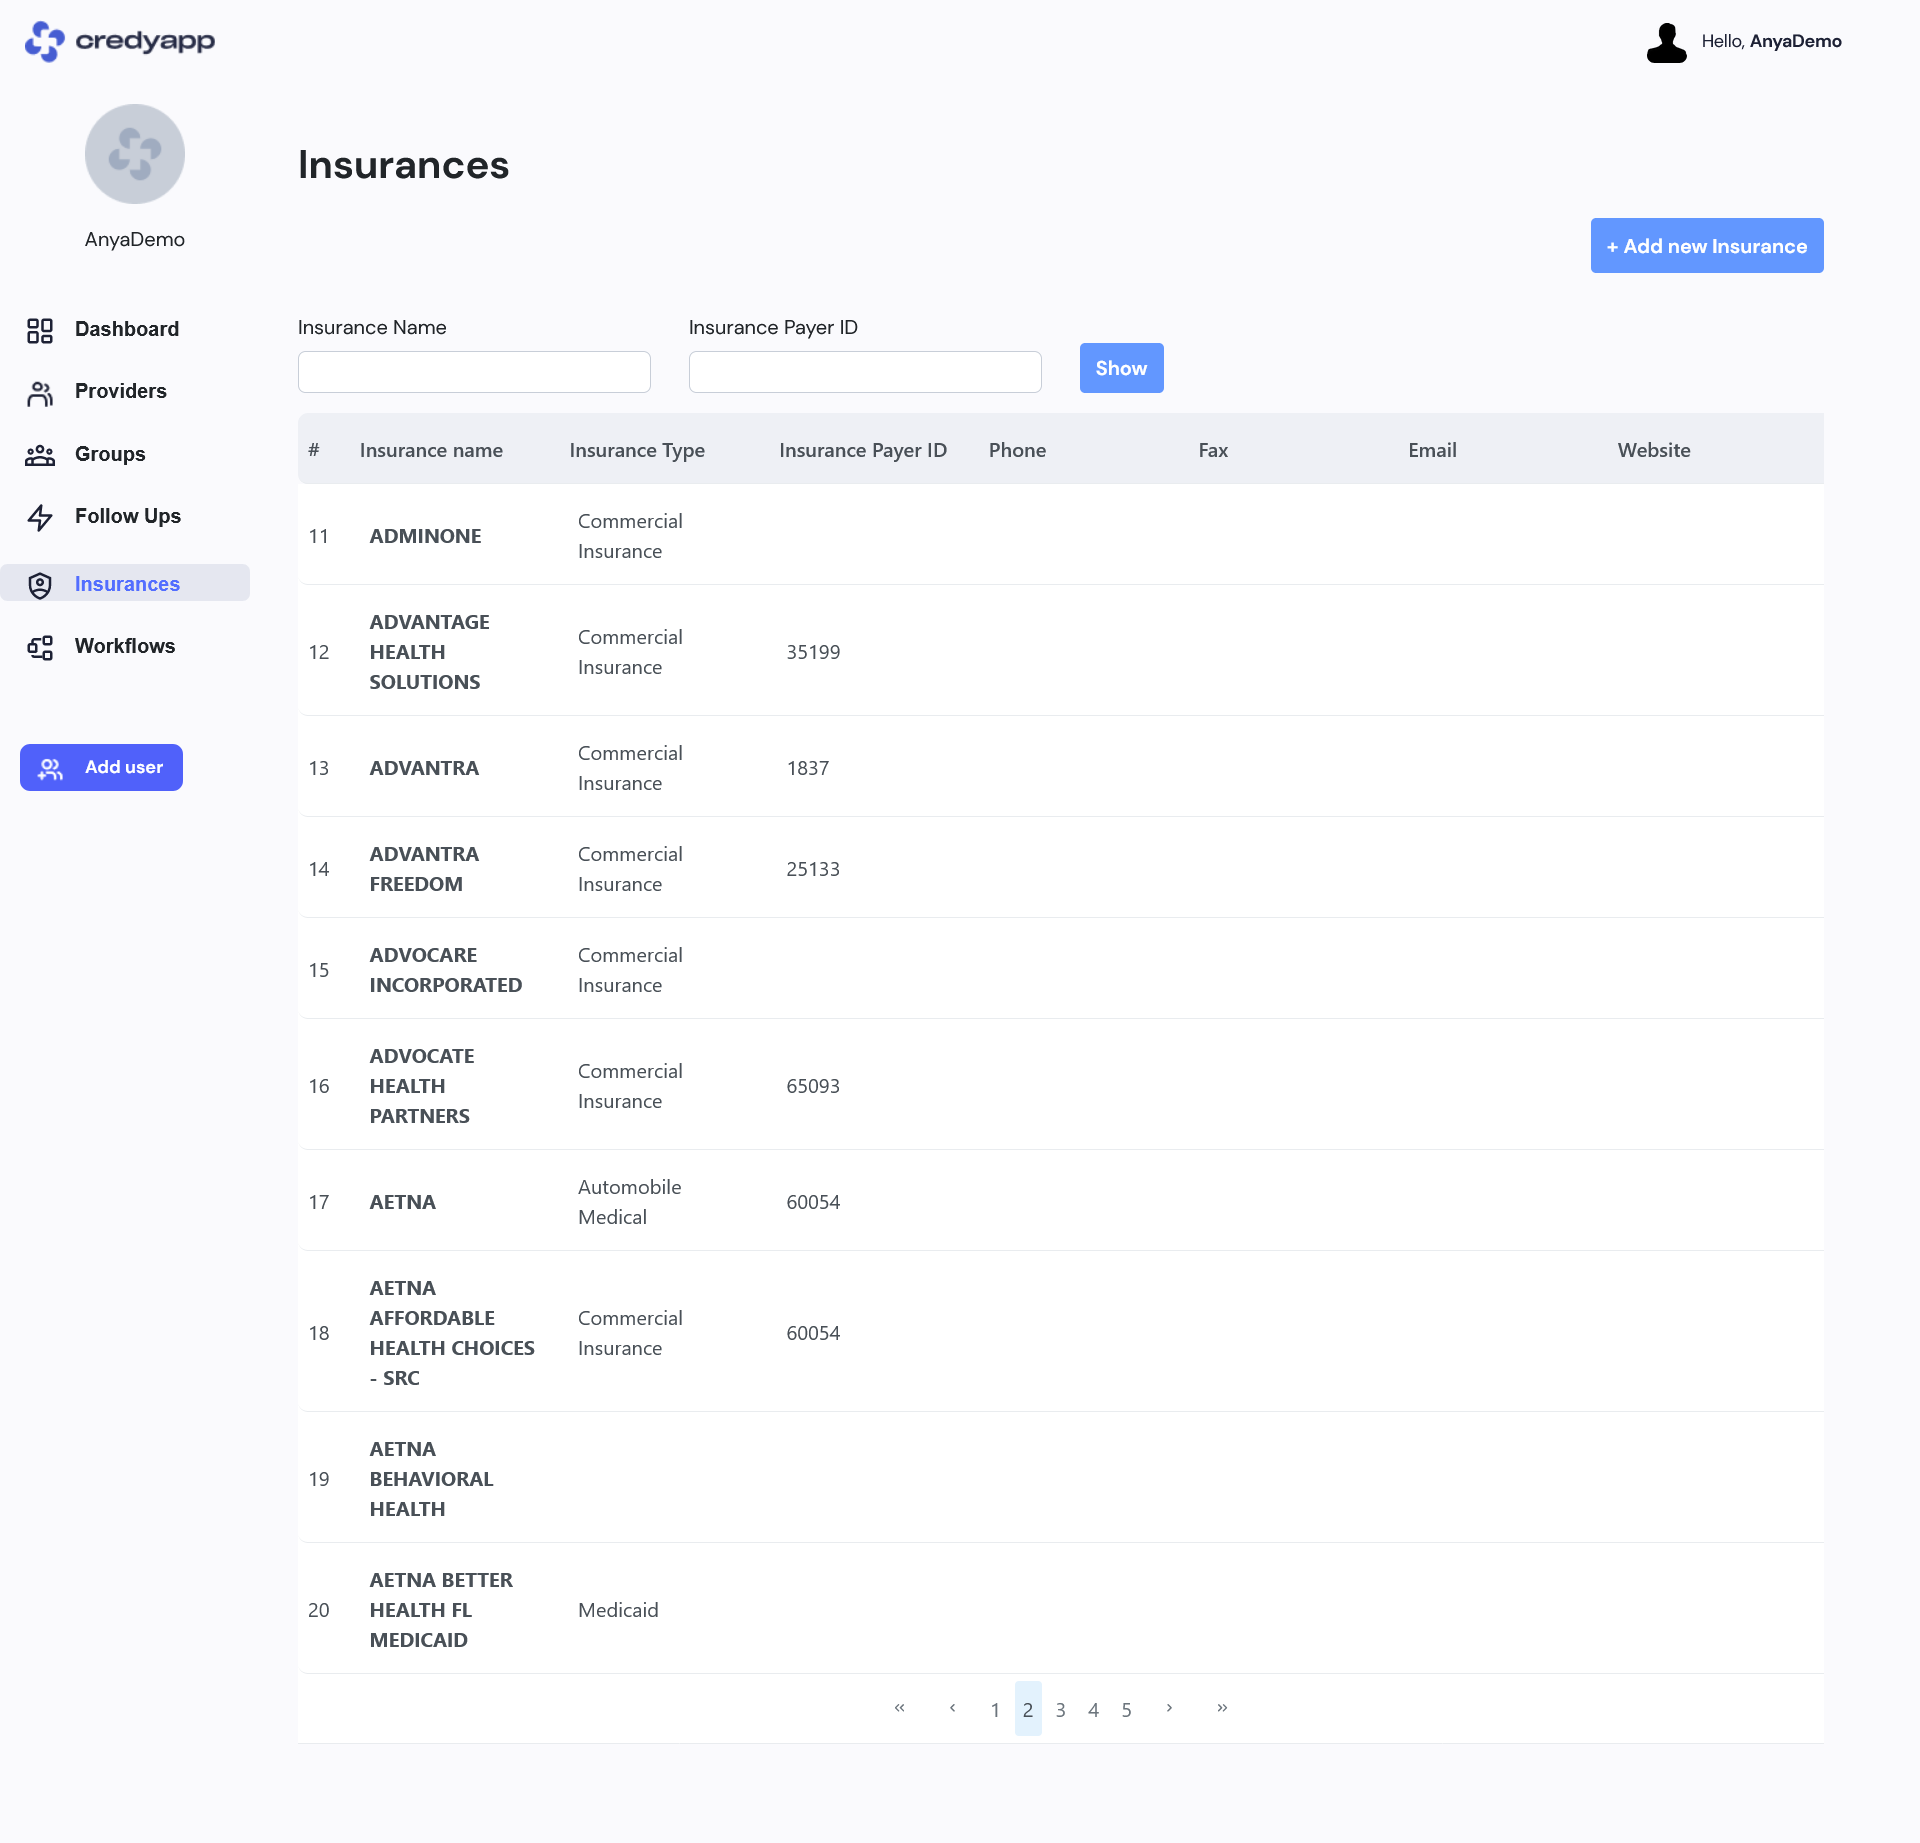
- From left Menu click on Insurances tab
-
On this page – click the Add new Insurance button.
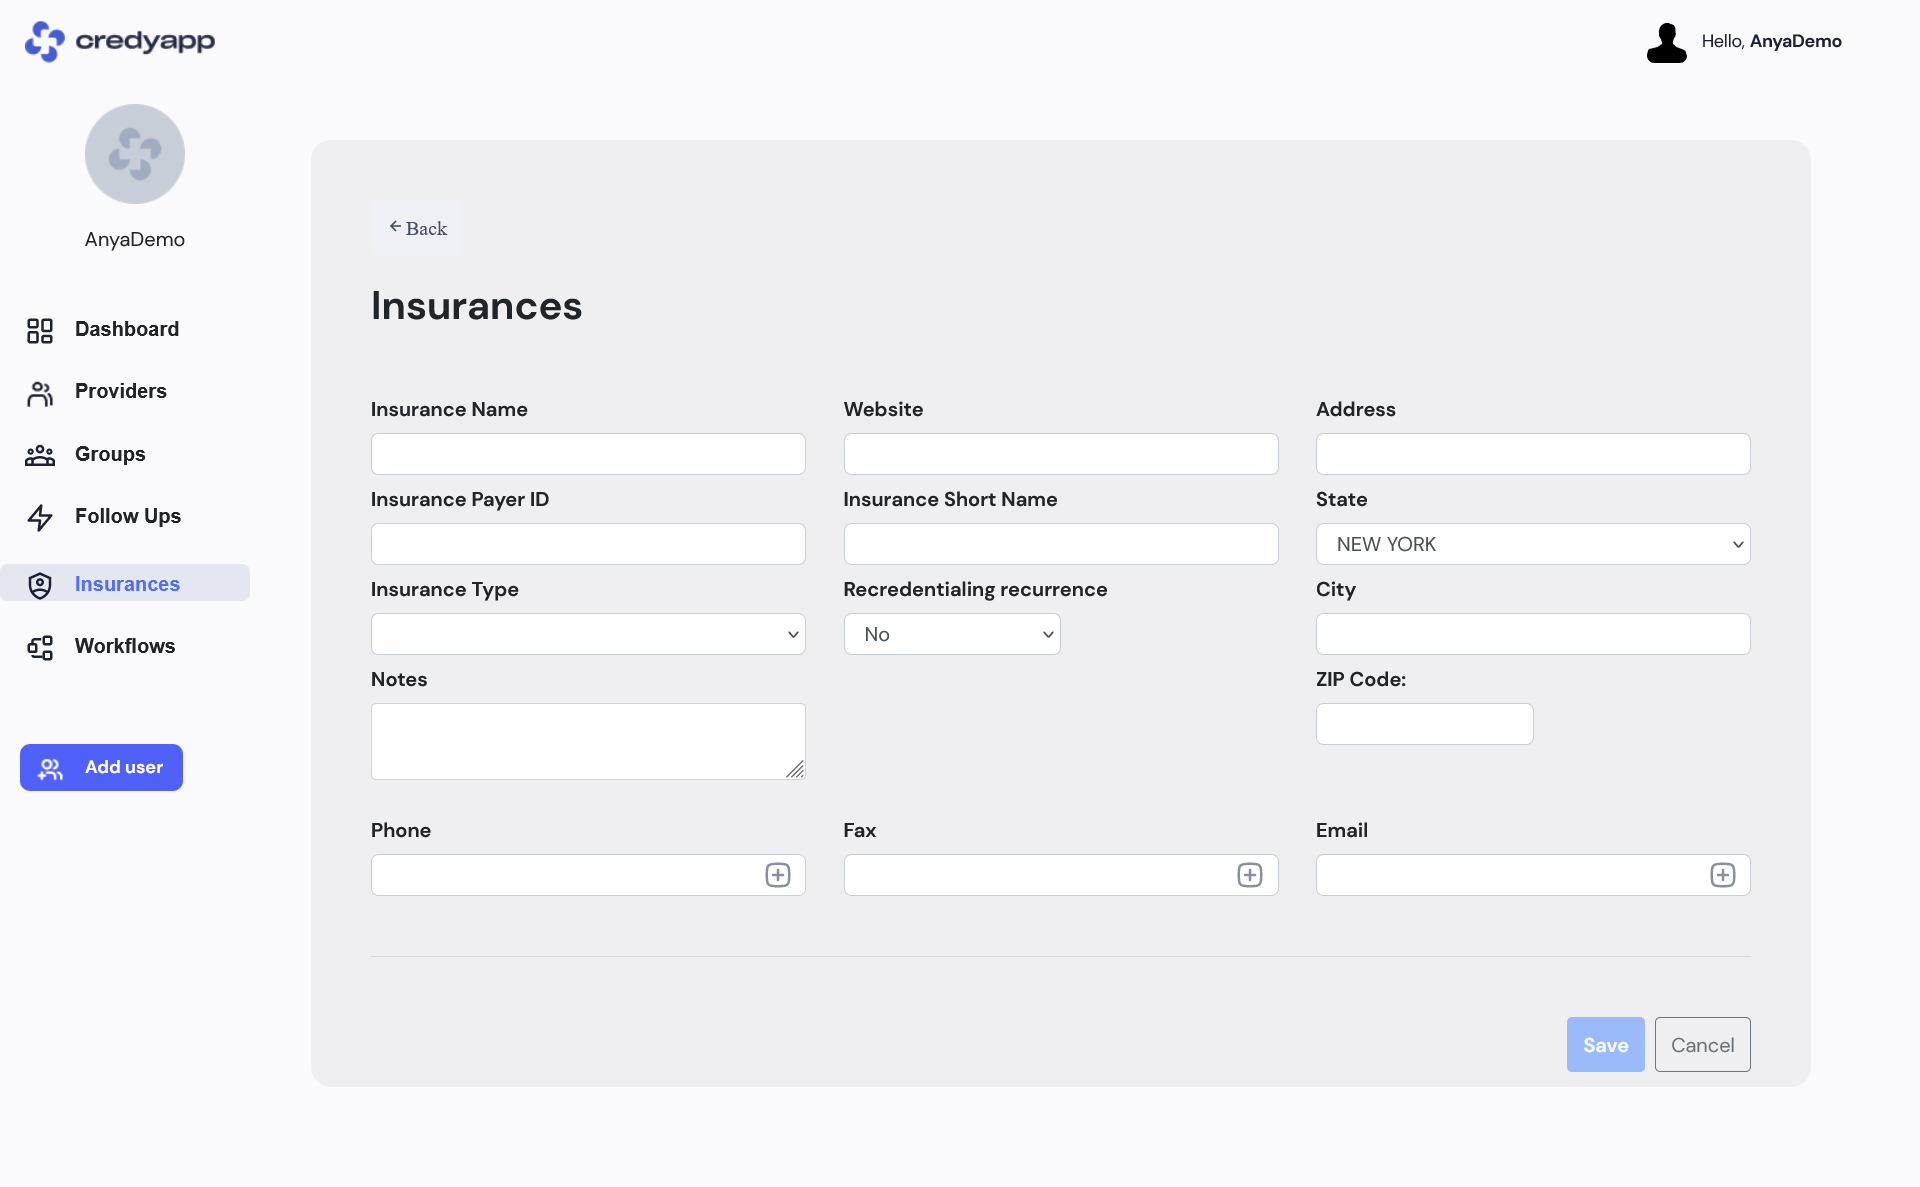
- We provide a large list of insurances that you can work with. If you do not find a particular insurance in the list, you can add it manually.
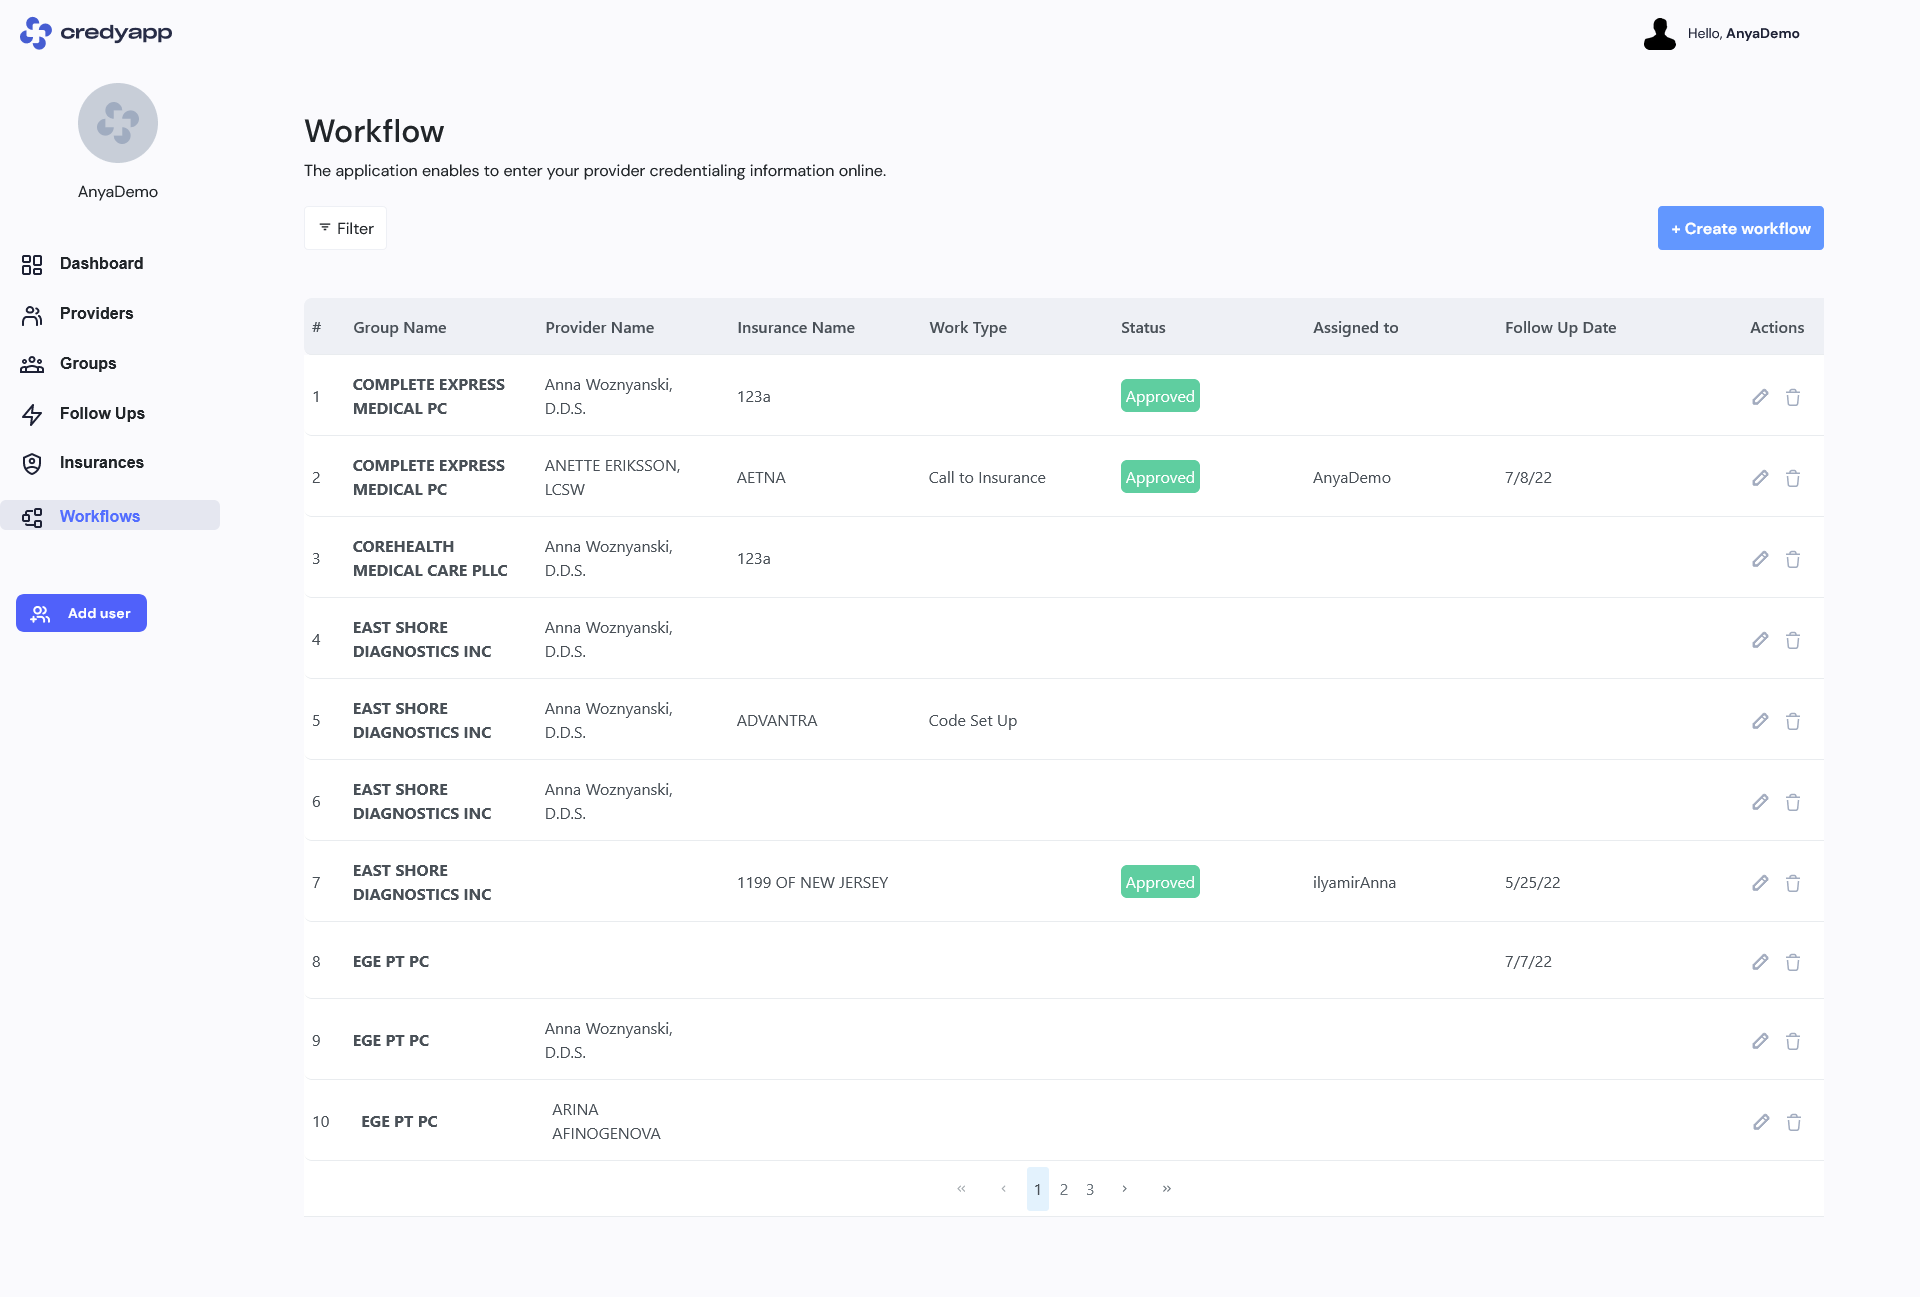
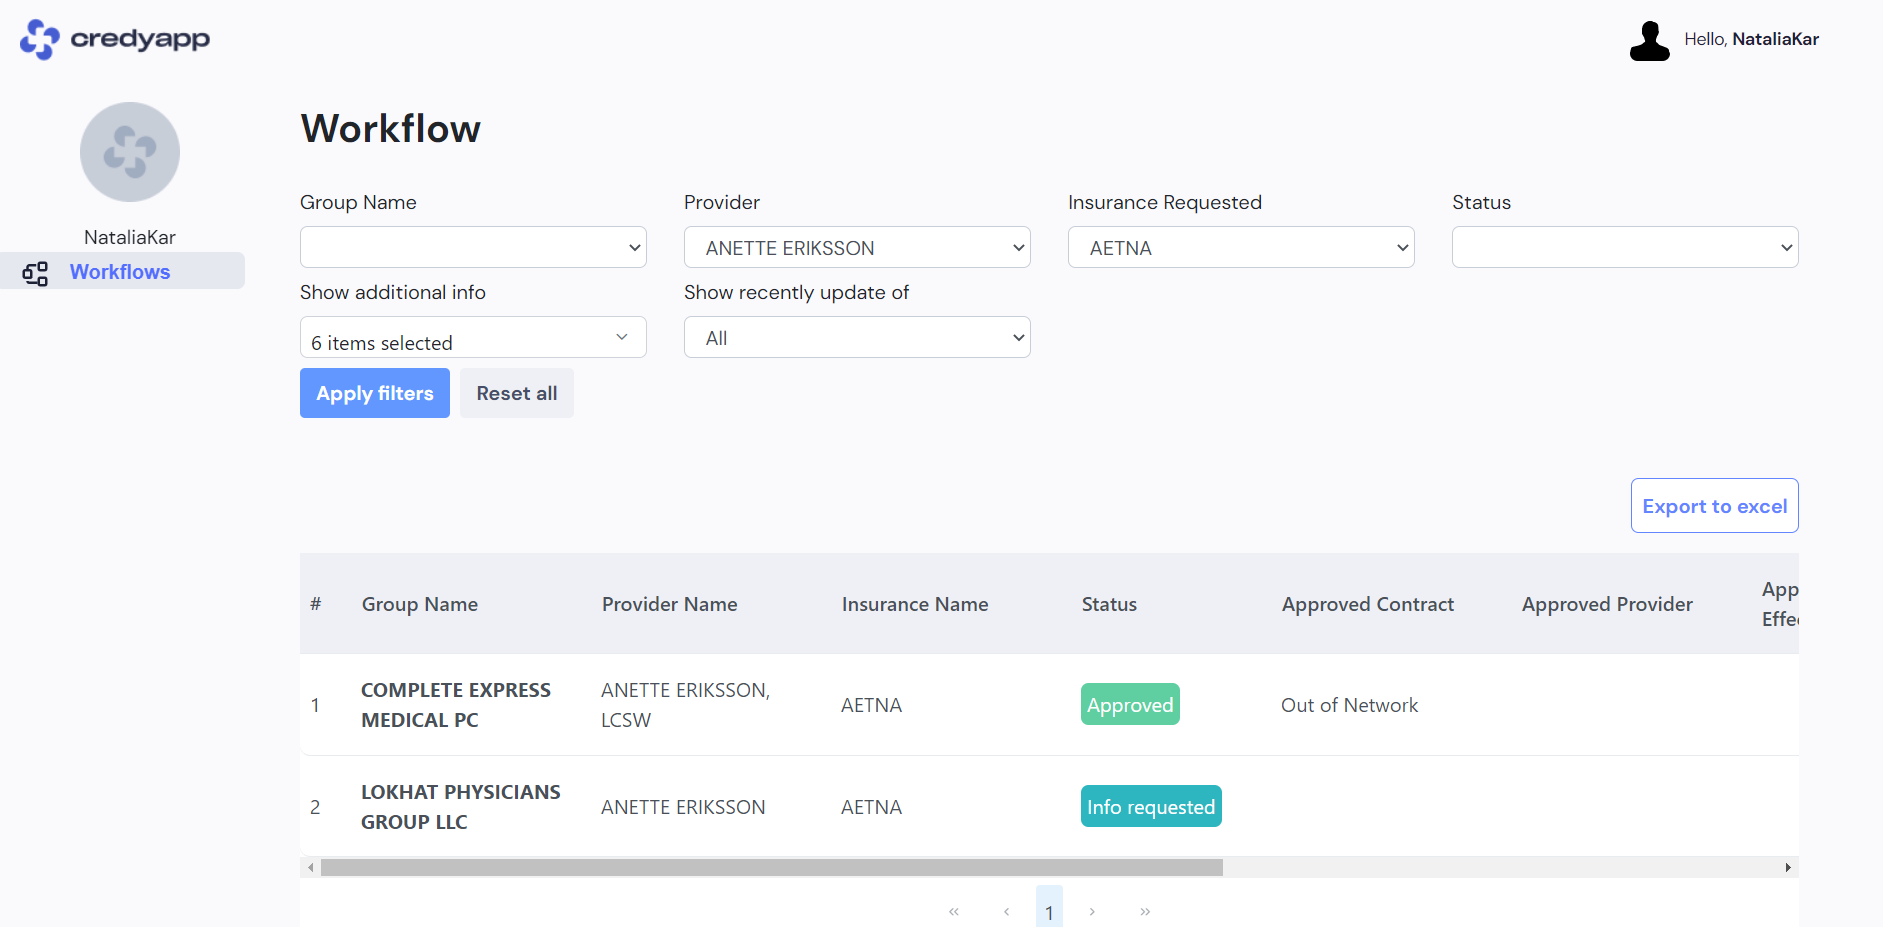
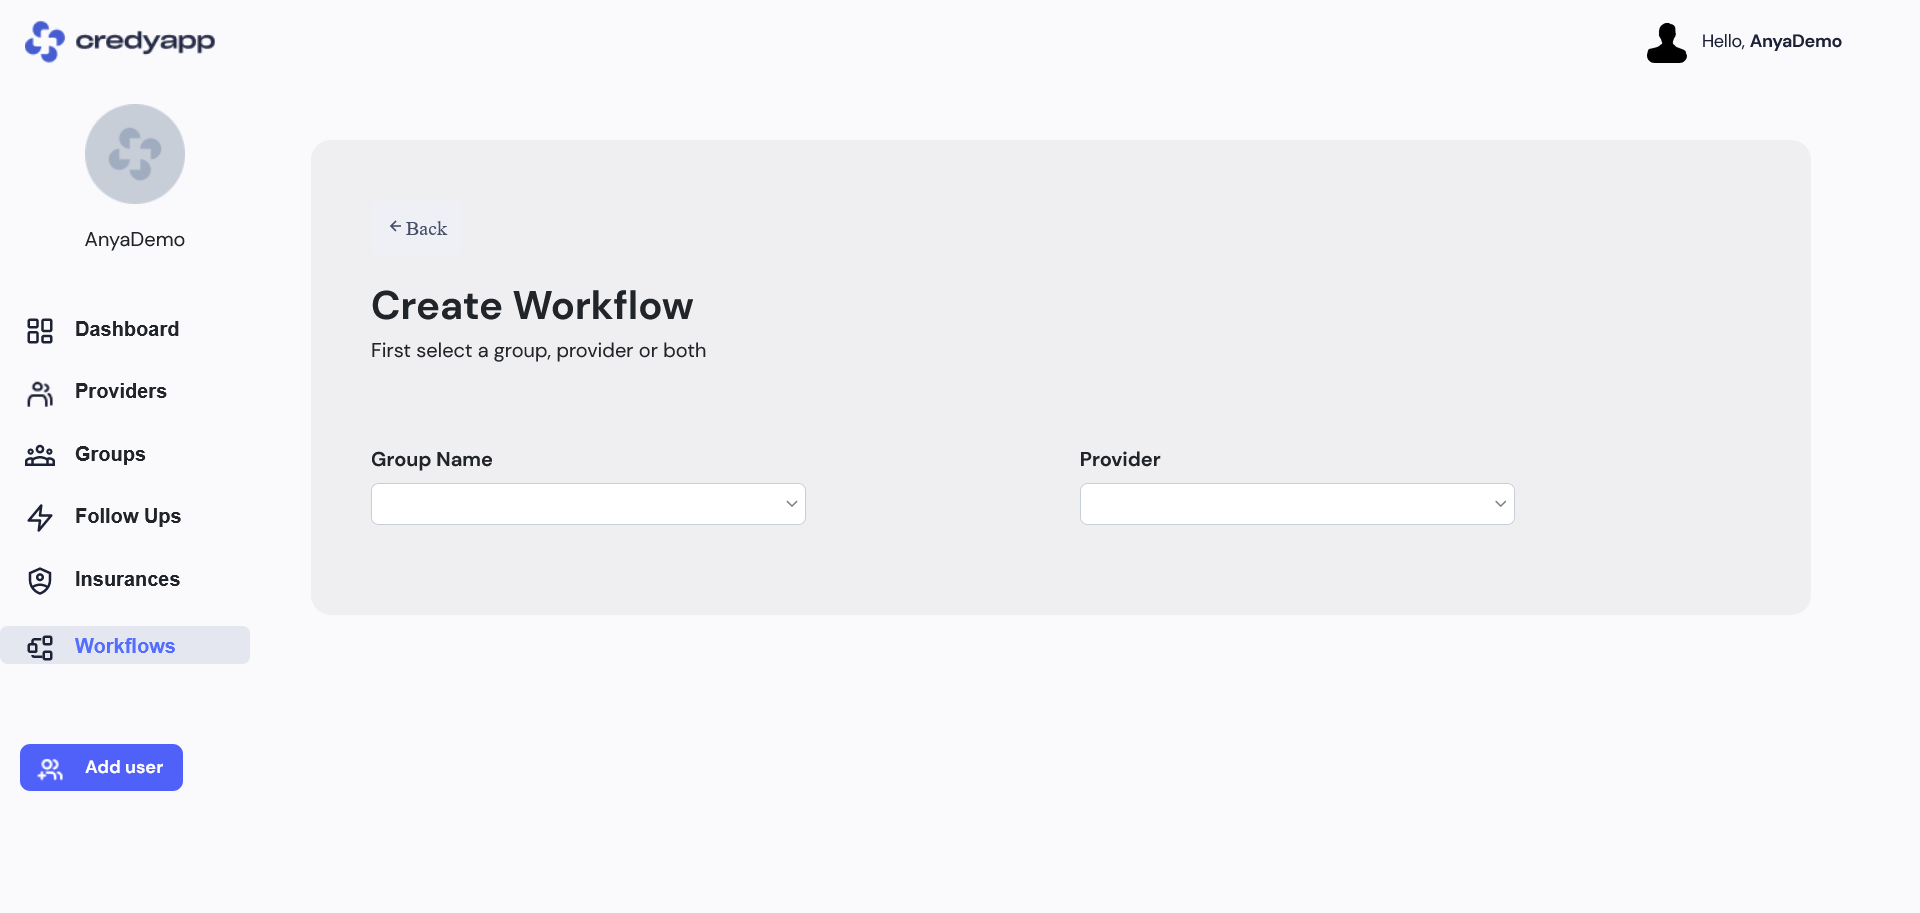
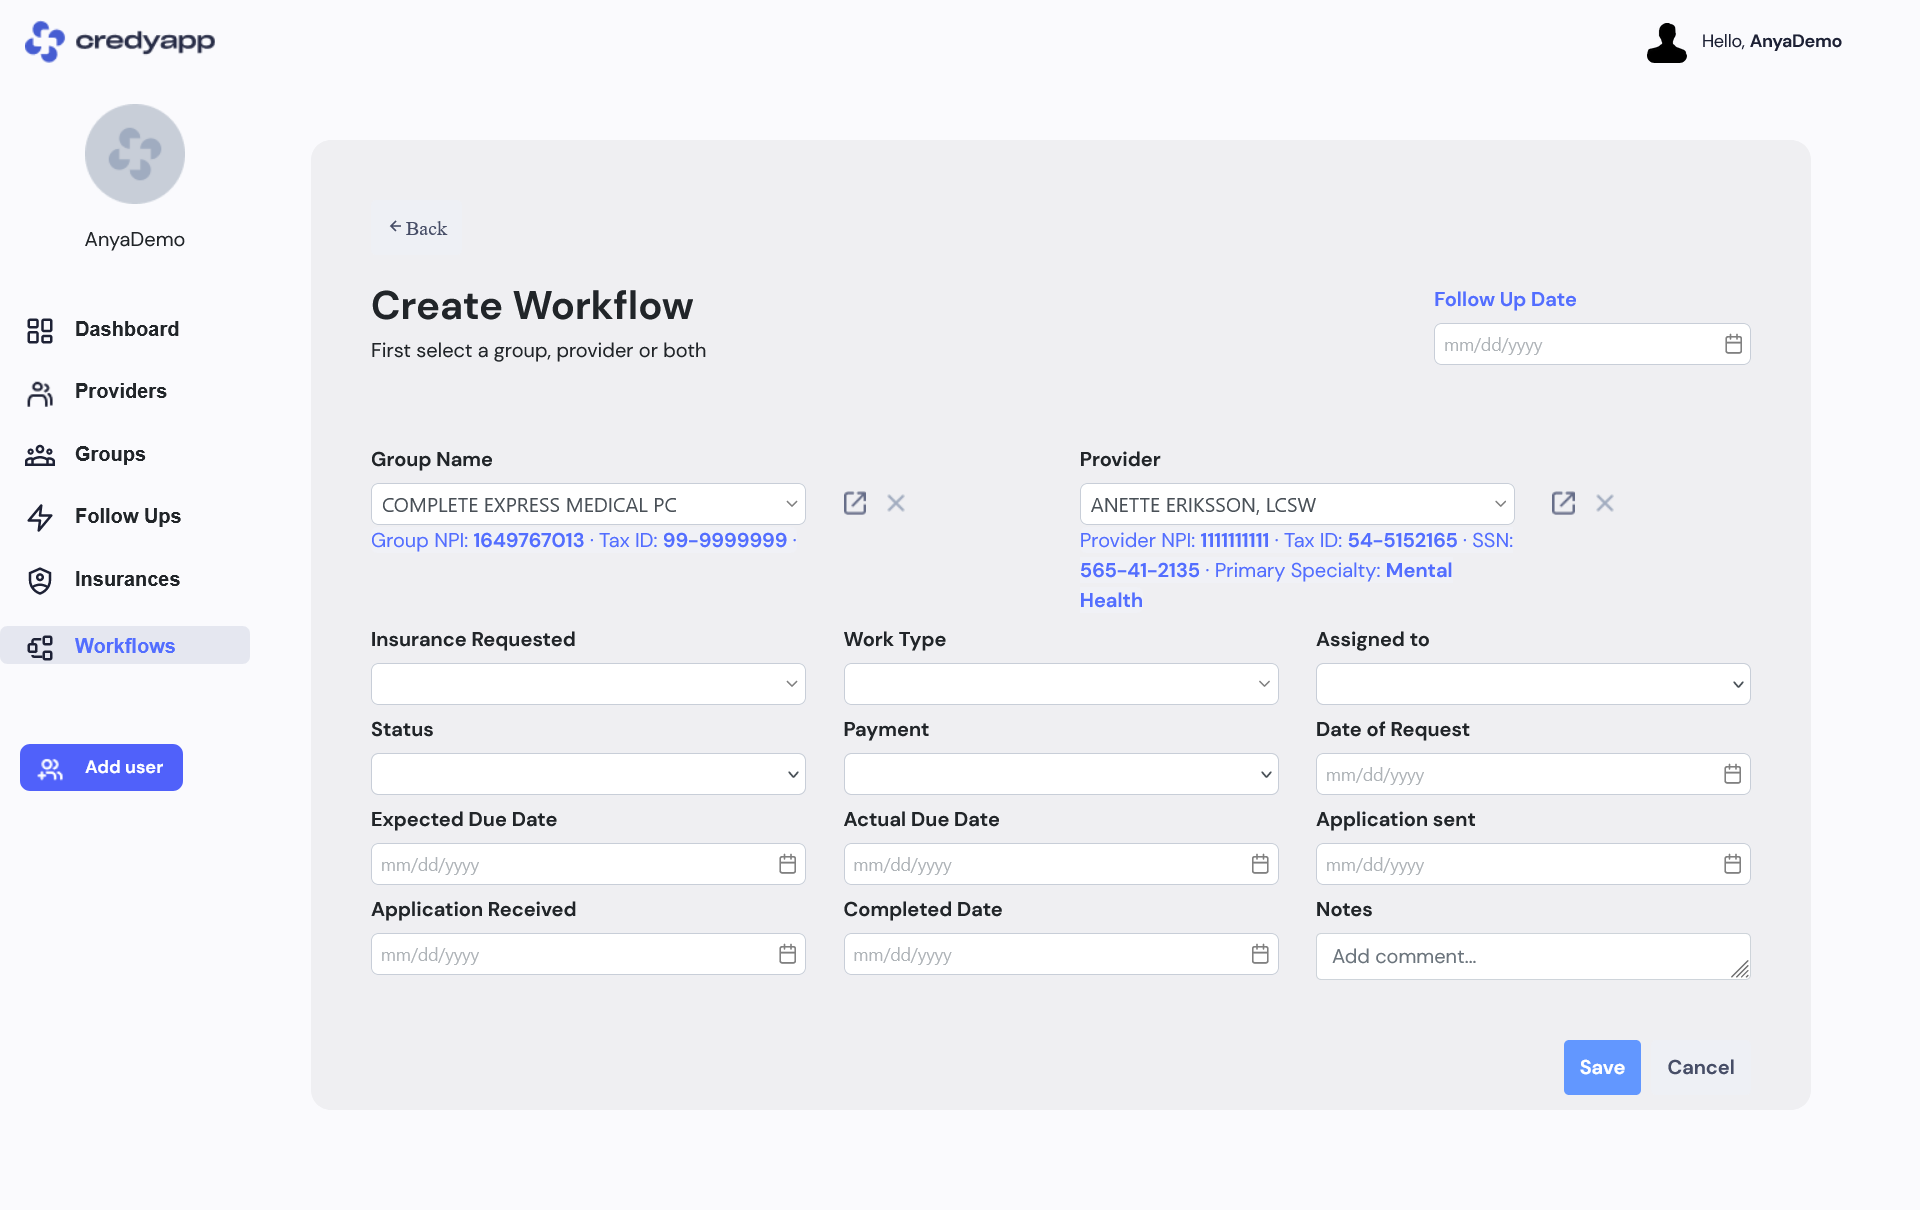
- From the left menu, click on the Workflow tab.
-
On this page, click the Create Workflow button.
-
Select the Group Name and Provider for whom you want to create a workflow. You can also create a workflow for a group without selecting a provider, and vice versa.
-
On the uploaded form, you can select:
Insurance requested-The insurance name that you are processing.
Work Type -The type of work you are performing, such as Demographic Updates, NPI Enrollment, Verification Status, Group Enrollment, etc.
Assigned to –The name of the user who will maintain and update this workflow.
Status – Shows the status of the workflow currently being processed in the system.
Follow Up date –All workflows with today’s follow-up date will be listed on the Follow Ups page. - After saving a workflow, you can attach multiple files and documents.
-
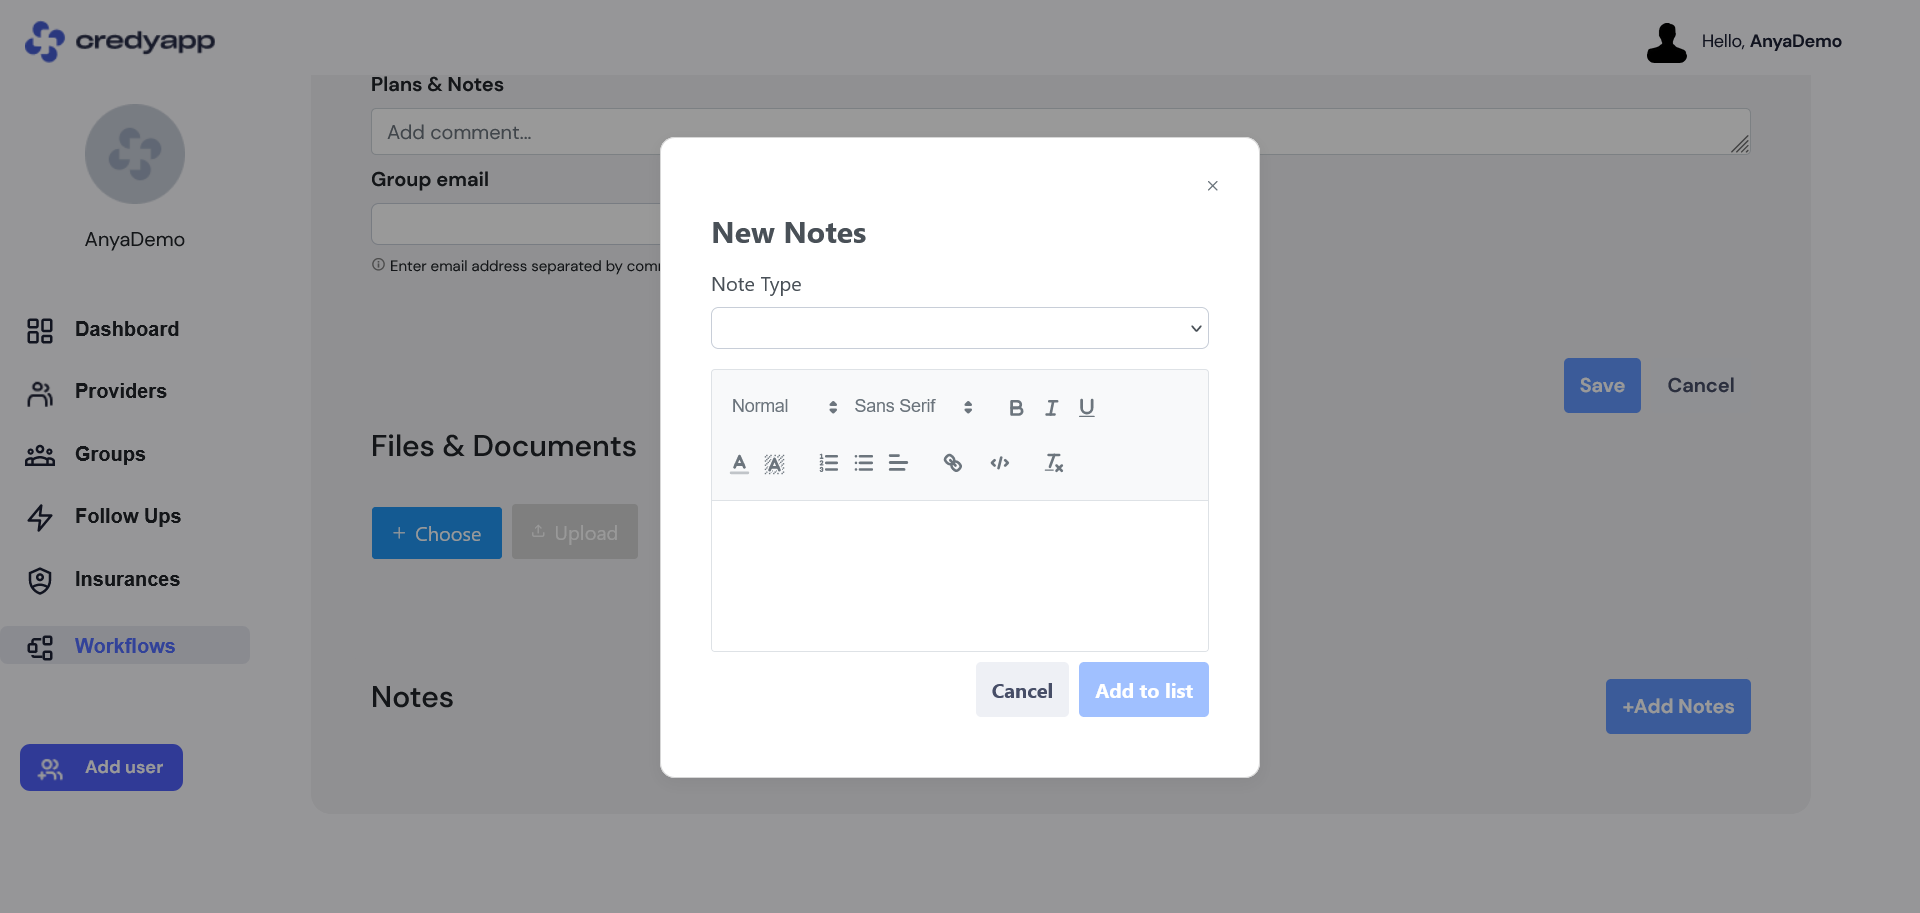
To add notes, open any workflow in Edit mode. At the bottom, you will see the Add Notes button.
-
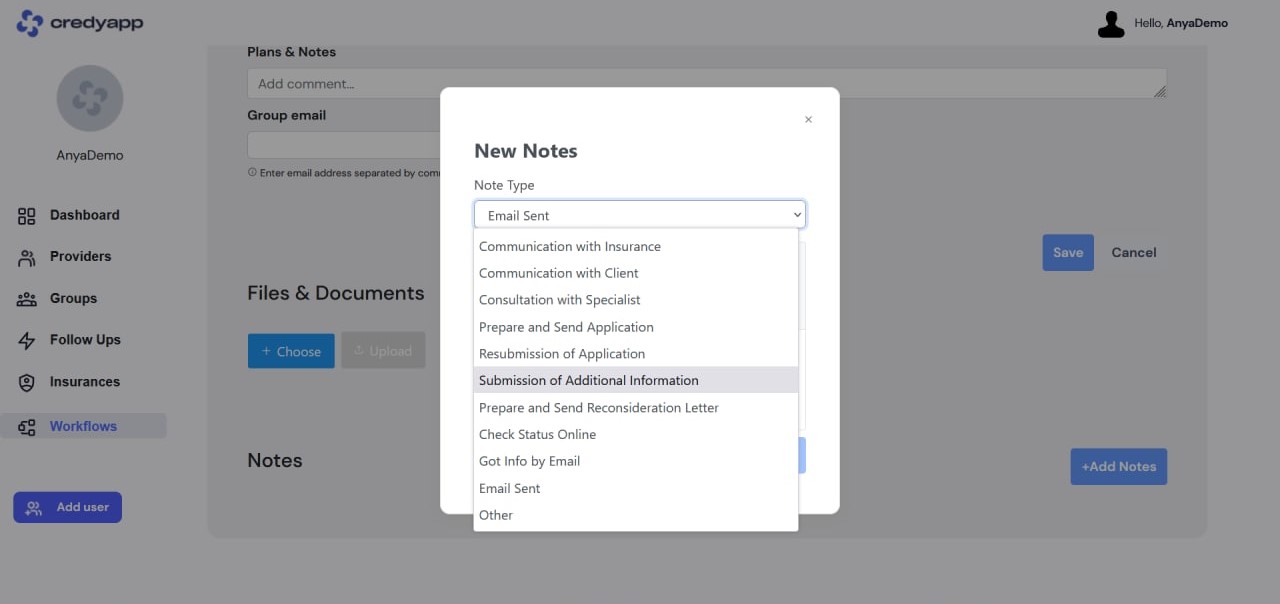
By clicking on it, a pop-up window will open where you can select the Note Type and enter useful information about the workflow.
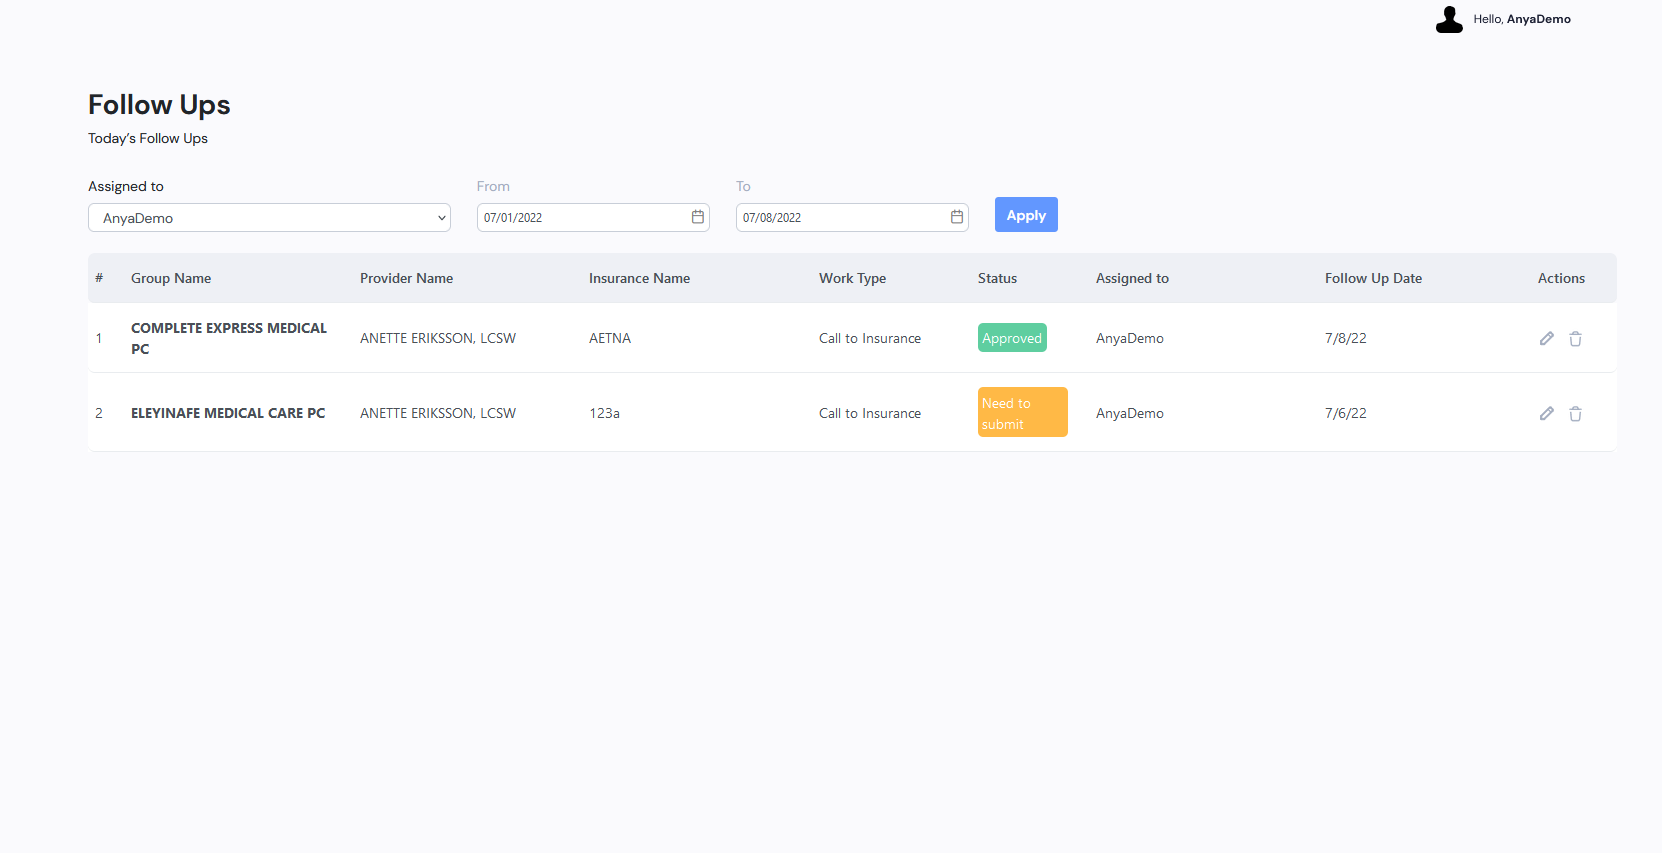
- From the left menu, click on the Follow Ups tab.
- This page displays a list of today’s follow-ups.
- You can filter them by Assigned Person or by a Date Range.